Sunday, December 9, 2012

Sock Snowmen


In keeping with the snowman theme of Christmas 2012 (see Liddy the Snowman here), I was inspired by Then She Madehttp://www.thenshemade.com/ and created some sock snowmen of my own.

I call them Huey, Dewey and Louie - after the ducks from the Disney cartoons.

I followed the directions from Then She Made but did make one minor change. I used felt for the eyes and nose since I didn't want anything hard or sharp in case Willow grabbed one off the table.

A few things to note.
  • I used up almost a 5 lb bag of rice making 3 snowmen.  I don't know if D's socks are gargantuan or what.  So if you are planning on making a lot of these, make sure to get a BIG bag of rice.
  • Your rubber bands should not be the super thin ones. Those will break.  Get ones that are medium weight. 
  • I didn't wash the striped socks that I used for my sweaters and caps (I got a pack of 10 at Costco for $8.00) and I am thinking that is why they are curling where they got cut.  So I would suggest washing the socks first. 
  • I needed to use a bit of fabric glue to hold the hats on their little heads.
These are a quick and easy way to add some snowman fun to your house.  Once I gathered all my materials, I made Huey, Dewey and Louie in a little less than an hour.  I think the filling of the sock was the hardest part of the whole process since I could only use a 1/4 c scoop to fit in the opening since the rice kept getting stuck in my funnel.

Here's hoping you have a snowman filled holiday season!

Don't forget to link up to the Winter Wonders & Holiday Happenings linky party hosted by Claiming Our Space, Black Fox Homestead, Life with the Hawleys, Lilacs and Longhorns, Practically Functional, The Thrifty Rebel and Yellow Spool. Each of us have our own project or recipe to share so make sure to stop by to check out what we have each created as well as to link up your own winter or holiday inspired posts.

Friday, December 7, 2012

Winter Wonders and Holiday Happenings Link Party

Welcome to the


Winter Wonders and Holiday Happenings Link Party!

December is here and that means Hanukkah, Christmas and Kwanzaa are right around the corner so it is the perfect time to share all your delicious holiday dishes and decor, along with your favorite Winter treats and projects.  

Help get us inspired!

Claiming Our Space has joined up with Black Fox Homestead, Life with the Hawleys, Lilacs and Longhorns, Practically Functional, The Thrifty Rebel and Yellow Spool. Each of us will have our own project or recipe to share so make sure to stop by to check out what we have each created as well as to link up your own winter or holiday inspired posts.


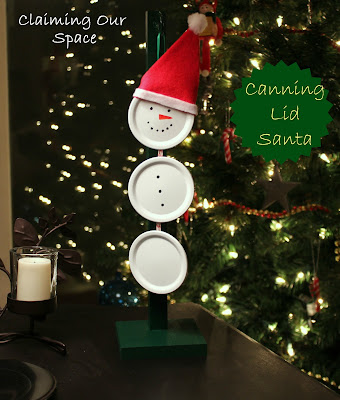
My project is a canning lid snowman. I call him Liddy the Snowman.


I started canning last year, jams, applesauce and tomato sauce, and so have been gathering the canning lids since it seemed a shame to throw them out. Yikes, that was just a little bit Horder-y wasn't it.  Well, in any case, I have a good number of the lids saved up. 

I have reused some to seal up some chalk paint jars but thought that they would work great for creating a snowman.  Thankfully, it turned out pretty cute!

 This is an easy project.  Once you get the lids painted, it takes only about 15 minutes to whip up your own Liddy the Snowman.

Materials Needed
1.  three canning lids
2.  glossy white spray paint
3.  ribbon or heavy twine
4.  black marker - I used a Sharpie
5.  orange marker - I used a Sharpie
6.  red felt
7. white felt
8.  cotton ball or sherpa type fabric
9.  hot glue gun

Directions
1.  Wash and dry three canning lids

2.  Using a flat head screwdriver, dig out and remove the reddish stuff that seals the jar.  If this step is skipped, the paint on it will never dry. I didnt' do this on my first go and over a week later, it still comes off on my fingers.

3.  Paint lids, both sides, a glossy white. Let dry. It may take 3 light coats to cover completely.

4.  Cut one piece of ribbon about 5" in length and cut another piece 8" in length.

5.  Cut a quarter circle with a 4" radius.

6.  Cut a piece of white felt 1/4" wide x 3 1/2".

7. Glue the red felt to a lid, with the "nice side" to the front, wrapping it around the back, to make a hat.

8.  Glue the white felt to the bottom of the hat, covering the edge so the red doesn't show.

9.  Glue fluffed cotton ball or a small piece of sherpa fabric to the point of the hat.

10. Using the black marker, make three dots on one of the lids then draw the eyes and mouth on the lid with the hat.

11.  Using the orange marker draw the carrot for the nose.

12.  Lay your lids, nice side down, spacing them out how you would like. 

13. Glue the 5" ribbon to the back of the tree lids so they are now all connected.

14. Use the 8" ribbon to make a loop to hang your snowman, glue it to the back of the hat.

15.  Hang your snowman.

I made a hanger using a piece of 3/4" x 3/4" scrap wood, 1" x 4" scrap and a cup hook.  I sprayed it all green so it would fade into the background. You can use whatever you have hanging around your scrap pile to make a hanger if you want.

I would love to see you version of Liddy the Snowman, so if you make one, let me know so I can check it out.


Now that you have seen my project, it is time for you to share your projects, crafts, recipes, whatever you have come up with that is Winter or Holiday related via the linky tool below.  

Your project will show up on all the host's blogs so you only need to link up once but, remember, all of us are sharing something different for the party. So make sure to visit Black Fox Homestead, Life with the Hawleys, Lilacs and Longhorns, Practically Functional, The Thrifty Rebel and Yellow Spool and Claiming Our Space to check them all out.

The party will be up until Thursday, December 20 and then on Friday, December 21, each host will pick their favorite two link ups. So mark your calendar to check back to see if you were feature. 

Just a few guidelines

1. If you aren't already a follower, we would love it if you would add each of the hosts.

2. Link ups should be Winter or Holiday related. (No shops or other link parties please)

3. Try to visit some of the other link ups and leave a comment. Everyone loves visitors!

4. You don't need to link back but we would appreciate it if you would display the button on your blog or in your post tolet your own readers know about the party.

<center><a href="http://www.claimingourspace.com/" target="_blank"><img alt="Winter Wonders & Holiday Happenings" border="0" src="http://i248.photobucket.com/albums/gg186/gooch100/Decemberbutton-3.jpg" /></a></center>

With that, it is time to party!!

Thursday, December 6, 2012

Poinsettia Pillow


I wanted to share with you one of my favorite projects from last Christmas - the Poinsettia Pillow.

Now, I can't take credit for this since it is a fabulous project Centsational Girl did back in 2009 but at that time, I didn't have a sewing machine so I bookmarked it as a future project (oh, the dark ages before Pinterest when you had to bookmark things and remember to put them in the correct favorites folder).

I used a drop cloth for my pillow cover fabric since it was a nice and neutral, bonus that I could use the finished edge to save some sewing, and I needed to make four pillows since I was giving these as gifts so it was very cost effective.

These pillows are a bit time consuming since you have to cut out all the leaves, especially if you are making more than one. I did it while watching television in the evening.  However, the final product is worth it I promise. Another tip, make sure you totally load your bobbin since there is quite a bit of sewing. It is no fun when you are in the groove of sewing and it runs out. Ask me how I know.

Now I did make a couple of changes from Kate's version.  I made a envelope back pillow (here is a good tutorial from Teal and Lime) since I haven't tackled a zippered anything yet. I also skipped the covered button and opted to just glued some small yellow buttons for the center. I like that they look like the yellow stamens of an actual poinsettia.

For the full tutorial with great photos, visit Centsational Girl's post.

Let me know if you make a poinsettia pillow of your own, I would love to see it!

Don't forget, tomorrow is the Winter Wonders & Holiday Happenings linky party hosted by Claiming Our Space, Black Fox Homestead, Life with the Hawleys, Lilacs and Longhorns, Practically Functional, The Thrifty Rebel and Yellow Spool. Each of us will have our own project or recipe to share so make sure to stop by to check out what we have each created as well as to link up your own winter or holiday inspired posts.

Wednesday, December 5, 2012

Willow Wednesday

Mom, why do you always wave a treat over your head when you are holding the camera?
It is SO annoying.

Tuesday, December 4, 2012

It's Voting Time! - Homemade Holiday Party


Marilyn and I are totally blown away by everyone's creativity!  All your projects are A-W-E-S-O-M-E!

Now it's just time to cast your votes for your favorites!!  Here's the deal on the voting - everyone gets 5 votes.  Yup, 5 votes.Whether or not you linked up a project, you're eligible to vote for your 5 favorites.  So make sure to check them all out!

You have until 11:59 pm December 9 to vote.

The top 3 projects are eligible for prize packages listed here.
The winners will be announced at noon (eastern time) December 10!

Tout It Tuesday - #35

Happy Tuesday!

Christmas is fast approaching and we am trying to get in the of things.  We just got our tree up on Saturday and got most of our decorations up in the living room on Sunday. Still have the outside stuff and the dining room (it still looks a lot like Thanksgiving in there) to go. I have also been working on several cute projects that I will be sharing in the coming days. 
 
How are you all coming with your decorating?  Better than us I hope. It seems like each day should have an extra couple of hours at this time of year doesn't it?

Now that you are caught up with what we have been up to, it is time for this week's features.

Julie from Being Home shared her Paper Mache Snow Reindeer. I think this is an beautiful transformation.


Tim from Marty's Musings shows how to patch a wall. We so need this since we have a corner that has been waiting for me to finihs up the repair for over a year. I am so excited to try the wet sponge technique since the mess of sanding has made me put it off


Tagana Rose shared how you can make your own sour cream. We never seem to have sour cream in the house when we neeed it so this will be a great thing for us.

Brandy from The Moody Fashionista uses bubble wrap to create an advent calendar. I am not sure I could only pop one a day since I love popping bubble wrap.

Make sure to grab the featured button!
<a href="http://www.claimingourspace.com/" target="_blank"><img src="http://i248.photobucket.com/albums/gg186/gooch100/COSButton-Featured.jpg" /></a>

This week's Fan Fav comes from Kim at Reposhture Studios. She used a drop cloth and other bits and bobs to create a beautiful holiday swag.  I love how versatile drop cloths are!!
Make sure to grab the Fan Fav button
<a href="http://www.claimingourspace.com/" target="_blank"><img src="http://s248.photobucket.com/albums/gg186/gooch100/COSButton-FanFav.jpg"/></a>

Before we get to the party, just a couple of other things.

First,  I am co-hosting the Homemade Holiday Link Party and the voting starts today. Make sure to come back at noon to vote for your favorite 5 link ups. 

Second, this Friday is the Winter Wonders & Holiday Happenings linky party hosted by Claiming Our Space, Black Fox Homestead, Life with the Hawleys, Lilacs and Longhorns, Practically Functional, The Thrifty Rebel and Yellow Spool. Each of us will have our own project or recipe to share so make sure to stop by to check out what we have each created as well as to link up your own winter or holiday inspired posts.

Now it's time for Tout It Tuesday!

I can't wait to see what people will be share this week and know that I will be inspired by everyone's projects and recipes.

Just a few rules/guidelines.

1. I would love it if you would follow through GFC or Bloglovin'. It would be great if you would also follow us on Twitter and Pinterest.

2. Please do not link shops or link parties that are not related to a project, photo or recipe challenge. Everything else is accepted.

3. Linking to Claiming Our Space isn't required but I would appreciate it if you would grab my button and either display it with the post you are linking up or under your list of parties.

<a href="http://www.claimingourspace.com/" target="_blank"><img src="http://i248.photobucket.com/albums/gg186/gooch100/COSButton-ToutIt Tuesdays.jpg" /></a>

4. Don't forget to click on the "like" button on your favorite project or recipe so I know which one should be the week's Fan Fav.

5.  Please try to visit at least two posts for each link you submit and leave a comment.  Comments make everyone happy!

With all that out of the way, let's get the party started!

Sunday, December 2, 2012

It's Time to Party - Homemade Holiday Party

I am so psyched that today is finally here!  I LOVE parties and I LOVE winning things!  Don't you?  So why not do both?  This party is being co-hosted by Claiming Our Space along with 4 You With Love and it is going to be a blast!

Here's the highlights!

Link up your homemade holiday projects now through Dec 3, 2012, 11:59 PM eastern time.
Come back and vote for your favorites between midnight Dec 4 through Dec 9, 11:59 pm eastern time.
The winners and features will be announced Dec 10 at noon, eastern time.

Here's the prize packages for the winners!

First Place Prize Package
 A $10 Gift Card to either Hobby Lobby or Michael's (winner's choice), a $5 Gift Card to Starbucks, 4 spices from my advent spice box, along with these items from my 20 days of Homemade Holiday Inspiration.  
Second Place Price Package
A $5 Gift Card to Starbucks, 4 spices from my advent spice box, along with these items from my 20 days of Homemade Holiday Inspiration.  

Third Place Prize Package
4 spices from my advent spice box along with these items from my 20 days of Homemade Holiday Inspiration.

Are you ready?  Let's get this party started!  (Also, this is my first time running something like this.  If you run into a snag, please e-mail me at your earliest convenience).  
<