Showing posts with label Accessories. Show all posts

Monday, December 1, 2014

Low/No Sew Reindeer Pillow {DIY Project}

Pinterest is, as you all know, an amazing amazing place filled with cool stuff.  It is also a great place to get inspired.  I love looking for possible things I can recreate in an easier way or with my own twist.

This beautiful pillow from Dear Lillie is exactly the type of thing I am looking for.

You see, I love the pillow but don't have a screen printer, or know anyone with a screen printer and I am in no way talented enough to paint it on a piece of fabric.  So what is a girl to do?

I have three words for you! Felt and Drop Cloth! 

With those 2 things and a reindeer silhouette, like this one it is easy to make a pillow.

Here is the result.  I made two so they could jump toward each other.


I think they look great, don't you?

Want to make one or two or three for yourself? Here's how.

Materials
  • Reindeer silhouette printed on a sheet of 11x14 paper (I used Google images to find one that looked good to me)
  • Scissors
  • Fabric glue
  • Laundered drop cloth
  • Felt (I used red)
  • Straight pins
  • Pillow Insert (mine was 18x18)
  • If you want to sew, a sewing machine (If you don't, heat-n-bond)
Directions
  • Cut out your paper silhouette
  • Pin silhouette to your felt (you can also use double stick tape)
  • Cut out your reindeer
  • Make yourself an envelope pillow (I used this tutorial from Teal and Lime, though I cut my fabric 17.5x42) using  the drop cloth as your fabric
  • Insert your pillow into into the cover
  • Lay your reindeer on pillow positioning it exactly as you you wish
  • Pin felt reindeer to pillow by inserting the pin trough the felt into the pillow
  • Using the fabric glue, glue the reindeer to the pillow
  • Done!!

Yes, it is that easy!  I am pretty sure that cutting out the reindeer was the lengthiest part.

I think it is a great addition to our holiday decorations.

One quick note, if you live near an IKEA, you can skip the whole make a pillow cover part and pick one up for cheap there, like this one.
  

Sunday, December 9, 2012

Sock Snowmen


In keeping with the snowman theme of Christmas 2012 (see Liddy the Snowman here), I was inspired by Then She Madehttp://www.thenshemade.com/ and created some sock snowmen of my own.

I call them Huey, Dewey and Louie - after the ducks from the Disney cartoons.

I followed the directions from Then She Made but did make one minor change. I used felt for the eyes and nose since I didn't want anything hard or sharp in case Willow grabbed one off the table.

A few things to note.
  • I used up almost a 5 lb bag of rice making 3 snowmen.  I don't know if D's socks are gargantuan or what.  So if you are planning on making a lot of these, make sure to get a BIG bag of rice.
  • Your rubber bands should not be the super thin ones. Those will break.  Get ones that are medium weight. 
  • I didn't wash the striped socks that I used for my sweaters and caps (I got a pack of 10 at Costco for $8.00) and I am thinking that is why they are curling where they got cut.  So I would suggest washing the socks first. 
  • I needed to use a bit of fabric glue to hold the hats on their little heads.
These are a quick and easy way to add some snowman fun to your house.  Once I gathered all my materials, I made Huey, Dewey and Louie in a little less than an hour.  I think the filling of the sock was the hardest part of the whole process since I could only use a 1/4 c scoop to fit in the opening since the rice kept getting stuck in my funnel.

Here's hoping you have a snowman filled holiday season!

Don't forget to link up to the Winter Wonders & Holiday Happenings linky party hosted by Claiming Our Space, Black Fox Homestead, Life with the Hawleys, Lilacs and Longhorns, Practically Functional, The Thrifty Rebel and Yellow Spool. Each of us have our own project or recipe to share so make sure to stop by to check out what we have each created as well as to link up your own winter or holiday inspired posts.

Thursday, December 6, 2012

Poinsettia Pillow


I wanted to share with you one of my favorite projects from last Christmas - the Poinsettia Pillow.

Now, I can't take credit for this since it is a fabulous project Centsational Girl did back in 2009 but at that time, I didn't have a sewing machine so I bookmarked it as a future project (oh, the dark ages before Pinterest when you had to bookmark things and remember to put them in the correct favorites folder).

I used a drop cloth for my pillow cover fabric since it was a nice and neutral, bonus that I could use the finished edge to save some sewing, and I needed to make four pillows since I was giving these as gifts so it was very cost effective.

These pillows are a bit time consuming since you have to cut out all the leaves, especially if you are making more than one. I did it while watching television in the evening.  However, the final product is worth it I promise. Another tip, make sure you totally load your bobbin since there is quite a bit of sewing. It is no fun when you are in the groove of sewing and it runs out. Ask me how I know.

Now I did make a couple of changes from Kate's version.  I made a envelope back pillow (here is a good tutorial from Teal and Lime) since I haven't tackled a zippered anything yet. I also skipped the covered button and opted to just glued some small yellow buttons for the center. I like that they look like the yellow stamens of an actual poinsettia.

For the full tutorial with great photos, visit Centsational Girl's post.

Let me know if you make a poinsettia pillow of your own, I would love to see it!

Don't forget, tomorrow is the Winter Wonders & Holiday Happenings linky party hosted by Claiming Our Space, Black Fox Homestead, Life with the Hawleys, Lilacs and Longhorns, Practically Functional, The Thrifty Rebel and Yellow Spool. Each of us will have our own project or recipe to share so make sure to stop by to check out what we have each created as well as to link up your own winter or holiday inspired posts.

Sunday, September 23, 2012

DIY Hand Stamped Tile Magnets


Have you ever realized that you bought materials for a project but then never actually did what you were planning? 

That is what happened with this project.

I had intended to create some magnets to coordinate with the DIY Hand Stamped Coasters I had made earlier on in my blogging.  Instead, the materials went onto the shelf and waited< and waited and waited< for me to find them again when I was organizing for my craft space. 

Just like the coasters, these are a quick and easy addition to any kitchen, gift basket or hostess gift.

Supplies:
  • Sheet of 2 x 2 inch porcelain tiles (36 total tiles)
  • StazOn Stamping Ink (this is a permanent stamping ink available at many scrapbooking stores or where scrapbook supplies are sold)
  • All Purpose Adhesive Glue (I used Aleen's 7800 adhesive)
  • Magnets (I use 2-1/2 inch magnets per tile)
  • Stamps
  • Rubbing alcohol (to remove the ink in case the stamped images get smudged)

Directions:
1. Remove tiles from backing. You may need to soak them in water overnight and scrub the backs a bit to loosen the glue.

2. Let tiles completely air dry.

3. Place dry tile in center of your work area.

4. Select your stamp color.

5. Select your stamp.

6. Ink entire image, taking care to wipe off any excess that may have gotten on the edges of the stamp.

7. Line up stamp and press stamp with steady pressure onto tile, making sure to not "jiggle" the image. (If you make a mistake at this point, you can use the rubbing alcohol on a paper towel to remove the ink).

8. Fill in any spaces in the image on the tile with permanent marker of the same color. (I bought a package of sharpies that had all different colors)

Isn't the owl so stinkin' cute?
9. Let ink dry for 15 to 20 minutes, then place tile onto a cookie sheet and place in oven preheated to 375 degrees for 12-15 minutes.

10. Let cool completely.

11. Apply magnets to back of tile with adhesive (I used 2 magnets per 2x2 tile). Let dry overnight.


12. Place magnets into an organza bag for gift giving.

Sunday, August 12, 2012

Plastic Horse Bookends - A Guest Post

I was happy to do this project for a guest posting on Adventures of a DIY Mom.


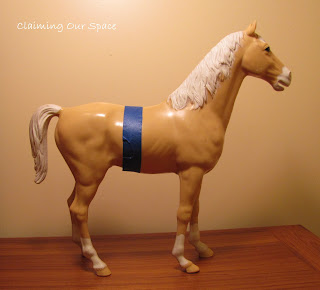
I was horse-mad as a kid and had horses all over my room. Over the years, they were given away, broken, or donated but a few managed to get boxed up.  I had previously turned one into an art piece and when I found this beautiful palomino in another box, I knew I had to transform him as well.

This project is a bit time consuming, mainly because of the wait time for the caulk and paint drying, but I really like how it turned out.

You will need 
  • a large plastic horse
  • tape
  • hack saw
  • sanding block
  • 2 small pieces of wood
  • gorilla glue
  • kreg jig
  • wood glue
  • 4 larger pieces of wood
  • screws
  • caulk
  • spray primer
  • spray paint
1.  Start with your large plastic horse.  Mark with tape where you will want to make your cut.

2.  Make your cut. If the edges are a bit rough, sand them with the sanding block. Give each side a quick spray with the primer.

3.  My horse was hollow so I needed to add an additional support to screw into the wooden part of the bookcase.  I cut 2 small pieces to fit inside, rounding the edges. I used the gorilla glue to secure it inside the horse.

4.  I used my Kreg jig drill the holes to secure the pieces of wood for each bookend.  I used the wood glue for a little extra insurance.  If you don't have a Kreg jig, just make sure to pre-drill your holes so the wood doesn't split. 

5.  To secure horse pieces to wood, I pre-drilled a hole and screwed everything together.

6. Using caulk, fill in any gaps. 

7.  Give everything a spray and you are all set. I used Krylon Ivy Leaf.  It is the same green that is in the fabric for the chair I am reupholstering.

So if you come across a plastic animal from your childhood, don't throw or give it away, turn it into bookends so you can see it every day.  I like that a piece of my childhood has been re-imagined in my present.

Friday, July 6, 2012

Poppy Pillow - Low/No Sew Project

Another belated Mother's Day present post.  My parents were away on vacation over Mother's day so we didn't celebrate until mid-June when we celebrated Mother's Day and Father's Day together.

This is another one of my low sew/no sew projects that involves felt.  I think this may be one of my favorite combinations of craft materials!


My mom loves poppies. She thinks they are just beautiful.  She has several pieces of art that includes poppies and her sister made her a cross-stitch pillow with poppies on it several years ago.  So I figured that she needed a poppy something from me too. 

First I made the pillow cover using these instructions using drop cloth for the material. If you don't have a sewing machine, you can use something like Stitch Witchery to make your pillow. 

Then it was off to the internet to find a tutorial on making poppies.  Have I told you lately how much I adore Google? It can help you find anything.  Using the search term "felt poppy tutorial" I found The Wishing Elephant's easy to follow instructions

Since I wasn’t sure where my sewing kit was, I used hot glue to make my flowers.  If you do this, be very very very careful. Hot glue is extremely hot and could cause swearing if you get it on your finger. (Or in my case, WILL cause swearing. I need to get some finger protectors if I ever make another one of these pillow.)

Once I had my flowers made, I cut some stems and leaves out of dark green felt.

I put my pillow in the cover and laid out where I wanted the flowers, stems and leaves.

Using fabric glue, I glued everything in place and let it dry overnight.

The next day, I used a bit more glue to attach some of the petals directly to the pillow since they were sticking up a bit too much for my taste.

Then, boom, done!

I think cutting out the flower petals was the longest part of the project but that can be done while watching a bit of TV. 

Mom loved her pillow and she says it looks great in her living room.

Check out the places I party.

Sunday, May 6, 2012

Yarn Covered Spheres


OK, I know that the using spheres in the title is a bit odd, but I just couldn't type yarn covered balls without giggling to myself (yes, it's true, inside I am a 8 year old boy :-D).


With that out of the way, onto the tut.

1.  Gather your materials.  Yarn, styrofoam balls, glue and not pictured-pins and a a brush. Tacky Glue is pictured but after wrapping two balls, I ended up using regular Elmer's Glue. It was less sticky.

2.  Use a pin to attach one end of a piece of yarn to the ball.

3.  Brush glue on the top of the ball.  I painted the glue about a inch or so at a time, all the way around the ball.

4.  Start wrapping the yarn.

5.  For a ball all the same color, skip to step 7.  For a ball with more than one color, when you get to the spot you want to transition, pin the starting color to the ball.

6.  To start the next color, pin the end of the new color on top of the end of the previous color.

7.  When working on the other side, keep wrapping, holding the uncovered end up and use your fingers to keep the yarn touching. This is where things can get a bit sticky so you may want to keep a damp paper towel to wipe off the glue.

8. Cut and pin the end of the yarn. Once you get to the end, snip the yarn so you have just a tiny tail and then pin the end down.

9.  You are done!

10.  Repeat over a dozen more times.

11. Display in your container & enjoy!

I think it looks pretty nice in our foyer.  It really picks up the blues and greens in the framed map.


I do have to share something weird that happened to me when I did this project.  Apparently, I am allergic to the yarns I selected (all the same brand).  What makes me thinks so? That evening, my hands started to itch and it just got worse from there. I ended up with hives from head to toe the next day.  Thank goodness for Benadryl and hydrocortisone cream.  I think it may have been some chemical used to treat the fibers since I know I am not allergic to acrylic.  So if you end up itchy after making some yarn covered balls for yourself, you will know what to do.

Check out the places I party.

Sunday, March 11, 2012

DIY Hand Stamped Coasters

This is a project that was originally posted back in 2008 on a cooking blog that I used to have.  Since I was just thinking to myself that the tiles I made back then still look fabulous today, I wanted to share this easy project on this blog.  Plus, I have been sick all weekend so that means my planned project never happened. (stupid sore throat and cough!)


DIY Hand Stamped Coasters

Monday, February 6, 2012

Valentine Pillow


Valentine’s Day is right around the corner.  While I am not a full-on “decorate the whole house for every holiday” person, I do like to put a few items out and about.

I ran into a few problems with Valentine's Day though.  I am not a huge fan of hearts, I am not a big fan of pale pink and red isn't a color we use much of in our house.  So I knew that I would have to get creative.  And go bright with some hot and deep pinks.

Sunday, January 29, 2012

Trivet Trouble - Take 2


Pin It
After last weekend's Trouble with Trivets , I still had many corks left in my "Big Box o' Corks."  I also had more space in my drawer where I keep my oven mitts, pot holders and trivets.  Did you know that Corks + Space = More Trivets?  I personally think this equation may be one of Pythagoras lost theorems.


This time construction went much quicker since there was no cork cutting since I wanted a trivet with more surface area.  Why?  While the trivet I made last week is fab looking and I love how it turned out, the reality is that it can't hold larger pots or pans. Square pans are a bit wobbly on it due to its rounded shape and what if I made a batch of brownies or a pan of enchiladas? I wasn't sure this small(ish) trivet would be able to handle them.

So my plan was to lay the corks on their sides in a basket weave pattern and hot glue them to the felt backer and to each other. I love it when a plan comes together.

The first trivet is 4 sets of corks wide by 4 sets of corks tall (approximately 7" x 7"). You will need 32 corks for this layout.  This size is perfect for those 8x8/9x9 pans.

The second is 4 sets by 8 sets (approximately 7" x 14"). You will need 64 corks for this layout. This size is great for the 9x11/10x13 pans.

Monday, January 16, 2012

Pinterest, How I Love Thee for Helping Me Find a Use for Unused Stuff


I am a later-comer to the Pinterest Party, having only joined a couple of months ago.  But, in that time, I have quickly become hooked and have definitley joined the ranks of the converted.  (Long Live Pinterest!!)

I think I will need to live to 100+ to visit all the places, make all the crafts, prepare all the recipes, create all the jewelry, plant all the gardens, etc. that I have pinned, plan to pin and want to pin. 

Sometimes, I think to myself there is no way I can even begin to work on any one of the myriad of ideas pinned to my "For Free Time - DIY Crafts" board, mainly because I don't always have alot of that thing called "free time."  I don't even have as many things pinned as some of the folks I follow.  The other problem is that besides the time investment, many projects also involve a financial investment into tools or materials that I either don't have on hand or have enough of to make the project.

However, the flip side is that when I am sorting out a cabinet, or closet, and come across items that remind me of something I have seen on Pinterest, I become totally inspired. 

This project is no exception. I found this image on Pinterest from http://eighteen25.blogspot.com.
I just knew that with minimal outlay, I could create something similar. Since I already had candlesticks and vases/jars in my living room cupboard.

My only expense was the E600 glue, which I know will come in handy for other projects down the road. The vases are leftovers from my wedding. The jar is from IKEA. The candlesticks are from who knows where (I have had them for at least 10 years). All these items have been packed away, unused, for the last 2+ years. 

But that is about to change with just a bit of glue after I ran everything through the dishwasher to make sure they were sparkly clean.
Then I set up my workspace at the dining room table (with Willow supervising), gathered my materials and tools and got to work.

Step 1:  Gather all your tools and materials
  • E600 glue
  • Vases/Jars
  • Candlesticks
  • Small Level
  • Toothpicks (I like the flat ones since you can use them to "scoop" up the glue)
  • Paper plate
  • Tape (if needed)
Step 2: Decide which vases/jars go with which candlesticks
     Since all my candlesticks are the same, for me this was the quickest step.

Step 3:  Put dollop of glue on the paper plate
     Size depends on how many pieces you have to glue. 
I have read several reviews on the glue that have said that trying to use it straight from the tube can result in a big mess and a cap that won't come off the next time you want to use it.

Step 4:  Applying the glue
     Using a toothpick gather up some glue and apply to the top of the candlestick.

This is probably the most tedious part of the who process.

Step 5: Placing the candlestick to the vase
     Place the vase upside down on your workspace.
     Gently place the glue end of the candlestick on the bottom of the vase.

Step 6: Making sure things are straight
     With your level, check to make sure things are straight.
This may not be as much of an issue if your vase/jar has a flat bottom, but if it has a curve, this step will ensure that your vase/jar won't look wonky once things are all dried.

If your vase/jar has a particularly curved bottom, you may need to use a couple of pieces of tape to keep the candlestick in the level position to dry.
   
Step 7: Move the glued piece(s) to somewhere safe so it can dry without being bumped.
     I places a couple of books on top to make sure things things got good adhesion.
     E600 glue needs 48-72 hours to fully cure.
Step 8:  Filling
     Once the glue has cured, remove tape (if necessary) turn it over and fill with whatever fits your decor.
Pin It


Cost of the Project:
$  0.00    Candlestick holders
    0.00    Vases from my wedding
    5.00    Tube of E600 glue
$  5.00    TOTAL COST

Linking to
A Round Tuit (84), The Girl Creative, Mad in Crafts, Craft-O-Maniac, Skip to my Lou, Hope Studios, Tip Junkie, Sugar Bee Crafts , Homework, Northern Cottage, Confessions of a Stay At Home Mom, Not Just a Housewife, Type A, Passionately Artistic, Blue Cricket Design,