Showing posts with label Room Preview. Show all posts

Wednesday, January 20, 2010

Dining Room Progress Report - Lighting, Paint and Board & Batten Wainscotting

Our dining room is almost done.  Just a few tweaks here and there are needed. Before we do the big reveal, here are some in progress pics to peak your interest.  

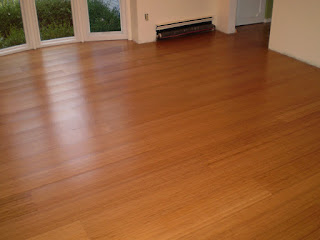
As I posted a couple of months ago, we replaced the carpet with bamboo.  That was the beginning of the transformation.

We swapped out the light fixture.  While the original chandelier was lovely in a sparkly brassy old world way, it was not our style.


This is our new chandelier.  It is a knock off of a chandelier from Restoration Hardware.  I love the warm glow from the "candles."  Even better was the price (compared to the RH version) of $230 at Lowes.


Next up was paint.  We selected a two tone color scheme that will make sense in a minute.  Behr Chocolate Sprinkle (in flat enamel) and Valspar Churchill Hotel Vanilla (in semi-gloss). 


Next we needed to add the wood for the board and batten wainscotting.  Thank goodness Hubs is a math wiz.  Without him, this would have taken days longer to complete. 


Once all the trim was installed, we started caulking (oh, there was so much caulking), priming and painting.


Now we are making progress.  Even better, it looks completely different from where we started. 


Stay tuned for the big reveal later this week.

Tuesday, December 22, 2009

We Have a Toilet! And a Sink! And a Locking Doorknob!

More progress on the powder room.  We now have a sink, toilet, baseboards, trim and a new doorknob (with a lock!). 


The trim still needs to be caulked and painted, the mirror needs to go up, along with the TP holder, towel ring and some sort of cabinet for extra storage needs to be found.  Lastly, we need to sand just a bit off the bottom of the door since the new floor is a hair higher than the old floor. 

I also need to find some artwork.  I have some ideas but not sure if they will work in the space. 

Stay tuned for more updates as more things get finished in the powder room.

Saturday, December 19, 2009

More (Powder Room) Progress! Paint!

The lastest step in the progress on the powder room was paint.


Glidden Dapper Tan, colormatched to Behr Flat Enamel. 
You may recognize this color.  It is the same one we used in our center bathroom.  I love the warmth to the color and how is makes a room seem cozy.  Additionally, it coordinates wonderfully with the grout color we selected.


Next up, installing baseboards and door trim.  Keep checking back on our progress.

Tuesday, December 15, 2009

We Have a Floor!

There is more progress in the powder room.  We have moved onto the next important step in our powder room redo. 

We have a floor and a quite nice one if I say so myself. 


We went with an octagon and dot tile, in an off-white color with a parchment (think light tan) colored grout.  Now, I have to say that the store called the tile color white, however, it is not a stark white.  So it will work perfectly with our bisque colored toilet and sink. 

Stay tuned for more progress.  Next up?  Paint.

Saturday, December 12, 2009

Making Progress on Our Center Bathroom

We have two full baths in our house.  One off the master bedroom and one that the office and other two bedrooms share.  We call the latter, the center bathroom. 

When we bought the house, it was a blank slate.  All in white with little color.  Check it out below in the listing photo.


Along with all the white, we were also "blessed" with a total of 5 different colors/types of knobs, towel bars, towel rings, towel hooks and a TP holder.  We had white ceramic, chrome, brushed nickel, brass and a  white rubber coating.  Pretty much a bland mismatched mess.

First order of business, paint.   I chose Dapper Tan by Glidden.  I had it matched to Behr flat enamel.  It is a nice tan with just a slightest teeniest tiniest hint of pink.  Everyone says they love how their complection looks in that bathroom.  A perfect color pick for a bathroom in my book.   


To make the fixtures cohesive, I painted them all satin nickel using Rustoleum paint.  The towel ring was brass, the knobs were white ceramic and the towel bar and hooks were chrome. 

I think they look much better all the same, don't you? 


Next on the list, replacing the vinyl tile floor.

I already have the tile picked out.


So stay tuned for as we make more progress in this room.

Sunday, December 6, 2009

What is Green, Orange, White and Rag Painted All Over?

Why our powder room, that is what.


We replaced the drywall that needed removing once I took down the tile with moisture/mold resistant greenboard.  It took a bit of doing to get the right cuts around the pipes but after about four or five little modifications we got it to fit just right.  Though it probably did not help that we did not start measuring and cuting until 9 pm.  Yeah, we got distracted and sidtracked during the day.  Whoops. 

With the greenboard up, we mudded and taped the seams.  Once they get sanded and remudded, I will move onto painting the room to remove the awful pinky tan on yellow rag painting currently on the walls.  I have already painted the ceiling a nice bright white. 

We laid the Ditra underlayment to prepare for laying the tile. We first saw this product on Holmes on Homes on HGTV.  Mike Holmes helps people who have been taken for a ride by their contractors. Hubs and I love the show, mainly because because Mike, and his teams, do gorgeous work.  Also, he highlights tips and products that help him do this wonderful work.

So far, the Ditra has been easy to cut and lay.  The next step is laying the tile.

Keep checking back to see the next steps.

Tuesday, November 17, 2009

What Do You Do With An Ugly Powder Room?

Demo it, of course.  When we moved in, our powder room looked like this.

Yes, that is wallpaper border running down the walls. That lovely detail was found in evey corner.  As an added bonus, it was put up before the trim was installed.  It was also running along the ceiling.  There was more wallpaper border in this teeny bath than in most bedrooms, a total of 86 feet.   It is at times like this that I have to wonder what the "designer" of this room was thinking.

The tiles also ran up the wall just around the sink and the wall next to it, again another interesting "design" detail.  Add to the mix wall tiles used as floor tiles, some of the tile having been installed over wall paper, and a particularly dingy shade of yellow painted on the walls and ceiling and you know why we scheduled a redo of this room.

After about 5 hours one evening, we ended up with this.


Some of the "fun finds" we discovered were the 1/2" plywood behind the drywall around the sink, the wall tiles had been attached to the wall with what I can only figure was grout (so I was chiseling like mad, which resulted in needing to remove the drywall due to all the damage), the tile was not installed correctly on the floor (there was no underlayment, the mortar wasn't grooved so the tiles were actually just sitting on top so came up with ease) and using fabric softener and water to remove the wallpaper makes your house smell amazing. 

Keep watching for updates as we make progess is putting this room back together.

Saturday, October 24, 2009

Room Preview - Dining Room

So far we don't have a single completed room.  However, we have gotten key elements completed in several rooms.

Here is a sneak peek at the new flooring in our dining room finished just a few days ago.

Before: (34 year-old stained and dirty sculpted shag carpet)


After: (beautiful caramel colored engineered bamboo flooring)


 Look for more room previews to come as we finish different elements of the rooms.