Showing posts with label DIY. Show all posts

Monday, December 1, 2014

Low/No Sew Reindeer Pillow {DIY Project}

Pinterest is, as you all know, an amazing amazing place filled with cool stuff.  It is also a great place to get inspired.  I love looking for possible things I can recreate in an easier way or with my own twist.

This beautiful pillow from Dear Lillie is exactly the type of thing I am looking for.

You see, I love the pillow but don't have a screen printer, or know anyone with a screen printer and I am in no way talented enough to paint it on a piece of fabric.  So what is a girl to do?

I have three words for you! Felt and Drop Cloth! 

With those 2 things and a reindeer silhouette, like this one it is easy to make a pillow.

Here is the result.  I made two so they could jump toward each other.


I think they look great, don't you?

Want to make one or two or three for yourself? Here's how.

Materials
  • Reindeer silhouette printed on a sheet of 11x14 paper (I used Google images to find one that looked good to me)
  • Scissors
  • Fabric glue
  • Laundered drop cloth
  • Felt (I used red)
  • Straight pins
  • Pillow Insert (mine was 18x18)
  • If you want to sew, a sewing machine (If you don't, heat-n-bond)
Directions
  • Cut out your paper silhouette
  • Pin silhouette to your felt (you can also use double stick tape)
  • Cut out your reindeer
  • Make yourself an envelope pillow (I used this tutorial from Teal and Lime, though I cut my fabric 17.5x42) using  the drop cloth as your fabric
  • Insert your pillow into into the cover
  • Lay your reindeer on pillow positioning it exactly as you you wish
  • Pin felt reindeer to pillow by inserting the pin trough the felt into the pillow
  • Using the fabric glue, glue the reindeer to the pillow
  • Done!!

Yes, it is that easy!  I am pretty sure that cutting out the reindeer was the lengthiest part.

I think it is a great addition to our holiday decorations.

One quick note, if you live near an IKEA, you can skip the whole make a pillow cover part and pick one up for cheap there, like this one.
  

Friday, August 15, 2014

Our Backyard Update - New Entertaining Spaces {Before and After}


Last summer we decided that we needed a better back yard.  Not because it is small but because it wasn't very good for entertaining.  We had a patio and a deck but not space for both seating and dining and a grill.  After brainstorming for a bit, we came up with a plan.  The first part of the plan was to add more and better entertaining space.

First up, remove the rickety railing on the existing deck and replace it with something that was up to code (and wouldn't collapse if someone leaned on it).  Then, add a step up deck, or patio deck as I call it, to the other side of the patio.

Here are some old photos from when we moved in.  The railing on the deck is less than 3 feet high and moved when you leaned on it.  Not exactly conducive to feeling safe.  

Here is another view of the rickety railing.

And that little deck to the right of the photo was off our master bedroom.  It was only about 4 feet by 6 feet.  Not exactly a spot for doing anything but standing there.

Since these are pretty big projects and not something we wanted to tackle ourselves, we hired this out. I asked around at work and got a great recommendation from one of my colleagues.  Dave the Fireman.  He is a full time fireman who does work like this on the side.  We were so happy with the result.  We have referred him to several other people, who are also very happy with his work. I am so happy we found him!

First up, our new "step up deck" off our bedroom.  It is glorious! So much space! 

It runs right into our patio.  So nice!
 
Here is the new railing on the existing deck.

Here is a view of the the whole back of the house.

We have almost 65 feet x 12 feet of entertaining space.  When it was all done we weren't quite sure how we were going to fill it all up.  

But don't worry, we have managed to make some progress on that front.  I will be sharing some patio lights, a fountain, patio furniture and a dining space.

Friday, November 23, 2012

Gallery Wall Pt 3 - Wall Shelves


Check out our Gallery Wall Shelves! I decided that we needed to jump on the wall shelf bandwagon since I loved the idea of being able to swap art work in and out at will.  Plus, the reality is that I was being too pokey about figuring out the layout to actually hang the art and this seemed like a way to actually get something on the wall before 2013.

You can see that the coin art and the sea biscuit shadowbox are included in the mix.  I also added some family photos, a silhouette of me from kindergarden, a rubbing from a church in London and some state love art (tute coming for that soon).

I used Ana White's Ten Dollar Ledges as the start for my project. Though I modified it to fit our needs.  

Our ledges are 5 feet in length and I used 1x4's, 1x3's and 1x2's.  While I used cheaper wood for the 1x4's and 1x3's, I splurged on 1st quality 1x2's so I wouldn't need to worry about knots.
 
I used our Kreg jig so I could hide the fasteners making the finishing that much easier.
  
Some wood glue, screws and caulk - and I had 2 gallery wall shelves. (it is the table that is wonky crooked, not the shelves)


I gave them each several coats of white semi-gloss paint and then they were ready to hang. 

Some help from D to get a couple of long wood screws into the studs and we were ready to go. 

 It fills up the space perfectly.

We hung it high enough so that we can put chairs, a bar or a small bookcase underneath without any problem.  There is space on either side soany pieces that need to be hung, like shadowboxes, can easily added.


Sunday, September 23, 2012

DIY Hand Stamped Tile Magnets


Have you ever realized that you bought materials for a project but then never actually did what you were planning? 

That is what happened with this project.

I had intended to create some magnets to coordinate with the DIY Hand Stamped Coasters I had made earlier on in my blogging.  Instead, the materials went onto the shelf and waited< and waited and waited< for me to find them again when I was organizing for my craft space. 

Just like the coasters, these are a quick and easy addition to any kitchen, gift basket or hostess gift.

Supplies:
  • Sheet of 2 x 2 inch porcelain tiles (36 total tiles)
  • StazOn Stamping Ink (this is a permanent stamping ink available at many scrapbooking stores or where scrapbook supplies are sold)
  • All Purpose Adhesive Glue (I used Aleen's 7800 adhesive)
  • Magnets (I use 2-1/2 inch magnets per tile)
  • Stamps
  • Rubbing alcohol (to remove the ink in case the stamped images get smudged)

Directions:
1. Remove tiles from backing. You may need to soak them in water overnight and scrub the backs a bit to loosen the glue.

2. Let tiles completely air dry.

3. Place dry tile in center of your work area.

4. Select your stamp color.

5. Select your stamp.

6. Ink entire image, taking care to wipe off any excess that may have gotten on the edges of the stamp.

7. Line up stamp and press stamp with steady pressure onto tile, making sure to not "jiggle" the image. (If you make a mistake at this point, you can use the rubbing alcohol on a paper towel to remove the ink).

8. Fill in any spaces in the image on the tile with permanent marker of the same color. (I bought a package of sharpies that had all different colors)

Isn't the owl so stinkin' cute?
9. Let ink dry for 15 to 20 minutes, then place tile onto a cookie sheet and place in oven preheated to 375 degrees for 12-15 minutes.

10. Let cool completely.

11. Apply magnets to back of tile with adhesive (I used 2 magnets per 2x2 tile). Let dry overnight.


12. Place magnets into an organza bag for gift giving.

Sunday, August 12, 2012

Plastic Horse Bookends - A Guest Post

I was happy to do this project for a guest posting on Adventures of a DIY Mom.


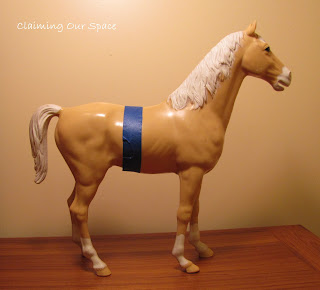
I was horse-mad as a kid and had horses all over my room. Over the years, they were given away, broken, or donated but a few managed to get boxed up.  I had previously turned one into an art piece and when I found this beautiful palomino in another box, I knew I had to transform him as well.

This project is a bit time consuming, mainly because of the wait time for the caulk and paint drying, but I really like how it turned out.

You will need 
  • a large plastic horse
  • tape
  • hack saw
  • sanding block
  • 2 small pieces of wood
  • gorilla glue
  • kreg jig
  • wood glue
  • 4 larger pieces of wood
  • screws
  • caulk
  • spray primer
  • spray paint
1.  Start with your large plastic horse.  Mark with tape where you will want to make your cut.

2.  Make your cut. If the edges are a bit rough, sand them with the sanding block. Give each side a quick spray with the primer.

3.  My horse was hollow so I needed to add an additional support to screw into the wooden part of the bookcase.  I cut 2 small pieces to fit inside, rounding the edges. I used the gorilla glue to secure it inside the horse.

4.  I used my Kreg jig drill the holes to secure the pieces of wood for each bookend.  I used the wood glue for a little extra insurance.  If you don't have a Kreg jig, just make sure to pre-drill your holes so the wood doesn't split. 

5.  To secure horse pieces to wood, I pre-drilled a hole and screwed everything together.

6. Using caulk, fill in any gaps. 

7.  Give everything a spray and you are all set. I used Krylon Ivy Leaf.  It is the same green that is in the fabric for the chair I am reupholstering.

So if you come across a plastic animal from your childhood, don't throw or give it away, turn it into bookends so you can see it every day.  I like that a piece of my childhood has been re-imagined in my present.

Sunday, July 22, 2012

DIY Handle Mitts


Last year for my birthday my mom got me one of the best presents EVER! A set of stainless cookware! Woohoo! It was this set from Wolfgang Puck. It is so fabulous! [please look away as I hug the wok that came with this set]


OK, maybe I am a bit biased but I had been wanting (drooling over) stainless cookware for several years. 

This stuff can be washed in the dishwasher, it cleans up quickly and easily, it can be washed in the dishwasher. I had to put that one in there twice since our other set of pots and pans from Analon can't be. Sometimes that is a bit of a (or rather a giant) pain to hand-wash them, especially when we make a recipe using lots of pots and pans. With this set, after making a really messy dinner where I have baked on stuff, a quick soak, a bit of a scrub and, BAM, clean saute pan!

Another good part is that you can saute on the cooktop and then put it directly in the oven. How great is that?  This greatness leads to the one drawback of this type of cookware - the stainless handles get stinking hot.  So the move from the over to the cork trivet can be dangerous if you aren't careful.


My fear of burnt fingers made me whip up a few handle mitts inspired by the kind they use at Chili's for the Skillet Queso. Yes, we could use oven mitts or pot holders, but what fun is that?  I wouldn't get to use my sewing machine or one of the fabrics in my stash. (OK, maybe these things aren't actually called handle mitts but I though pot mitts or oven holders just sounded odder than handle mitts.  Yeah, I make up words all the time)

These are a quick and easy project.  Once I figured out the dimensions and cut out my template, I was able to whip up 3 of them in less than an hour. Yup, it was that quick.


DIY Handle Mitt


1.  Make a template out of card stock
     For my handles my template was 6 inches long by 3 inches wide.
     I used a candletick to get the curve on the end


2.  Use your template to trace and cut out
     2 pieces of "pretty" fabric
     2 pieces of insulbrite batting
     2 piece of liner fabric (I used scraps of drop cloth)
     This is for 1 Handle Mitt


3.  Cut either a piece of bias tape just larger than the shortest dimension of your fabric or if you are like me, and don't have any bias tape, You can just take a a piece of your fabric and make your own.

     Cut a piece of fabric 4 inches long and 2 inches wide.
     Fold in half and finger press.
     Fold each side into the middle, finger press
     Fold in half.

4.  Layer the pretty fabric, batting and liner together with the bias tape - pinning them together.


5. Sew on bias tape/fabric and trim off excess


6. Place right sides together and straight stitch around the edge, leaving enough room to do a zip zag stich between the straight stitch and the edge of the fabric.


7.  Using an unsharpened pencil or chop stick, turn the handle mitt right side out and you are all done!

Check out the places I party.

I was featured on The Fun In Functional @ Practically Functional
The DIY Dreamer

Friday, July 6, 2012

Poppy Pillow - Low/No Sew Project

Another belated Mother's Day present post.  My parents were away on vacation over Mother's day so we didn't celebrate until mid-June when we celebrated Mother's Day and Father's Day together.

This is another one of my low sew/no sew projects that involves felt.  I think this may be one of my favorite combinations of craft materials!


My mom loves poppies. She thinks they are just beautiful.  She has several pieces of art that includes poppies and her sister made her a cross-stitch pillow with poppies on it several years ago.  So I figured that she needed a poppy something from me too. 

First I made the pillow cover using these instructions using drop cloth for the material. If you don't have a sewing machine, you can use something like Stitch Witchery to make your pillow. 

Then it was off to the internet to find a tutorial on making poppies.  Have I told you lately how much I adore Google? It can help you find anything.  Using the search term "felt poppy tutorial" I found The Wishing Elephant's easy to follow instructions

Since I wasn’t sure where my sewing kit was, I used hot glue to make my flowers.  If you do this, be very very very careful. Hot glue is extremely hot and could cause swearing if you get it on your finger. (Or in my case, WILL cause swearing. I need to get some finger protectors if I ever make another one of these pillow.)

Once I had my flowers made, I cut some stems and leaves out of dark green felt.

I put my pillow in the cover and laid out where I wanted the flowers, stems and leaves.

Using fabric glue, I glued everything in place and let it dry overnight.

The next day, I used a bit more glue to attach some of the petals directly to the pillow since they were sticking up a bit too much for my taste.

Then, boom, done!

I think cutting out the flower petals was the longest part of the project but that can be done while watching a bit of TV. 

Mom loved her pillow and she says it looks great in her living room.

Check out the places I party.

Sunday, May 20, 2012

Gallery Wall Pt 2 - Sea Biscuit Shadowbox

I was so happy to do this project a guest posting over at Makin My Apt a Home as part of the Trading Blogs party hosted by Serendipity & Spice.


I finally whipped up another piece for our gallery wall.


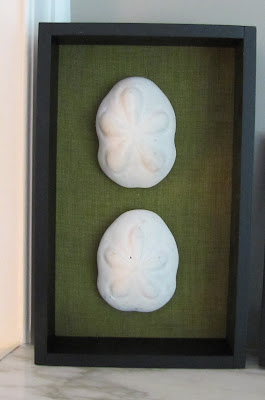
It all started a couple of months ago my mother-in-law showed up with a tin.  When D opened it up, he found two sea biscuits that his grandmother had brought him from Florida over 30 years ago.  MIL had been toting it from place to place since he was a kid.  (Sea Biscuits are similar to sand dollars but are more puffy looking)

I knew that I had to come up with something special to display them so they wouldn't live in another 35 years in that tin. Plus, it was a cool old Coca-Cola Santa tin that I wanted to be able to use in my decorating next Christmas!

First, I had to bleach them.  I added some bleach to warm water and soaked them for 10 minutes.  Once they dried, they were nice and white.


Then it was time to make the box.  Mine was about 7.5 by 10.5.  I cut down some scrap and nailed it together with some brads.


A quick sand then onto priming and painting.

Once everything was dry, I needed to find a backing board.  Luckily I found another scrap piece that would work.

A quick trim and it was starting to look like a shadowbox.  Well, an upside-down shadowbox.

Then it was onto fabric.  First I spray painted the edges of the backer and let it dry.  Using spray adhesive, I applied the fabric to the backing piece.   Since I wanted to make sure that no fabric could be seen sticking out between the side and back, I trimmed the fabric just a bit, then let it dry for about an hour.

Now it was time to attach the back.  I predrilled the holes for the screws. 2 holes on each side, 1 on the top and 1 on the bottom.

Once everything is screwed down and the back has gotten a coat of black spray paint, I attached a tooth hanger. I don't think that is actually what they are called but hey, it is descriptive and you knew exactly what I was talking about before you saw the pic didn't you?

Now it is time to first up the hot glue gun.  Since this is ultimately going to be hanging on the wall, I didn't want there to be any chance of anything coming loose.

No pics of the actual gluing since that stuff starts to harden so quickly.  But I applied a generous bead of glue about 3/4" from the outer edge and then pressed it firmly to the fabric.

I think it turned out great.


Right now it is living on my half stripped mantle.  But it still looks pretty darn good.  My mother-in-law teared up when she saw the "biscuits" displayed so nicely.  D thinks it looks pretty nice but is still not convinced about how the gallery wall is going to look. 

I am so happy I was able to share my Sea Biscuit Shadowbox with Arod's readers.

If you would interested in trading posts with us sometime in the future, let us know.  D would be thrilled because it might get me working on the million projects I have half finished in the basement!

Check out the places I party!

There is still time to sign up for my Blog-a-Pal-Loosa giveaway for a set of 4 hand stamped travertine coasters, a set of 4 Celtic stamped slate magnets and a set of 4 dragonfly stamped magnets.  Click here to enter.