Showing posts with label Outdoors. Show all posts

Friday, August 15, 2014

Our Backyard Update - New Entertaining Spaces {Before and After}


Last summer we decided that we needed a better back yard.  Not because it is small but because it wasn't very good for entertaining.  We had a patio and a deck but not space for both seating and dining and a grill.  After brainstorming for a bit, we came up with a plan.  The first part of the plan was to add more and better entertaining space.

First up, remove the rickety railing on the existing deck and replace it with something that was up to code (and wouldn't collapse if someone leaned on it).  Then, add a step up deck, or patio deck as I call it, to the other side of the patio.

Here are some old photos from when we moved in.  The railing on the deck is less than 3 feet high and moved when you leaned on it.  Not exactly conducive to feeling safe.  

Here is another view of the rickety railing.

And that little deck to the right of the photo was off our master bedroom.  It was only about 4 feet by 6 feet.  Not exactly a spot for doing anything but standing there.

Since these are pretty big projects and not something we wanted to tackle ourselves, we hired this out. I asked around at work and got a great recommendation from one of my colleagues.  Dave the Fireman.  He is a full time fireman who does work like this on the side.  We were so happy with the result.  We have referred him to several other people, who are also very happy with his work. I am so happy we found him!

First up, our new "step up deck" off our bedroom.  It is glorious! So much space! 

It runs right into our patio.  So nice!
 
Here is the new railing on the existing deck.

Here is a view of the the whole back of the house.

We have almost 65 feet x 12 feet of entertaining space.  When it was all done we weren't quite sure how we were going to fill it all up.  

But don't worry, we have managed to make some progress on that front.  I will be sharing some patio lights, a fountain, patio furniture and a dining space.

Wednesday, February 1, 2012

I Have Moved...

OK, not physically. Apparently I have moved Hardiness Zones. 

For those that are not gardeners, a hardiness zone give guidance on what may or may not grow and/or thrive in your area.  Most tags, packet or descriptive provided by growers for a plant or seed indicate the zone range that the plant can survive in. 

According to the new USDA Plant Hardiness Zone Map chart, our location is no longer Zone 5b, it is now Zone 6a. I used to be light blue but now am green. Wahoo!
I am hoping this means that some of my flowers and herbs may make it through the winter better than they usually do. I am especially hoping that my two rosemary plants left outside survive.  How I love rosemary!  I brought one plant inside to overwinter but haven't had much success with that in the past. 

I am also hoping it means I can start my direct sow veggies earlier, too.  Spring is right around the corner

Have you "changed" zones?  Click on this link and enter your ZIP to check out which zone you are in. 

Thursday, January 19, 2012

Winter is Finally Here!

This past weekend we finally got some snow that actually stuck around for more than a day.  This hasn’t been our usual Michigan winter.  We have had 50+ degree days in December, thunderstorms in January. All in all very very strange winter.

It snowed for three days and we had no wind.  A totally unusual occurrence here in the north.  Usually snow is accompanied by wind and lots of it. Think blowing drifts and the wind chill in the single digits. But that wasn’t the case so I headed out to the backyard with Willow to take a few photos (she doesn’t really like the cold, even with her red jacket).

SnowWillow
I think this one of a tree in the backyard looks like lace, woven by Mother Nature.

SnowLace
There were a few berries on one shrub and I can only imagine that the one of the many birds who live in our backyard will find them soon and have a winter snack. And that is about an inch of snow on those branches. The snow was so light and fluffy.

SnowBerries2
One of my plant hangers is waiting for spring.

SnowWaitingForSpring
The snow was so light, it didn’t settle but stacked up, like little snowflake building blocks, that you could see through.

SnowSeeThrough
These beautiful pictures almost make me like winter…almost.

I know that we have at least 2-3 months more of winter so I am spending some quality time flipping through my growing stack of seed catalogs. Makes spring seem a bit closer.

Thursday, April 15, 2010

Spring has Sprung!

Spring has arrived here in the northern climes.  And it is exciting to see what is coming up in our yard since this is our first spring here. 

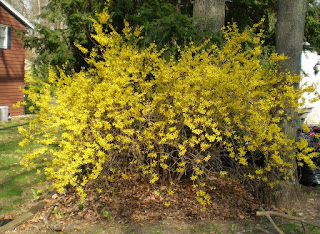
The forsythia is blooming.


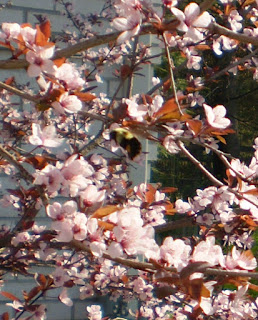
The tree outside our office is blooming (and the big bumble bees are in heaven).


The one of our rhodadendrons in the back yard had begun to bloom.


The hyacynths are blooming making the back yard smell amazing.  (Those little suckers are really potent!)


Does anyone have any idea what this plant is?  It has pretty blue flowers and we have a ton of them in the backyard.


We even have a robin's nest. 


And maybe best of all, some of my veggies are starting to sprout.


We are planning a garden this year a la Square Foot Gardening.  Next up in the "creating a garden" department is moving some shrubs so I can place my raised garden boxes.  Watch for posts on what I am sure will be quite an adventure.

Has Spring sprung in your area?

Thursday, December 10, 2009

Winter Has Arrived!

A week ago today I woke up to these views out my windows. Looks like winter has finally arrived.  Just in time for the holidays.  Too bad it has pretty much been snowing since these photos were taken with at least 5 inches falling in the last 24 hours, with possibly another 5 coming in the next day or two.


From the office


From the dining room


The backyard

The best view, I think, is the one from the front that I took after shoveling the walk and driveway.  I am leaning toward using this photo for our Christmas card next year.


Wednesday, October 28, 2009

Cleaning Up The Yard - Stage One


One of the first projects we have undertaken is cleaning up the front yard. (My dad is so happy about this. He loves his lawn care!)

First, we removed two juniper shrubs right next to the front door that smelled like cat urine. You see, when we moved in there was a lingering odor of cat. We thought it because the house had been closed up for a month and leftover smell from the seller's cat. However, after cleaning all the carpets (twice), mopping all the hard surfaces (twice) and checking the house with a black light for any possible areas needing treatment, it still smelled strongly of cat pee around the front of the house. We just couldn't figure it out. Turns out the culprit was those pretty little juniper bushes. Apparently a strong smell is very common with junipers. As much as we loved the formal look and clean lines of the shrubs, we hated the odor and the fact it always smelled like a stinky litter box in the front of our house. So they had to go. But we did Freecycle (http://www.freecycle.org/) them so that someone with a less sensitive nose could enjoy them.

Second, we mowed the grass. After finding a great deal on a self-propelled mower on our local Craigslist site (http://www.craigslist.org/) to replace the old fashioned push mower we used in our tiny city yard, I am sure the neighbors were so excited to see me out there cutting a swath through the tall grass. Just the clippings from the front yard filled the yard waste can to overflowing, just to give you an idea of how long it was.  We also rented an edger to clean up the lawn along the driveway, sidewalk and road.  I was surprised at how much the lawn had encroached on the pavement in several places.

Third, I trimmed the dead stems off the dozens and dozens of hostas in the front. Time consuming but I think it looks more tidy.

Finally, we trimmed the lower branches off of the pine trees in the front. We are still unsure of the exact species of our four pines, or maybe they are spruce since the needles on some of the branches have a distinct bluish hue and they are very sharp, but they are definitely unique looking with their drooping branches. Almost like the tree itself is melting. Apparently one of the drawbacks of this type of conifer is that it likes the sun. Sadly, three of the four are shaded by large oak trees so have many dead branches. So, I got up on the ladder and, using our reciprocating saw along with my brother's loppers, cut off several dozen branches. We think that it definitely lightens up the look of the front of the house now that those dead branches have been removed. Additionally, more light reaches the ground allowing us to plant some annuals next year to add some color to the front.

With the changing season, you will have to wait until spring to see what else we have in store for the exterior of our home.

Tip of the Project: If you get pine sap on your skin, use Pam or cooking oil to remove it. Apply to the skin and rub until the sap is loosened. After the sap is loose, wash with warm soap and water.

Sunday, October 11, 2009

The Perfect Grill!


(the big reveal of the actual grill coming later in the post)

One of our first purchases after we moved in, before any power tools, before any new flooring or paint, was a grill.  Now to some, that may sound a bit nutty, especially if you have seen the listing photos of the house.  I mean, we have LOTS of work to do. 

However, we love to grill.  Or rather the hubs loves to grill.  Personally, I am a relative grilling novice with only a few successfully grilled chicken breasts and brats under my belt.  But back to hubs; in our old house, we had a hard line gas grill so were able to grill year round.  After each snow storm, hubs would shovel a path to the grill...just in case there was a grill emergency and he needed to cook up a steak or brat right away. 

So getting a good grill was essential.  It needed to have lots of grilling space, be somewhat portable (so we can move it to the deck off the kitchen for winter grilling), easy to use and not too expensive. 

We found this beauty at Lowes.   The Char-Griller Duo Gas and Charcoal Grill.  For a mere $299.00, this grilling machine was ours.


It has two full sized grills together on the same frame, one (on the right) for propane and one (on the left) for charcoal.  And there is even a side burner that can be used to heat whatever.   It even has an automatic lighter for the propane burners.  Turn on the burner, click the button and you have flame.  Very nice. 

I think it is pretty amazing.  So does hubs.  We have used it with great success since we got it.  The latest success (Seasoned Steak Perfection) can be found in our other blog http://aboutabitofeverything.blogspot.com/

Related to the nuts and bolts (no pun intended). We were able to turn the box containing the pieces


to a fully functioning grill in about 2 hours.  We were pleasantly surprised at how clearly the instructions were written.   Apparently whoever wrote them had actually seen and put one of these grills together. 

Let me know if you have any other questions related to the grill and I (or the hubs) will answer them the best we can.