Showing posts with label Tip of the Project. Show all posts

Sunday, January 31, 2010

Entering the Digital Age!


In honor of the dip in temps in our neck of the woods, I thought that today would be all about gas.  Not methane, though we have quite a bit of that thanks to Hubs.  I am talking about natural gas, the kind we use to heat our house. 

We have a multi-zone, natural gas fueled, hot water baseboard heating system with four thermostats.  Zone One is the Family Room and Kitchen*, Zone Two is the Dining Room and Living Room*, Zone Three is the Office and Front Bedroom*, Zone Four is the Master Bedroom* and the Center Bedroom, Zone 5 is the bathrooms (this zone comes on whenever another zone kicks on). The * denotes which room the thermostat is located in.

It is quite nice because we are able to turn the heat up in only the areas where we are hanging out versus heating the entire house.  The not nice part?


We had the old fashioned "lever style" thermostats.  You know the kind I am taking about.  The ones where you have to guestimate and eyeball what the current temp is and hope the temp you want is the temp you are setting it for.  Personally I loath these types of thermostats.

After getting a wake up call in the form of our December natural gas bill (more than double November's), we realized that we needed to get a better handle on how we are heating the house.   Solution:  digital thermostats.  Like these.


We went with the most basic model since we didn't need it to be programmable and we only have a 2-wire system.  We got these at Home Depot for about $25.00 a unit.

Then it was a matter of switching them out.  The switching out part was easy.  Since we have a 2-wire system, we only had two connections to make.    Here is a tip:  Take a pencil and wrap the wire you removed from the old fixture around it.  This will ensure that the wire won't fall back into the wall. 

One hiccups we found was that some of the thermostats had an old-fashioned mercury switch.  Needless to say once those were carefully removed, they got double bagged and placed in the basement waiting to be brought to our county's Public Works Department for proper disposal since placing liquid mercury in the regular trash is a big no no.

I swear this gizmo looks like a high school science project from the 50s.

It actually took more time to sand, spackle and paint the area that was previously covered by the old thermostats.


No these were not taken all in the same room.  I realized that I hadn't taken photos of all the stages in any one room.  Whoops.  So you get to see the Benjamin Moore Riviera Azure from our front bedroom, the awful tan from our living room and Valspar Key Lime Pie from our kitchen.

Now all we need to do is wait to see if being able to set each zone to a definite temperature will result in lower bills or at least not the same shocking jump we saw in the last bill.  Personally, I think it will be the latter since January is our coldest month here is Michigan.   

Will keep you posted when we get out bill for the last week of December and the first three weeks of January.  

Tip of the Project:  After you disconnect the thermostat wires, wrap them around a pencil to ensure they don't fall back into the wall.

Thursday, January 21, 2010

Why You Should Wear a Mask...


when spray painting or using a paint gun.

I took the photo above in my garage about 5 minutes after spray painting a lamp and a couple of baseboard rad covers.  To my eye, the air looked clear even if the smell of paint was still very strong.  However, as you can see in the photo, there were still a bunch of small unseen particles in the air.  Yup, all those dots in the photo are paint molecules.

I will admit, I am not always the best about wearing my mask but after looking at the photo above, I realize that I need to wear it all the time when I am spraying paint and need to keep it on until I am back in the house.

 Just something to keep in mind when turning your Frugal Finds from ugly ducklings to beautiful swans. 

Tip of the Project:  Wearing a mask while spraying paint to keep your lungs safe. 

Sunday, January 17, 2010

Wanna Hang Out? A Review of Wall Anchors

When doing remodeling, you will inevitably need wall anchors to secure any one of a myriad of things to your walls. It could be shelves, pictures, curtain rods or even a bathroom sink. After completing several projects with successes and even more failures, I have found what works and more importantly what doesn't.

Below is a review of the four main types of wall anchors we have used over the last few months as we have been moving from room to room making changes to our home.


The Sleeve: this is a plastic cylinder that the screw fits inside. The basic concept is that as the screw goes in the sleeve expands and 'grabs' the wall. The problem is you have to have just the right size hole or the sleeve is too loose and pulls out. Or the hole is too small and the sleeve won't go in. Even with a proper size hole, this type never seems as secure as I would like. I guess they would be OK for something light like a small picture. But, in my opinion, they are far too much work for too little result.  An example of The Sleeve is found in black in the photo above.

The Cone: this is a plastic anchor shaped like a traffic cone. An improvement over the sleeve-type, the cone shape doesn't require drilling as specific a hole size, although you definitely still have to pre-drill. But being able to step down a tad on the hole size allows for a more secure fit. This type of anchor is actually quite useful for light duty shelves or larger pictures. Examples of The Cone are found in white, blue and gray in the photo above.


The Self-drilling in plastic (in photo above): This is a cone shaped anchor with large threads on the outside. I have seen some with a knife-like point for stabbing into drywall and cone-types that screw in without the need to pre-drill a pilot hole. The knife end goes right into drywall with ease but is also easy to break off if you twist a little too hard or strike a stud. The result is a big hole to patch if you make a mistake. The all-screw cone types (without the knife-like point) are a little harder to start, however I find a 1/8 pre-drilled hole allows them to screw right in. They have a strong and secure hold. I even have some of these holding a curtain rod track in a ceiling.


The Self-drilling in metal (in photo above):  the cream of the crop well worth the extra money. They, like the self-drilling in plastic, look like a really thick wood screw and they will hold whatever you are trying to hang very securely. I have two sizes one rated for 50 lbs and one for 75 lbs. Due to being made of metal they screw right into the drywall or wood without much trouble. However, like the plastic versions, a small pre-drilled hole does make it so much easier. We have used these in plywood with great success as well.

The biggest difference between the metal and plastic versions is that the metal version very rarely breaks and always holds firm. The extra cost for means less frustration and that is a smart buy in my book.

The verdict: The only ones I use now are the self-drilling either in plastic or metal depending on the application.

Tip of the Project: Pre-drilling a small pilot hole allows the self-drilling anchors to more easily seat themselves in wood or drywall.

Friday, November 13, 2009

My New Reading Light - From Garage Sale Bargain to a Highlight of the Living Room

**I am linking to Shanty2Chic's Rust-oleum Revamp Link Party.  Check it out to see what others have done with their projects**


Shanty 2 Chic


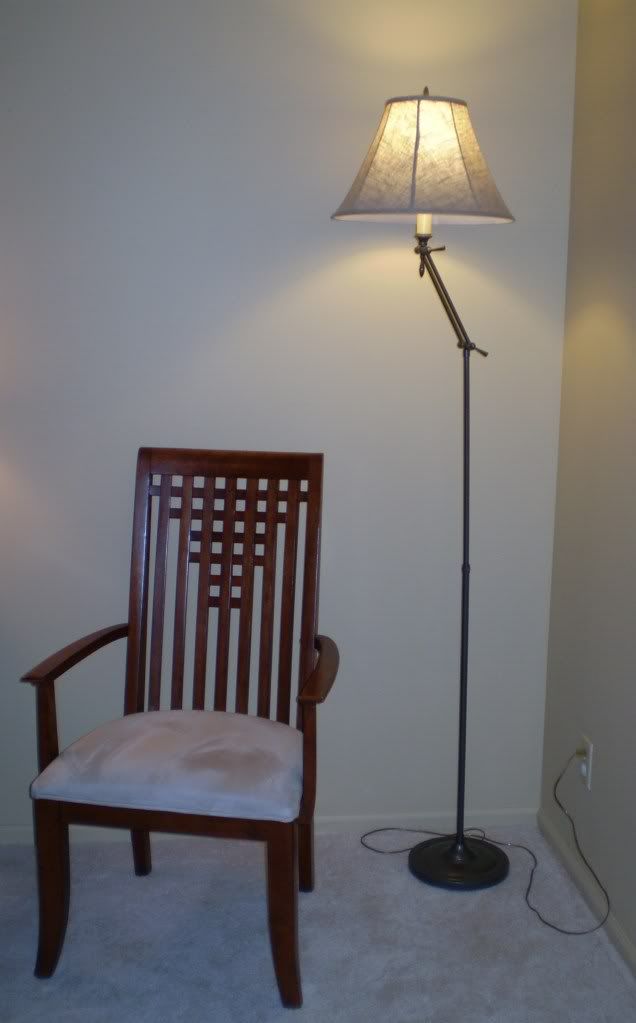
In a previous post, I alluded to big changes to a garage sale floor lamp that I bought for either $3 or got for free, depending on how you look at it.  You see, I bought this lamp and a wheelbarrow for $15.  The wheelbarrow was priced at $15 and the lamp at $3. Since I bought them both for $15, I am not sure of the "exact" price of the lamp.  Either way, it was a pretty good deal on a lamp with a nice look.

Here is the lamp as purchased.


Nice lines with a slightly water-stained shade and an unattractive aged brass color.  Not exactly screaming out for a place in our home.  But as we all know, a bit of spray paint can make a world of difference.

First, I bagged and taped the cord.  A plastic grocery bag and painters tape work great for this.


I chose Rustoleum Hammered Bronze for this lamp, since we have hammered bronze metal on several of our overhead light fixtures.  I also used the easy-grip handle so that my hand wouldn't get sore and my finger wouldn't get covered in spray paint. 


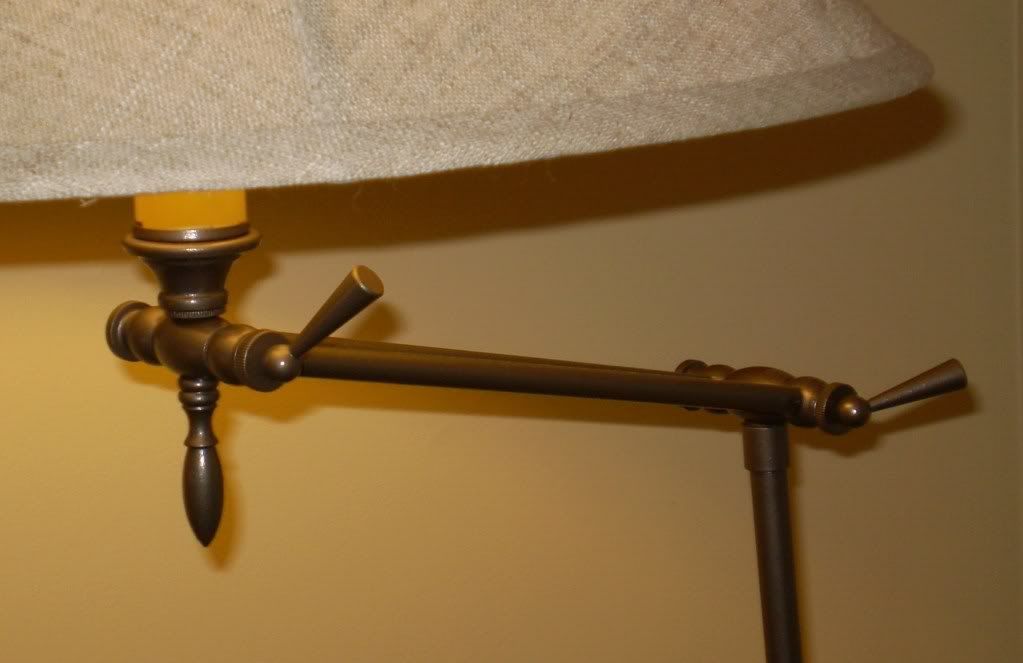
After several coats, I was left with a lamp with a much more updated look.   I especially love the pointed finials. 


A new $20 lamp shade from Target and we are ready to read.   I like the more antique look of the lamp. It coordinates wonderfully with the antique library table passed down from Hubs' family and works perfectly with our more formal living room.

I am pretty impressed with the transformation that cost less than $25.  Now all we need to do is get a comfy reading chair to put next to the lamp. 

Tip of the Project:  Use painters tape and a plastic grocery bag to protect lamp cords from spray paint overspray.

Wednesday, October 28, 2009

Cleaning Up The Yard - Stage One


One of the first projects we have undertaken is cleaning up the front yard. (My dad is so happy about this. He loves his lawn care!)

First, we removed two juniper shrubs right next to the front door that smelled like cat urine. You see, when we moved in there was a lingering odor of cat. We thought it because the house had been closed up for a month and leftover smell from the seller's cat. However, after cleaning all the carpets (twice), mopping all the hard surfaces (twice) and checking the house with a black light for any possible areas needing treatment, it still smelled strongly of cat pee around the front of the house. We just couldn't figure it out. Turns out the culprit was those pretty little juniper bushes. Apparently a strong smell is very common with junipers. As much as we loved the formal look and clean lines of the shrubs, we hated the odor and the fact it always smelled like a stinky litter box in the front of our house. So they had to go. But we did Freecycle (http://www.freecycle.org/) them so that someone with a less sensitive nose could enjoy them.

Second, we mowed the grass. After finding a great deal on a self-propelled mower on our local Craigslist site (http://www.craigslist.org/) to replace the old fashioned push mower we used in our tiny city yard, I am sure the neighbors were so excited to see me out there cutting a swath through the tall grass. Just the clippings from the front yard filled the yard waste can to overflowing, just to give you an idea of how long it was.  We also rented an edger to clean up the lawn along the driveway, sidewalk and road.  I was surprised at how much the lawn had encroached on the pavement in several places.

Third, I trimmed the dead stems off the dozens and dozens of hostas in the front. Time consuming but I think it looks more tidy.

Finally, we trimmed the lower branches off of the pine trees in the front. We are still unsure of the exact species of our four pines, or maybe they are spruce since the needles on some of the branches have a distinct bluish hue and they are very sharp, but they are definitely unique looking with their drooping branches. Almost like the tree itself is melting. Apparently one of the drawbacks of this type of conifer is that it likes the sun. Sadly, three of the four are shaded by large oak trees so have many dead branches. So, I got up on the ladder and, using our reciprocating saw along with my brother's loppers, cut off several dozen branches. We think that it definitely lightens up the look of the front of the house now that those dead branches have been removed. Additionally, more light reaches the ground allowing us to plant some annuals next year to add some color to the front.

With the changing season, you will have to wait until spring to see what else we have in store for the exterior of our home.

Tip of the Project: If you get pine sap on your skin, use Pam or cooking oil to remove it. Apply to the skin and rub until the sap is loosened. After the sap is loose, wash with warm soap and water.

Monday, September 28, 2009

Installing the New Dishwasher


(Isn't it so pretty?)

We needed to get a working dishwasher in the kitchen. Since the one that came with the house didn’t actually work (thanks for letting us know it broke, seller of our house). So we measured the width, depth and height of the space in our cabinets. Then went shopping for a replacement that would fit. Notice I did not say that we actually measured the dimensions of the replacement. This will come into play later (thanks GE).

OK so all the shopping is done and we brought the new dishwasher home full of anticipation like kids on Christmas morning.

If you are reading this as a how-to, I STRONGLY recommend that, if possible, you run your old unit on rinse cycle before beginning the replacement process. (More on the importance of this in a moment).

The removal of the old dishwasher was fairly easy. Before doing any work on an appliance always disconnect the power. Since ours is hard-wired that involved finding which one breaker, of the four that supply the kitchen, was connected to the dishwasher. Or, what the hell, kill all the power, we didn't need it since we will be busy with the dishwasher. Plus how long could it take?

Now we moved onto turning off the water.  If your home was not hand-built by a European gentleman, you should probably have a shut off near the unit.  Since our home was built by a European gentleman, we did not have such a luxury and needed to turn off the water to the entire house.  If you also need to do this operation, make sure to drain the water by turning on the faucet in the lowest point in the house. 


Now that you have no power or water running to the dishwasher the unit is safe to un-install. Some units attach under the counter and others, like ours, have side brackets that attach to the lower cabinets. Either way a few screws and the dishwasher was ready to pull out. We pulled it out gently and carefully, taking care to not break any of the hoses or wires attached. Hopefully, you will have te same experience and will be able to pull it out far enough to make disconnecting the 3 things easier: electrical, water supply and drain line.

A caution note about the drain line. If your drain line is run as a “high drain”; meaning it goes up first and then down to house drain, have some towels or a bucket handy to clean up the sewage that falls out when you disconnect that. When you are done gagging you should have a unit that is ready to be removed. (Gagging will be greatly reduced if you run the dishwasher on the rinse cycle to flush out the nasty smelling water and any food reside from the hose.  This is a tip we learned the hard way...after all our gagging.)

Now for the replacement washer. Wouldn’t it be nice if you could just take it out of the box and plug it in? Yeah I thought so too. Anyway, follow all the prep steps for your particular unit. If your washer is bolted to a shipping crate don’t throw away the bolts. You’ll need those later. Take care when setting the spring tension for the door. For some reason there are plastic pieces in between the springs and door hinges. If you break one it will cost $3.95 plus S&H. Ask me how I know.

OK, so all prep steps followed and your new washer is ready to hook up. Our instructions were pretty easy to follow. The only cheat I used was to put a little (two wraps) Teflon tape on the supply fitting. Hopefully you have enough length in your supply, drain and electrical lines to connect them before you slide the washer under the cabinet. I would recommend connecting them in this order: Drain then Supply. Once you’re all hooked up cross your fingers turn on the water and check for leaks. After verifying you are not leaking water, now hook up the electric. I may be overly cautious with the electric but I’ve been shocked enough to know I don’t like it.

Now follow the checklist in your instructions to make sure your washer is working properly. If all is well then its time to slide the new washer under the cabinet. Unless of course your “24 inch” washer is actually 24 1/8 inches wide. (thanks again GE). I will expand more on this later.

Once you have the washer under the cabinet you need to make sure it sits level. Our instructions said to use a ratchet to adjust the height of the feet (aka useless shipping bolts). I cheated again and used a small pry bar to lift the washer into place and spin the feet by hand. After the washer is level only thing left is to put on the bracket and toe plate. Viola, new dishwasher without installation charges. Easy, right? Yeah, whatever.


OK for those who want to see the gritty details. Our new washer was actually 1/8” larger than advertised and consequently 1/8” wider than the hole in our cabinet. I used a cordless circular saw with a carbide wood and nail blade to shave it back a bit. I found that setting the depth of the cut really shallow for the first pass gave me greater control. Trying to make a thin shave like this with a single deep pass proved problematic. The reciprocating saw made a very rough cut and splintered the face of my cabinet so I went back to the circular saw.

If the washer had actually been the right dimension, had we not broke a piece and needed to order a new one and wait for it to arrive in the mail, had our cabinets actually had a square opening and had we a shut off right near the dishwasher, installation would have been a breeze. 

Tip of the Project: Use a small pry bar to lift the weight of the washer off the feet and then adjust. This will not only save time but lots of headache trying to reach the feet with a ratchet or wrench once installed under cabinet.

Tuesday, September 22, 2009

Outfitting the Fireplace Without Breaking the Bank

We have a working woodburning fireplace in our family room.  (Sqwee!!)  However, it was a blank slate.  Literally.  


See what I mean. 

The previous owner needed to take out the firebox due to an ill fit resulting in a potential fire hazard.  So we didn't even have a grate to hold the logs.   We also didn't even have a damper door for the flue (no wonder we were having so many bugs in the house in the evening).  The adventure of getting that figured out will be in another post. 

Back to the fireplace.  We have some major changes planned for the family room,  however we didn't want to wait for those to happen before we could use the fireplace.  Craigslist was again the place I went, trying to find something that would work and at the same time wouldn't stretch our wallet.  And just like with the chair, I hit the jackpot.    A fireplace set for $30.  The set included the log holder, fireplace screen, tool holder, shovel, broom and poker in a black wrought iron finish.


Add the log grate for about $32 and for just over $60, we were all set for the cold fall nights (and maybe some s'mores).

Tip of the Project:  Don't forget to check Craigslist, garage sales and other non-traditional sources for supplies for your home to save money.

Friday, September 18, 2009

Redone Bedroom Chair a.k.a. That Place We Will Throw Our Clothes


Every bedroom needs a chair.  For sitting and putting on, and taking off, shoes.  For a quick read of a magazine.  Or for their actual purpose (you know what I am talking about) to be that thing you throw your pants on at the end of the day.

I went right to Craigslist to find a chair since we haven't made a final decision on a new bedroom set and I didn't want to spend too much. 

And Craigslist came through with this beauty for a whopping $5.


I liked the lines and the previous owner had stripped/sanded most of the finish and/or paint off so the prep work was quick and easy.  Just a it more sanding was needed.

Priming was done with that fabulous primer in a can, Kilz Odorless Oil-Based Primer.  This has been recommended by many a blogger.  I can add my own plug to the list.  The spray can application makes it a breeze.  My only problem was that since the wood was so old and dry, I needed two cans of primer to get good coverage.  Once primed, I let it dry overnight and then gave the chair a quick sand in several places that felt a bit rough. 

Then it was onto painting.  I had a quart of Benjamin Moore Midberry Brown left from painting the cabinets in the bathroom of our old home.  I love the color.  It reminds me of a rich extra chocolatey mocha coffee drink.  (mmmm, chocolate).  Here is the chair painted and waiting for the glossy finish to dry.


The next step was recovering the very "attractive" leather seat.  Two layers of batting and a brown, cream and green patterned fabric later, the seat looks brand new.


Put them together and what do you have?  A fabulous chair for our bedroom. 


And with the colors I chose in the fabric, if we go in another direction I can move the chair to the green bedroom or even the office.

Tip of the Project:  Let the paint dry overnight before spraying with the final clearcoat.  Then let the clearcoat dry overnight before securing the seat to the frame.

Wednesday, September 16, 2009

Picking a Paint Color - Such a Dilemma


This is what most of the walls in our house look like right now.  (This is in our office.)  Paint swatches taped up, samples painted on the walls.  Trying to pick just the right shade of blue, green, tan, brown, cream, greige, whatever. 

Luckily, we have made and/or are close to making some decisions related to our paint colors.  Phew.

Unfortunately, that means the hard work of actually painting is about to begin.  

Wish us luck!

Tip of the Project:  Use painters tape to tape paint swatches to the wall to avoid damaging the paint already on the walls.

Saturday, September 12, 2009

Pantry Love!


Our house has a pantry!  And it is a walk in pantry to boot.  It was love at first sight.  You see, I am so excited to have an actual pantry.  In our old house, the pantry was a bookcase secured to the wall on the landing of the stairs to the unfinished basement.  Well, there was a lazy susan in the only under-the-counter cabinet but it was hard to access and didn't hold much.

However, there was a big problem with my new pantry which was threatening my budding love affair.  Someone, in what I can only imagine was a caffeine induced frenzy while being snowed in, had covered the walls from floor to ceiling and wrapped most of the shelves in the ugliest contact paper I had ever seen.  All I can ask is why on earth you would use a contact paper that has gray and dark green in a tiny closet with a small light?  It makes it dark and depressing and you would never know if things are clean.


Here is a close up of the contact paper.  Ugh and ly are the only things I can come up with.


My solution, strip all the contact paper off.  I don't have any actual before pics since I was in a frenzy to get that stuff peeled off.  This is the best I can do. 


I removed all the contact paper, filling a large garbage bag, and wiped down the walls and the shelves with an adhesive remover, Goo Gone. I love this stuff. It seems to disolve that sticky residue with ease. Once that was done, here is what I was left with. Pretty scary stuff. But I especially love the blue-ish paneling that was used for the walls instead of drywall.


I then used two coats of Kilz primer and two coats of stark white semigloss paint.  I resecured several pieces of loose hardware and reinstalled the shelves.  Once the interior was complete, I painted the inside of the door with chalkboard paint.  What better place for a shopping list than the pantry itself?  The only thing I still need is the chalk tray Hubs said he would make me.

Here is pantry filled with all the things that had to live in tubs while waiting for me to get done with the panty.


I am in love all over again.  And what a transformation.  I am hoping that this is a sign of what great changes we can make to our new home.


Tip of the Project:  Goo Gone is great for removing sticky residue from surfaces.