Showing posts with label Furniture. Show all posts

Thursday, September 20, 2012

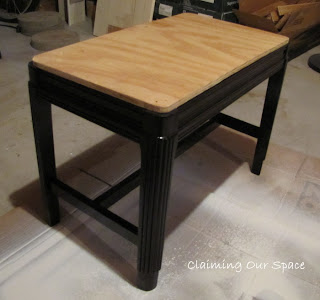
From Grandma to Gorgeous - An Endtable Update

This post was originally posted on 4 You With Love.

Last winter D's grandmother passed away and her apartment at the assisted living facility needed to be cleaned out and everything put into storage.  However, there were some pieces that weren't going to fit into the storage unit and my mother-in-law was going to donate them to Goodwill.


Not wanting to pass up free furniture and wanting D to have some of his grandmother's things in our home, I loaded them into Donnie Durango (yes, I have named my vehicle) and brought them home.  This is one of the end tables. 


Over Labor Day weekend, I was finally able to get around to updating this lovely lady of an end table.  I hate to say it but it does look a bit like a piece of furniture a grandmother would own.  The medium brown stain, the very traditional shape, the doors style...yup, a piece from Grandma.  But as we have seen a million times, a traditional shape with an updated paint job can equal a beautiful piece to be treasured.

First up was a good cleaning.  I wiped her down with a damp rag and then let dry while I got my sanding stuff together.

The top, which was a solid piece of wood got sanded to bare wood.  Thank goodness for my orbital sander.  I used 80 grit first, followed by 120 grit.  A sanding blog took care of the curvy edges.

A wipe down with a microfiber cloth and another with a damp cloth to prep the wood for stain and I was ready to go.  Three coats of water-based espresso stain later, I had a gorgeous deep and dark top.  A couple of coats of clear paste wax and this part was done.  I love the sheen from the wax.  I was surprised how much I love it versus the usual poly I usually use.

 
Once that was done, it was onto the base.  Since I didn't want to sand the whole thing - chalk paint it was the obvious choice.  I was so happy with how my last chalk paint project turned out so I used the same recipe I used before that I found on Elizabeth & Co.  Using leftover light greige paint from the living room, some dark grey oops paint and white flat paint, I created a barely greige color that looked great with the top. 

2 coats of paint, a light sand to smooth the paint out, some light distressing and a coat of the clear paste wax and I was done!

What do you think?


I think she turned out lovely.

Best part, Since I was able to use stain and paints I already had and I was able to use the knobs that were originally on the end table so my cost of this project was $0.00. Can I hear a wahoo?


She looks great in the space and best part, other than the price, is that I am already using the cubby in the middle to store some of the Christmas presents I have already purchased.


Marilyn, thank you so much for letting me share this project with your readers!

And for those that made it all the way to the end of my post, be sure to head over to Claiming Our Space to check out Marilyn's stool project and maybe stay a while to see what we are up too. I would love to have you as a follower.

K


Thursday, July 19, 2012

Dabbling In Upholstery


I am so excited! I am signed up for an upholstery class next month!  

Last fall I bought a Groupon for half off an upholstery class at a local interior design/custom upholstery shop called Something to Talk About Interiors. Score!!

It took me a while to find the chair but as fate would have it, my firm was doing an update on their furniture and I was able to purchase 2 matching side chairs for $25 each. Love it! I did some checking and turns out these are Steelcase chairs, made in Italy. [No, they are not fra-gi-le. Props if you recognize that Christmas Story reference]. I know I got a total deal.

Took even longer to find the perfect fabric. I knew in my head what I wanted but finding it seemed to take forever. I wanted a floral but not anything stuffy. Something a bit bold but not too graphic since the living room is a bit more formal. It needed to have the right colors, which was the hardest part.  I finally found the perfect fabric at Joann.  Even better, I had a coupon for 50% off.

I will keep you posted on how the class goes. Hopefully I will be able to take some pictures and I won't staple my finger!

Sunday, July 15, 2012

$1 Garage Sale Bench Revamp

I like to call this project my $1 garage sale bench revamp. Yup, I got a small wood bench for $1 at a garage sale the first summer we lived in our house. Score!

There was a reason she was only $1.  (Yes, this bench is a she. Something about the legs to me says "classy lady.")


Imagine hideous disintegrating green boucle fabric, wood that was stained a horrible shade of cherry and, even better, turquoise paint splatters.  Basically she was a DIYers dream:  lots of potential and a dirt cheap price.  Am I right?

Of course, you will notice I said you would need to "imagine" her in all the bad fabric, ugly stain and paint splattered glory because, after almost 3 years, I can't find any before photos.  I was totally convinced I knew where those photos were on my computer but, after almost an hour of searching, and muttering things like "Oh, I know where it must be" and "what was I thinking, it must be in this folder" out loud to myself, I was totally wrong.

Hopefully the after will make up for it!

Here she is in her new and improved - never to be stuck in the basement for three years again - glory!


First, she got good sanding and then a restain using the same espresso stain I used for my CL couch table revamp

A couple coats of poly and a new seat base and I was ready for the next step.


Next up, new foam and batting.


Finally, I covered her with new and fabulous fabric.

And I was done.


Doesn't she look lovely?


I love that I can use it as either extra seating or, if used with a tray, as a coffee table.  Don't you love things that can be dual purpose? Me too.

Of course now I need to do a tray makeover to coordinate with the fabric.  Of course, I am so upset that I have another project! :-) 

Slowly but surely the living room is starting to come together.  The marble coffee table got a repaint, the DIY chalk paint table is done and now the bench/table is complete. At this rate, it will only be another 3 years until the living room is done!

Total cost of the project:
$ 1.00 Bench
$ 0.00 Stain - already had
$ 0.00 batting - already had
$ 8.00 2" foam - purchased at Joann's with a coupon
$ 7.00 fabric  - purchased at Joann's from the remnant section (The entire piece was about $15.00 but I used less than half)
$16.00 Total - Not too shabby!

Check out the places I party.

Sunday, April 11, 2010

Marble Coffee Table Revealed

Remember this table?  I gave you all a sneak peak way back in January.


I first spied this lovely piece while out with an old friend and fell in love.  While the color was all wrong, the grey and white marble top is fabulous.  While I would have purchased it on the spot, I wanted to make sure that Hubs was on the same page with my vision for both the table and the color scheme for the living room redo.  Lucky for me, Hubs saw the potential and $55 later, it was headed home with us.

Now that the weather has warmed up enough so I don't see my breath while working in the garage and paint doesn't take days to dry, here it is in all its repainted glory.

 
SOOOO much better, right?  I absolutely love it. 

And that elephant I referred to in the original post? The name of the paint color is Elephant Skin by Behr in their primer + paint line. It is a fabulous color. It is a dark grey with just a hint of tan. I am already trying to figure out other places to use it in the room.


Redone, the table looks fabulous in the room, especially with the new wall color (a post on the trials and tribulations of the repainting coming soon.)


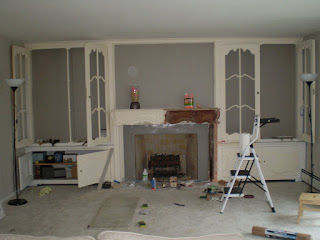
And no, our living room is not usually this crammed together on one side of the room.  I am still working on the other side of the room.  It is pretty bad. But I am trying to work on it bit by bit. 


So until this is done, our living room furniture will be crammed on the other side of the room. 

And there are a couple of upcoming projects in the pic of the living room furniture.  Keep checking in to see what they might be. 

Cost Breakdown:
$55 Cost of table
$  5 One can Kilz spray Primer
$  6 1/3 of a quart of Behr Elephant Skin in semi-gloss
$66 Total Cost

Saturday, April 10, 2010

Boys' Room Dresser Makeover - Before & After


During the makeover of the boys' room, we realized that we needed a dresser.  Something that could fit in with the surf/beach theme they wanted for the room. 

When I found this dresser on Craiglist for $30, I knew it would be the perfect piece.  It is not a factory-made piece but instead was handcrafted from what looks like high grade 2x4s and has hand carved wooden handles.  It weighs a ton and is one of the sturdiest pieces of furniture I have come across.  Unfortunately, it was also ugly as all get out. 


Luckily, the ugly was easily covered up with primer and paint. 

The best part?  I already had the paint I needed in my ever expanding garage "paint store."  With the grey paint I planned on using (found on the "oops table" at Home Depot for a steal) matching the bedding I was making for the boys' beds exactly.  What a wonderful bit of coincidence.  So other than three cans of spray primer I had to purchase, my finishing costs were minimal.

The dresser fits perfectly in the space in the corner of the room and the deep drawers fit a surprising amount of clothing.  Even better, the boys think it is cool that they have a "custom finished" piece of furniture made over just for them.  Glad my "clients" are happy with the finished project. 


Cost Breakdown
$30  Dresser (from our local Craiglist)
$  5 White Paint (1/4 gallon of semi gloss)
$  1 Grey paint (1/4 gallon of flat enamel from the Oops table)
$15 three cans of Kilz spray primer
$51 Total Project Cost

Tuesday, January 26, 2010

Elbow Grease + a Coat of Paint = A New Nightstand

Have I told you lately how much I love Craigslist? OK, maybe I have.  But it is true.  And pieces like this are the reason.

This is not a good before pic.  
I apparently forgot to take a pic of the end table in all its dinged wood and formica topped glory.

This little table was $7.  It is solid wood but very very dinged up.  As an added bonus the top is formica.  Not exactly a decorators dream piece.

But as I have learned, a lot of elbow grease (sanding and more sanding) and a coat of paint (well, several coats) will result in something that looks entirely different.  Especially when the piece has nice lines and good storage space.


How did I transform the piece? 

Step one:  Sand, sand, sand.  Then sand some more, especially the formica top. You need to give the primer something to "grab" onto. 

Step two:  Wipe with microfiber cloth or other lint free cloth to remove all the dust created by sanding.

Step three:  Prime.  I used Kilz oil based primer (the smelly version since I was working in the garage).

Step four:  Let it dry, overnight.

Step five:  Tape off the base and the edges of the two layers.  (I painted the flat surfaces in a glossy finish and the sides and legs in a flat finish.) Spray glossy paint, in thin layers, letting dry completely between layers.  Once you have the coverage you like, let dry for at least 24 hours.


Step six:  Mask off glossy surfaces with newspaper and painters tape.  Spray flat paint, in thin layers, letting dry completely between layers.  Once you have the coverage you like, let dry for at least 24 hours.

Step seven:  Remove tape and place in intended location.  In our case, this was our front bedroom.


Here's wishing you luck (and strong forearms for the sanding) on your revamp projects.


Cost of the Project:
$ 7.00 Cost of end table
   5.00 Can Kilz Primer
   2.00 1/2 Can Glossy White Spray Paint
   2.00 1/2 Can Flat White Spray Paint
   2.00 Most of a roll painters tape (you can see in the pic above why I ended up using so much tape)
$18.00 Total Cost

I am linking this project to
the Power of Paint Party. 


The Penny Pinching Party at The Thrifty Home


http://www.thethriftyhome.com

Monday, January 25, 2010

Not Bad for a Free Table - A Couch Table Revamp


Remember the redo of the computer desk?  Well, at the same time I picked up that lovely piece, the seller gave me this couch table for free, along with another end table that hasn't yet been revealed.


So not our style.  The color is all wrong.  We are not yellow-y orange-y oak people.  We are dark espresso stain people.   However, I thought the table had potential (plus it was my favorite price - free!).  The lines are clean and with a darker stain, would fit in nicely with our plan for the downstairs guest room. 

With a complete sanding, the piece was prepped for stain.  Sorry no picture of the sanded piece, I need to be better about taking "during" pics.

After not finding an actual espresso stain at either Home Depot or Lowes, I headed to the local woodworking store for a pint can of water-based espresso stain.

It took three coats of the stain to get the table dark enough to match other pieces in the house that I wanted to coordinate this one with.  After another three  coats of water based poly and 24 hours to dry, we have a great piece for the guest room.


I like that the space under the table gives a spot for a guest's suitcase and the table itself gives them a place to put out a few of their things.

Now we just need to get the rest of the room done.

Cost of the Project:
$ 0.00 Table - Free from Craigslist Seller
   2.00 Espresso Stain  (Used only a small part of the $10.00 can)
   4.00 Water-based Poly (Used only a small part of the $16.00 can)
   5.00 Two sanding blocks (can be resed on another project)
$11.00 Total Cost

Tuesday, January 19, 2010

IKEA Table of a Different Color


After our center bedroom was complete, I realized that we needed another bedside table.  Since we are on a budget, the first place I checked was Craigslist.  However, apparently, the end table/night stand/bedside table is a hot commodity in our area since my searching over several weeks was unfruitful.

My next low cost option?  IKEA.  (Boy do I love that store!)

With the geometric shape theme we have going on in the room, I thought that the round shape of the Noresund table would work quite nicely.


However, the black is all wrong.  It is too dark for the room.

Solution:  Spray Paint!!  Our favorite brand Rust-Oleum in particular. 

I decided to go with a two-tone look.  White glossy for the flat surfaces and navy glossy for the legs.  That color combo ties in with the bedding with the white, blue and green.  To be honest, I would have loved to do a green leg but I couldn't find the right color green in a glossy spray can. However, now that it is in place, I love the navy. It stands out so nicely against the green walls. 


Project Cost:
$20.00 Noresund table
    3.50 1 Can White Gloss Spray Paint
    1.75 1/2 Can Navy Gloss Spray Paint
$25.25 TOTAL COST

I am linking this to the Domestically Speaking Power of Paint Party.  Come join in the fun.


Wednesday, December 23, 2009

A Desk for the Kid's Computer - Another Craigslist Find


A short time after we moved in, we realized that with all our extra space, we needed quite a bit more furniture. One piece that we needed was a desk for the extra computer that the kids will use for their games to be placed in the basment rec room which also houses the television.

I searched my local Craigslist for an inexpensive desk and found just what I needed for $15.  She wasn't pretty, but she was just what we needed for the space.  And the seller even threw in a couch table and a glass topped end table for free.  Watch for redos of those pieces in the future.


It is amazing what a good sanding, my favorite oil based primer Kilz and a can of paint will do to dress up a piece of furniture.

The hardware which I thought was a lost cause, cleaned up quite nicely with Brasso and a lot of elbow grease.  While I wouldn't normally put brass hardware back on a piece of furniture, since I don't like brass, the basement has golden walls and carpet so the hardware just seems to work. 


I love the rope detail on the edge of the desk.

The total cost for the piece was less than $30.00.
$ 15.00 for the desk
     0.00 for the brown paint (I used paint left over from our previous home)
     2.50 for the part of the gallon of Kilz
     2.50 for a 1/2 can of poly spray to protect the surfaces
     1.00  for the amount of Brasso used to clean the hardware
     7.00 for the brush I didn't clean well enough where the bristles turned hard as a rock (figured that it should be counted in the cost of the project). 
$28.00 Total Cost for the desk redo

I think it looks quite nice in its new home.


Please note:  The chair next to the desk is NOT the chair that will ultimately be used with the desk.  That chair is in my garage waiting to be repainted the same brown and recovered with a coordinating fabric.  The chair pictured next to the desk is Hubs' old office chair.  Lovely isn't it?

I am linking this post to The DIY Show Off:  Fabulous Furniture Show & Tell.  Check to see what others have linked up. 

Thursday, December 17, 2009

My "Free" Stool - A Quick and Easy Revamp

One of the items the sellers of our home left us is this stool. Isn't is lovely?


The one thing it had going for it was the hammered bronze finish on the metal.

So with a couple of spare hours (avoiding my really long to do list), I decided to do a quick redo. After removing the woven cover, which took longer than I thought since I had to remove several dozen staples and about a hundred little nails since each strip was held in place by a small nail on either end.


 Looks like the stool was originally $99.00 purchased for $39.99


Check out all the nail holes.  Each one is a nail I had to remove.  Boy was my hand tired.

I added two layers of batting for a bit more comfort for the tushy and a layer of upholstery fabric.


The result, I had what looks like a whole new stool.


Please disregard the gross carpet.  We hope to replace the flooring after in the new year.

Project Cost:
$0.00 stool
  0.00 fabric leftovers from the $5 chair project
  0.00 batting leftovers from the $5 chair project and other crafty crafts
$0.00 Total cost (my favorite price!)

Added bonus, we now have another seat in the living room for our big Christmas Eve party which means one less person will have to sit on the floor.

I have included this stool in The DIY Show Off Surpirse Party hightlighting Home Accents.  Want inspiration?  Make sure to visit the site.


Friday, September 18, 2009

Redone Bedroom Chair a.k.a. That Place We Will Throw Our Clothes


Every bedroom needs a chair.  For sitting and putting on, and taking off, shoes.  For a quick read of a magazine.  Or for their actual purpose (you know what I am talking about) to be that thing you throw your pants on at the end of the day.

I went right to Craigslist to find a chair since we haven't made a final decision on a new bedroom set and I didn't want to spend too much. 

And Craigslist came through with this beauty for a whopping $5.


I liked the lines and the previous owner had stripped/sanded most of the finish and/or paint off so the prep work was quick and easy.  Just a it more sanding was needed.

Priming was done with that fabulous primer in a can, Kilz Odorless Oil-Based Primer.  This has been recommended by many a blogger.  I can add my own plug to the list.  The spray can application makes it a breeze.  My only problem was that since the wood was so old and dry, I needed two cans of primer to get good coverage.  Once primed, I let it dry overnight and then gave the chair a quick sand in several places that felt a bit rough. 

Then it was onto painting.  I had a quart of Benjamin Moore Midberry Brown left from painting the cabinets in the bathroom of our old home.  I love the color.  It reminds me of a rich extra chocolatey mocha coffee drink.  (mmmm, chocolate).  Here is the chair painted and waiting for the glossy finish to dry.


The next step was recovering the very "attractive" leather seat.  Two layers of batting and a brown, cream and green patterned fabric later, the seat looks brand new.


Put them together and what do you have?  A fabulous chair for our bedroom. 


And with the colors I chose in the fabric, if we go in another direction I can move the chair to the green bedroom or even the office.

Tip of the Project:  Let the paint dry overnight before spraying with the final clearcoat.  Then let the clearcoat dry overnight before securing the seat to the frame.