Friday, October 30, 2009

A Thank You to Hirondelle Rustique for an Award

For giving us the Honest Scrap award.  Make sure to check out her blog and her fab living room redo.  It looks like something out of a magazine. 


We are especially honored since this little house blog of ours hasn't been around for very long.  Though we anticipate it having a long life since we have many many projects planned.

Now, there are rules with this award.  We need to pass it on.  So here it goes.

1) Say thanks and give a link to the presenter of the award.

2) Share “10 Honest Things” about myself and the hubs.

3) Present this award to 7 others whose blogs we find brilliant in content and/or design, or those who have encouraged me.

4) Tell those 7 people they’ve been awarded HONEST SCRAP and inform them of these guidelines in receiving.

Here is goes.
My 5 Honest Things.
1.  I am a picky eater.  It is easier for me to list the things I do like than it is for me to list the things I don't like. 

2.  I am surprised to learn I like using power tools. 

3.  I hate talking on the telephone for long periods of time.

4.  I am a better baker than I am a cook.  I like the precise nature of baking.

5.  I am self concious about my big feet.

Hubs 5 Honest Things
1.  I have been over 150 feet below the surface of the ocean.

2.  I have driven a dodge Viper at over 170 mph

3.  I speak 3 languages.

4.  I have set foot in 46 of the lower 48 states.

5.  Despite all this I have never been featured in a Dos Equis ad.  :-)

And the 7 blogs that have encouraged us, we enjoy reading and/or just find brilliant.

1.  Sarah from The Gallaghers
2.  Johnny from 15 Minute Lunch
3.  Whitney and Ashley from  Shanty2Chic
4.  Kelly from The Sunset House
5.  Kay from Dutch Girl Cooking
6.  Mrs. Limestone from A Brooklyn Limestone in Progress
7.  Lolly from Lollychops

We can't wait to see what comes next from these and the other bloggers we follow.

Wednesday, October 28, 2009

Cleaning Up The Yard - Stage One


One of the first projects we have undertaken is cleaning up the front yard. (My dad is so happy about this. He loves his lawn care!)

First, we removed two juniper shrubs right next to the front door that smelled like cat urine. You see, when we moved in there was a lingering odor of cat. We thought it because the house had been closed up for a month and leftover smell from the seller's cat. However, after cleaning all the carpets (twice), mopping all the hard surfaces (twice) and checking the house with a black light for any possible areas needing treatment, it still smelled strongly of cat pee around the front of the house. We just couldn't figure it out. Turns out the culprit was those pretty little juniper bushes. Apparently a strong smell is very common with junipers. As much as we loved the formal look and clean lines of the shrubs, we hated the odor and the fact it always smelled like a stinky litter box in the front of our house. So they had to go. But we did Freecycle (http://www.freecycle.org/) them so that someone with a less sensitive nose could enjoy them.

Second, we mowed the grass. After finding a great deal on a self-propelled mower on our local Craigslist site (http://www.craigslist.org/) to replace the old fashioned push mower we used in our tiny city yard, I am sure the neighbors were so excited to see me out there cutting a swath through the tall grass. Just the clippings from the front yard filled the yard waste can to overflowing, just to give you an idea of how long it was.  We also rented an edger to clean up the lawn along the driveway, sidewalk and road.  I was surprised at how much the lawn had encroached on the pavement in several places.

Third, I trimmed the dead stems off the dozens and dozens of hostas in the front. Time consuming but I think it looks more tidy.

Finally, we trimmed the lower branches off of the pine trees in the front. We are still unsure of the exact species of our four pines, or maybe they are spruce since the needles on some of the branches have a distinct bluish hue and they are very sharp, but they are definitely unique looking with their drooping branches. Almost like the tree itself is melting. Apparently one of the drawbacks of this type of conifer is that it likes the sun. Sadly, three of the four are shaded by large oak trees so have many dead branches. So, I got up on the ladder and, using our reciprocating saw along with my brother's loppers, cut off several dozen branches. We think that it definitely lightens up the look of the front of the house now that those dead branches have been removed. Additionally, more light reaches the ground allowing us to plant some annuals next year to add some color to the front.

With the changing season, you will have to wait until spring to see what else we have in store for the exterior of our home.

Tip of the Project: If you get pine sap on your skin, use Pam or cooking oil to remove it. Apply to the skin and rub until the sap is loosened. After the sap is loose, wash with warm soap and water.

Monday, October 26, 2009

We Actually Have a Basement Rec Room!

When we moved in, all the boxes that we didn't know what to do with ended up in the basement family room.  As a result, the space looked like this. 


Not good.  It was a maze to walk to make one's way through the boxes to the work room where our tools,  paint and hardware are stored. 

With our Housewarming coming up in less than 2 weeks, something needed to be done to organize the basement.   (Personally, I find nothing spurs deep cleaning and major organizing like knowing 30 people are coming over for a party.) 

After spending over 6 hours in the basement, going through boxes, repacking things into tubs, organizing the shelves and putting together one of our bookcases to hold some of our many books, I ended up with this.


(Those last few boxes at the back will be brought upstairs as soon as the office and dining rooms are finished)
A pretty big difference, don't you agree.  It's as if we actually have a basement family room.  Now all we need to do is figure out what furniture to put in the room.  But that is a post for another day since we have no idea what we are actually going to do down here yet.

And in case you were wondering where all the boxes went, they ended up here

and here

and here. 

Even better, I have a couple of heavy duty wire shelving units I haven't put together yet.  So there is more basement organization to come in the work shop area.

Saturday, October 24, 2009

Room Preview - Dining Room

So far we don't have a single completed room.  However, we have gotten key elements completed in several rooms.

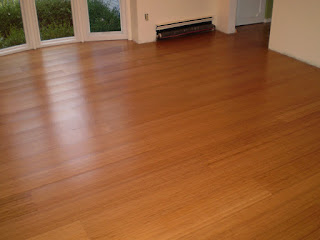
Here is a sneak peek at the new flooring in our dining room finished just a few days ago.

Before: (34 year-old stained and dirty sculpted shag carpet)


After: (beautiful caramel colored engineered bamboo flooring)


 Look for more room previews to come as we finish different elements of the rooms.

Thursday, October 22, 2009

My Buddy - The Dremel (A Tool Review)


Photo compliments of Dremel website


The Dremel or as I like to call it, “My Buddy.” If you are old enough to remember there was once a toy called My Buddy. The tag line in the ad was: “where ever I go, he’s gonna go.” Well, my Dremel tool follows me on every project. The two things that stand out most about this tool are: 1. its versatility and 2. how did I ever get along without it?

When looking at the Dremels, I wanted a cordless model, so I opted for the 10.8v 8000 model. There are two other cordless models that are smaller and less powerful. Tim Taylor would not approve of those. But to be honest, for me, the big draw on the more expensive 10.8v over the 7.2v 7700 model was the variable speed. The 7.2v comes with only two speed settings. My 10.8v comes with a speed dial that allows for about 200 speed settings anywhere from 5,000-35,000 rpm. It is small and easy to control at about 10 inches long and less than 12 ounces. This made the 10.8v the easy choice for me. The catalog says this tool has over 150 different attachments. A quick trip to the hardware store will show you that it actually has more than that. The manual has a very handy guide to show you approximate speed settings for the various attachments on different types of material. This gets you started in the right ball park and then just spin the speed wheel with your thumb for more or less speed to get just the right effect.

All the attachments connect to the Dremel tool just like drill bits to a drill. There is a handy lock button near the chuck and the kit comes with a little chuck wrench as well. If you lose it an open end or small adjustable wrench will work just fine too. The case it comes in is a great place to keep the tool, charger and manual. I suggest getting a tackle box or something similar to keep all the little bits and wheels in. The case doesn’t keep them secure and just walking around the house with it can break some of the grinding discs, plus when the small sanding wheels get in the pocket for the manual it can be difficult to get them out. The battery has a pretty good life when used on slower speed settings and it recharges in less than an hour. There is a battery life meter on the tool itself so you know before you start a project if the battery is low.

I have used my Dremel on all kinds of stuff around the house. Sanding, cutting, polishing and more, on many different materials, including wood, metal, plastic, even grout and concrete. I am constantly amazed at how well it works. For example: I have used a copper wheel to remove black baked on crud from my enamel painted cook top grates; the sanding wheels to help my wood flooring fit just right; cutting discs because various bolts were too long. The tungsten cutting tip rips through plastic and grout with ease. The drywall bit works almost too well. I would recommend using a guide with the drywall bit if you want a straight cut as the slightest side pressure will put send you off course.

All in all, this tool has been a great help to my various projects around the house. We have only scratched the surface on what the Dremel is capable of but the most common use is when something almost fits. I just grab my Dremel, pop in the right bit and a few moments later whatever I am working on fits like a glove. I love the having the confidence to take on projects that I might not get quite right with the first try because I know if I am a little off the Dremel can get me back on target. This amazing little tool helps any amateur, like me, have results like a pro. There are many more attachments and uses for “My Buddy” and I am confident when we get into the bathroom remodel this guy will get a work out. In my opinion this tool is worth at least twice the price. (shh, don’t tell Dremel)

One final note, the wife was unfamiliar with most power tools, except for the battery powered screwdriver used to put together various pieces of furniture. The Dremel is the perfect gateway tool. Once she became familiar with its use and realized how versatile it was, she started using it as much as I did. And she has since moved onto the jig saw, the reciprocating saw and the table saw with her sights set on learning how to use the circular saw. [I have a wife that uses power tools…I am so excited.]

Thursday, October 15, 2009

Project Sneek Peeks

I thought that you might want to see a preview of some of our upcoming DIY projects. 

We have the start of a bulletin board utilizing a rummage sale frame.


A Craigslist buffet getting a new look through color.


A garage sale reading lamp revamp.


Look for posts on these and a few other projects we have in our tool belts to come soon.

Sunday, October 11, 2009

The Perfect Grill!


(the big reveal of the actual grill coming later in the post)

One of our first purchases after we moved in, before any power tools, before any new flooring or paint, was a grill.  Now to some, that may sound a bit nutty, especially if you have seen the listing photos of the house.  I mean, we have LOTS of work to do. 

However, we love to grill.  Or rather the hubs loves to grill.  Personally, I am a relative grilling novice with only a few successfully grilled chicken breasts and brats under my belt.  But back to hubs; in our old house, we had a hard line gas grill so were able to grill year round.  After each snow storm, hubs would shovel a path to the grill...just in case there was a grill emergency and he needed to cook up a steak or brat right away. 

So getting a good grill was essential.  It needed to have lots of grilling space, be somewhat portable (so we can move it to the deck off the kitchen for winter grilling), easy to use and not too expensive. 

We found this beauty at Lowes.   The Char-Griller Duo Gas and Charcoal Grill.  For a mere $299.00, this grilling machine was ours.


It has two full sized grills together on the same frame, one (on the right) for propane and one (on the left) for charcoal.  And there is even a side burner that can be used to heat whatever.   It even has an automatic lighter for the propane burners.  Turn on the burner, click the button and you have flame.  Very nice. 

I think it is pretty amazing.  So does hubs.  We have used it with great success since we got it.  The latest success (Seasoned Steak Perfection) can be found in our other blog http://aboutabitofeverything.blogspot.com/

Related to the nuts and bolts (no pun intended). We were able to turn the box containing the pieces


to a fully functioning grill in about 2 hours.  We were pleasantly surprised at how clearly the instructions were written.   Apparently whoever wrote them had actually seen and put one of these grills together. 

Let me know if you have any other questions related to the grill and I (or the hubs) will answer them the best we can. 

Saturday, October 3, 2009

Fall Front Door and Entry Decor

With the arrival of Fall, I wanted to add some of the season to our entry way.  


I purchased the yellow mums from Costco (2@$15/ea), the scarecrows from Joann's Fabrics (2@$5/ea) and the parts for a pumpkin wreath at Hobby Lobby ($20).  For about $60 we have a colorful and welcoming entry for our guests.  Of course, closer to Halloween we will be carving pumpkins for the front steps. 


The wreath was a fun project to make and was very easy to complete.  I think it took me about 20 minutes.   The idea for the wreath from Better Homes & Gardens (http://www.bhg.com/).  All you need are a grapevine wreath, some plastic mini-pumpkins, ribbon and a hot glue gun.

Apply the hot glue to the bottom of the pumpkin and place on the wreath.  Press down and hold for several seconds to ensure that the glue makes contact with the vines.  Continue adding pumpkins until the front of the wreath is covered.  Leave a small space for the ribbon and bow at the top of the wreath.  Once the glue has hardened completely (just a couple of minutes) tie on your ribbon to create the bow.  You are now ready to hang on your front door. 

Welcome Fall!!