Monday, December 1, 2014

Low/No Sew Reindeer Pillow {DIY Project}

Pinterest is, as you all know, an amazing amazing place filled with cool stuff.  It is also a great place to get inspired.  I love looking for possible things I can recreate in an easier way or with my own twist.

This beautiful pillow from Dear Lillie is exactly the type of thing I am looking for.

You see, I love the pillow but don't have a screen printer, or know anyone with a screen printer and I am in no way talented enough to paint it on a piece of fabric.  So what is a girl to do?

I have three words for you! Felt and Drop Cloth! 

With those 2 things and a reindeer silhouette, like this one it is easy to make a pillow.

Here is the result.  I made two so they could jump toward each other.


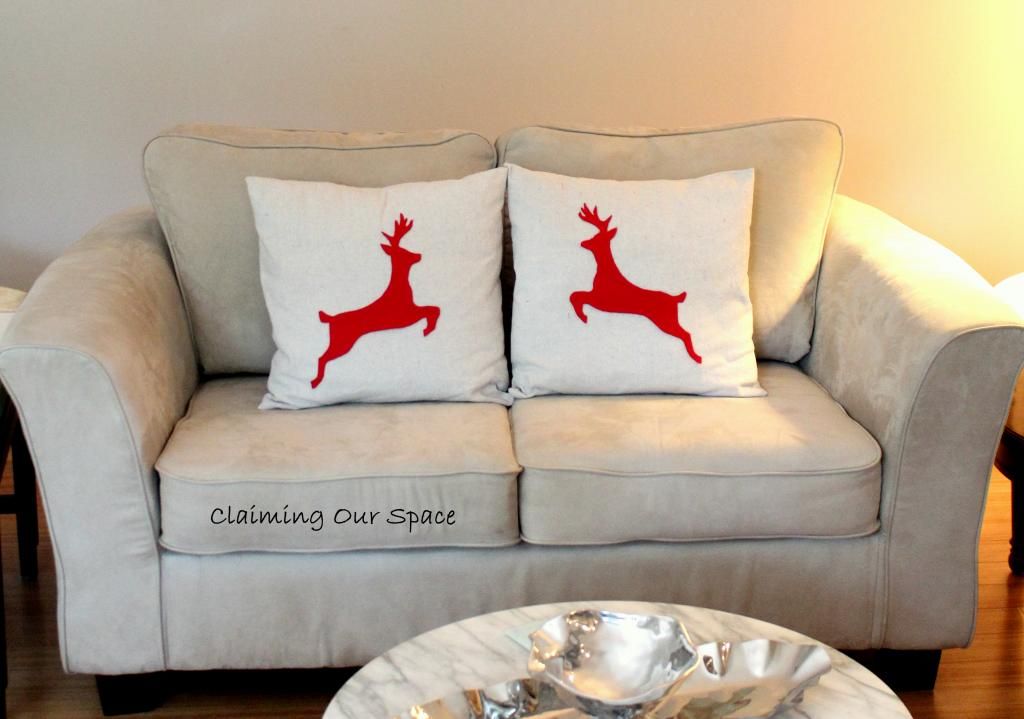
I think they look great, don't you?

Want to make one or two or three for yourself? Here's how.

Materials
  • Reindeer silhouette printed on a sheet of 11x14 paper (I used Google images to find one that looked good to me)
  • Scissors
  • Fabric glue
  • Laundered drop cloth
  • Felt (I used red)
  • Straight pins
  • Pillow Insert (mine was 18x18)
  • If you want to sew, a sewing machine (If you don't, heat-n-bond)
Directions
  • Cut out your paper silhouette
  • Pin silhouette to your felt (you can also use double stick tape)
  • Cut out your reindeer
  • Make yourself an envelope pillow (I used this tutorial from Teal and Lime, though I cut my fabric 17.5x42) using  the drop cloth as your fabric
  • Insert your pillow into into the cover
  • Lay your reindeer on pillow positioning it exactly as you you wish
  • Pin felt reindeer to pillow by inserting the pin trough the felt into the pillow
  • Using the fabric glue, glue the reindeer to the pillow
  • Done!!

Yes, it is that easy!  I am pretty sure that cutting out the reindeer was the lengthiest part.

I think it is a great addition to our holiday decorations.

One quick note, if you live near an IKEA, you can skip the whole make a pillow cover part and pick one up for cheap there, like this one.
  

Monday, September 1, 2014

Parmesan Sage Pork Chops {Recipe}


Another part of our eating local, knowing where our food comes from, getting away from factory farm meats is buying our pork from a local farmer.  In February, D and I bought a whole pig we named Wilbur 2. Not to keep at out house but to keep in our freezer so we would have tasty pork for the rest of the year.  Wilbur joins Ferdinand 2, the 1/4 steer, who also lives in the freezer.  (We had previously bought a pig and steer so that is why they have the 2 after their names.)

We like that we supported both a local farmer, the same folks who run the CSA that we have taken part in in the past, and we know how the animals were cared for.  We also have a great local butcher who processes the meat and makes the best bacon and brats ever.  Seriously, we can't eat regular store bacon after eating Wilbur bacon - it is that good.  Don't worry, I will have some bacon-y recipes coming soon but today it is about the chop...the pork chop.

Growing up my family never had pork chops for dinner. We were more of a beef, chicken and fish family.  So I always wondered what my friends were talking about when they said it was "pork chop night." When I got older, I tried making pork chops and always ended up with something tough and dry. I think shoe leather may have a similar texture. 

D has shown me that this isn't the normal state for a pork chop.  That they can be juicy and delicious.  He finds the tastiest recipes.  This is one of them.  

Parmesan Sage Pork Chops
Source: Allrecipes.com

Ingredients

  • 2 tablespoons all-purpose flour
  • 1/4 teaspoon salt (we used a smoked salt - so good)
  • 1 pinch ground black pepper
  • 1 egg, lightly beaten
  • 3/4 cup bread crumbs
  • 1 teaspoon Italian Herb Seasoning blend
  • 1/2 cup grated Parmesan cheese
  • 1 1/2 teaspoons powdered sage
  • 2 boneless pork chops
  • 1 tablespoon olive oil
  • 1 tablespoon butter
Directions
  • Preheat oven to 425 degrees F.
  • Spray a square baking pan large enough to fit pork chops without touching.
  • Combine flour, salt, and ground pepper in a shallow dish.
  • Combine bread crumbs, Italian herb blend, Parmesan cheese, and sage in a 2nd shallow dish - a pie pan works great for for the shallow bowls
  • Place beaten egg into a 3rd shallow bowl. 
  • Heat skillet over medium heat with butter and olive oil 
  • Rinse and dry pork chops.
  • Gently press pork into flour mixture to completely coat, shaking off any excess flour.
  • Dip into beaten egg, making sure to coat entirely.
  • Press one side firmly into bread crumbs. Repeat on opposite side.
  • Gently shake chop to remove any lose bread crumbs.
  • Place breaded pork chops in skillet.
  • Brown pork chops about 4 minutes on each side, then transfer to the baking dish.
  • Bake in preheated oven for approximately 10 to 15 minutes(or until juices run clear and a meat thermometer inserted into the middle of pork reads 160 degrees). 
  • Let sit for a few minutes before serving. 

Wednesday, August 27, 2014

Willow & Cricket Wednesday - 8/27


Tuesday, August 26, 2014

What To Do Before Starting C25K


Before D and I started C25K, we did a few different things.

First, we talked to our doctors.  Before starting something strenuous like this, especially when you are overweight, it is always a good idea to make sure there are not any concerns that may impact you.  Both of us got the green light so we were onto our next To Do, good shoes.

Since I have been working on the "run only when chased" model of running for the last 10 years, I went to my local running store to get fitted for new shoes that would work best for my gait and weight.  I didn't want to start off with bad shoes that would result in injuries later.  If you aren't a runner but would like to start, I would suggest getting professionally fitted.  The guy who helped me looked at my shoes, had me walk and then jog a bit in the different shoes he suggested.  It was amazing how different they felt.

Another confession here, I was a little worried about the shoes since I didn't want anything crazy colored.  Have you been in a sports store lately?  The display looks like rainbow blew up.

Source
Thankfully the pair that worked best for me is much more bland.  I mean, no one wants to see size 10 wide hot pink shoes coming at them.

Here are my new skips.  They are the Brooks Ghost 7.  I love them.  They are light and have a lot of support.  Perfect for someone just getting back into running.

So shoes in hand, it was onto my next To Do.  Good bras.  I had been getting by with so called high impact ones from Target. But now that I was going to be running, they just weren't going to cut it.  Even with doubling up, there was still a lot of locomotion, if you know what I mean.

I got a bunch of recommendations from various community boards and ordered 3 different sports bras for large breasted women that had good reviews from both the community boards and Amazon.  The Enelle, which looks a bit like a breast plate and two from Glamorise, the No Bounce and the Sport Double Layer.  The Galmorise both worked out best.  So they are keepers.  I took the Sport Double Layer out for a test run for Week 1, Day 2 yesterday and it was glorious how little movement there was.

So now I have the shoes and the bras so there is no more excuse for not getting out there.

Source
There was one final To Do - downloading the free C25K app onto my phone.  It is available on both Android and Apple.  This is a great tool and keeps track of your time so you don't have to.  It notifies you with both a vibrate and a voice alert when your transitions are.  This is very helpful on the last running minute, which feels like a whole lot longer.  :)  It also works with your music apps.  Start your music first and then start the app, the voice alerts come on over the music so you don't miss them. 

Week 1 is now done, though I did repeat Week 1/Day 3 since my knee was quite sore and I couldn't do all the runs the first go round.  But tomorrow begins week 2.  Each session is 5 minute brisk walk to warm up, 90 seconds followed by 2 minutes walking (for 20 minutes), followed by 5 minutes of cool down walking.  It will be interesting how that extra 30 seconds will go. 

If anyone else has done C25K, I would love to hear from you about your experiences, successes, trials and tribulations.

Monday, August 25, 2014

Caprese Salad {Recipe}


One of the things that D and I are working toward is eating more foods that we know the source of.  Or foods we make from scratch. It is a bit more time consuming but we have found that the results are worth it.    

As we work toward that end, a couple of months ago, I bought a cheese making kit from Amazon.  This is the one - Mozzarella and Ricotta Cheese Making Kit.  $25 and it has enough rennet and salt and citric acid to make many many batches of mozzarella cheese (something like 40 batches).  And you can use the leftover whey to make ricotta cheese.  So it is like a double win.  It takes about 30 minutes, a gallon of milk and the stuff in the kit to make 3/4 of a lb of mozzarella cheese.  The instructions are very easy to follow and our first batch turned out to be amazingly tasty.  The only thing I would do differently is to get some food safe gloves since stretching the cheese when it is so hot is not entirely comfortable. 

The cheese was softer and smoother than the stuff you get in the store.  I added a bit of extra salt since I knew we would be using it for a Caprese Salad appetizer later that night.

Cheese making aside, this is one of the easiest appetizers ever and perfect for a summer evening on the patio.

Caprese Salad
Ingredients
  • Fresh Mozzarella Cheese
  • Fresh Tomatoes
  • Fresh Basil Paste (which is what you use when Meijer is totally sold out of fresh Basil and ends up being so good)
  • Olive Oil
  • Grey Finishing Sea Salt

Directions
  • Slice fresh mozzarella into thin slices about 1/4 inch thick
  • Spread a thin layer of basil paste onto each slice
  • Slice tomato the same thickness
  • Layer on a plate
  • Drizzle with olive oil
  • Sprinkle with finishing salt

You can serve with a basket of crostini or do as we did and skip those letting the tomato, basil and cheese flavors shine alone.  Don't skip the glass of wine, though.  :)

Friday, August 22, 2014

C25K. Here we come!

Source
Confession time here:  D and I are overweight.  Our BMIs put us in the obese category.  This is not at all a good thing.  So in 2014 we decided to do something about it.  I signed up for My Fitness Pal (MFP*) and started tracking everything I ate (that was an eye-opener and I quickly figured out why I was so heavy).  We got a food scale and started weighing all the foods we are eating. 

Up until now, we have mainly been watching what we eat and doing some exercising, mainly riding the exercise bike and walking.  This has been pretty successful and I am down almost 38 lbs from January. D is down about 30 lbs.  Woo hoo!  Seeing the scale slowly move downward has been a positive thing.

However, now it is time to step it up a notch and really get serious about the exercise thing.  So we have started Couch to 5K or C25K as it is often called.  It claims to get you ready to run a 5K in 9 weeks.  We will see if that actually happens.  I haven't run any real distance in almost 10 years.  So this is the first in a series to let you all know how it goes.

We do have an end goal to our training.  A Zombie Dash at the end of October.  We thought we would celebrate our 7th wedding anniversary by running from zombies.  (we are so romantic!)

I will be updating weekly on our progress.  So far week one has been a success, we have 2 runs under our belt with the third planned for Saturday.  Willow and Cricket join us and seem to love getting out and moving a little faster and further than our usual walks. 

In case you want to start your own C25K program.  I copied it from the Cool Runnings website

*If you are on MFP and want to be friends, send me an email.  I know the only way to be successful is to have support from people making the same weight loss journey.

Wednesday, August 20, 2014

Monday, August 18, 2014

Fresh Strawberry Pie {Recipe}


Making my Dad a strawberry pie for Father's Day is becoming a regular tradition.  Two years ago, I made him this baked strawberry pie.  Last year it was a strawberry meringue pie.  After getting one baked and one fresh, Dad said he like the fresh kind better.   I have to say, I agree.

So this year, the search was on to find another fresh strawberry pie.  Brown Eyed Baker to the rescue!  I have actually made this pie twice and the recipe below is with my minor modifications.  And since I am not great at making pie crusts, I just went with store bought and it was still delicious.  So if you are like me and have a tough time with pie crusts, don't feel bad about going with store bought.

The Father's Day Pie was a huge hit and according to my mother, he only let her have one piece.  Upon that news we made him another one for his birthday and he was so excited to see the candles in his birthday pie.

Fresh Strawberry Pie
Source:  Brown Eyed Baker

Ingredients:
1 frozen pie crust

For Filling:
4 pints (about 4 pounds) fresh strawberries, gently rinsed and dried, hulled
¾ cup granulated sugar
3 tablespoons cornstarch
3 teaspoons pectin for low-sugar recipes(make sure it says for low/no sugar on the container or box)
Pinch of salt
1 tablespoon lemon juice

Directions:
  • Prepare pie crust according to package instructions
To make the Filling
  • Select 6-7 ounces misshapen, underripe, or otherwise unattractive berries, halving those that are large.
  • In a food processor, puree the berries.
  • Whisk the sugar, cornstarch, Sure-Jell, and salt in a medium saucepan.
  • Stir in the berry puree, making sure to scrape the corners of the pan.
  • Cook over medium-high heat, stirring constantly with a heatproof rubber spatula, and bring to a full boil.
  • Boil, stirring consistently to prevent scorching, for 2 minutes to ensure that the cornstarch is fully cooked (mixture will appear light and frothy when it first reaches a boil, then will darken and thicken as it cooks).
  • Remove from heat.
  • Stir in lemon juice.
  • Let cool to room temperature.
  • Check the remaining berries and measure out 3 pounds of the reddest and prettiest ones; halving only extra-large berries.
  • Add the berries to the pot wit the the glaze and fold gently with a rubber spatula until the berries are evenly coated.
  • Pour the berries into the pie shell, piling into a mound.
  • Turn any cut sides face face down so all you see is the outsides of the berries.
  • Arrange the berries so that holes are filled and the mound looks attractive. 
  • Refrigerate pie until chilled, about 2 hours. 
  • Serve within 5 hours of chilling.

Saturday, August 16, 2014

Menu Plan - Week of August 17


This week's menu plan is a boring one.

A is leaving to go back to his mother's house.  We did lots of entertaining at the end of the week and over the weekend so will be subsisting on leftovers for most of the week.  But it will clean out the fridge and freezer!

Sunday:  Pool Party at my Aunt and Uncle's house

Monday:  Forage in the Fridge

Tuesday:  Forage in the Fridge

Wednesday:  Forage in the Fridge

Thursday:  BBQ Chicken, salad, quinoa/rice medley

Friday:  Pork Milanese, brown rice, salad

Saturday:  Forage in the Fridge

Friday, August 15, 2014

Our Backyard Update - New Entertaining Spaces {Before and After}


Last summer we decided that we needed a better back yard.  Not because it is small but because it wasn't very good for entertaining.  We had a patio and a deck but not space for both seating and dining and a grill.  After brainstorming for a bit, we came up with a plan.  The first part of the plan was to add more and better entertaining space.

First up, remove the rickety railing on the existing deck and replace it with something that was up to code (and wouldn't collapse if someone leaned on it).  Then, add a step up deck, or patio deck as I call it, to the other side of the patio.

Here are some old photos from when we moved in.  The railing on the deck is less than 3 feet high and moved when you leaned on it.  Not exactly conducive to feeling safe.  

Here is another view of the rickety railing.

And that little deck to the right of the photo was off our master bedroom.  It was only about 4 feet by 6 feet.  Not exactly a spot for doing anything but standing there.

Since these are pretty big projects and not something we wanted to tackle ourselves, we hired this out. I asked around at work and got a great recommendation from one of my colleagues.  Dave the Fireman.  He is a full time fireman who does work like this on the side.  We were so happy with the result.  We have referred him to several other people, who are also very happy with his work. I am so happy we found him!

First up, our new "step up deck" off our bedroom.  It is glorious! So much space! 

It runs right into our patio.  So nice!
 
Here is the new railing on the existing deck.

Here is a view of the the whole back of the house.

We have almost 65 feet x 12 feet of entertaining space.  When it was all done we weren't quite sure how we were going to fill it all up.  

But don't worry, we have managed to make some progress on that front.  I will be sharing some patio lights, a fountain, patio furniture and a dining space.

Wednesday, August 13, 2014

Willow & Cricket Wednesday - 8/13

I was playing around with my "Nifty Fifty" lens and got some good shots of our dynamic duo.


Monday, August 11, 2014

Fresh Strawberry Mini Muffins {Recipe}


Back in June, D and I went strawberry picking.  This is the 4th year we have picked at this farm and we now make it a priority to get there and pick a bunch of berries every Spring.  This year's haul was almost 20 lbs.  We would have picked more but our backs and knees just couldn't take it.  Next year we are bringing 2 gallon buckets to sit on like we saw some others doing.

If you follow us on Instagram, you may have seen this photo of the fields that we were picking at.  

 In addition to freezing a bunch for smoothies, I was perusing Pinterest to see what possible tasty treats we may need to make.  So many possibilities but in the end, I decided that these mini muffins were one of the delicious treats treats we needed to make.  Plus, doesn't everything taste better when it is mini? 

Fresh Strawberry Mini Muffins
Modified from Flavor Mosaic

Ingredients
    1 egg
    1 cup white sugar
    1/3 cup applesauce
    1/3 cup  skim milk
    1/2 teaspoon vanilla
    1 1/2 cups all-purpose flour
    1/2 teaspoon salt
    2 teaspoons baking powder
    3/4 cup fresh strawberries, chopped into small pieces
    2 tablespoons all-purpose flour

Direction
    Preheat oven to 350 degrees F.
    Spray muffin tins with baking spray.
    In a large mixing bowl, add the egg and sugar and mix on low until combined.
    Add in vegetable oil, milk, vanilla, continue mixing on low.
    Mix 1-1/2 cups flour, salt and baking powder in a bowl.
    Slowly add to liquid mixture until combined.
    In a small bowl, toss strawberries with 2 tablespoons of flour to coat.
    Manually fold in Strawberries into the batter.
    Fill mini muffin cups about 1/2 full.
    Bake for 12-15 minutes or until done.

These were delicious and the perfect accompaniment to our morning cup of coffee.

Saturday, August 9, 2014

Menu Plan for the Week of 8/10


Time for this week's menu plan.  We have been slacking on this over the summer but A is with us this week so we definitely have to make a plan since we are pretty busy with activities and family coming over. 

Sunday:  This one is A's pick so we are having Surf and Turf - steak and crab legs, baked potato, cole slaw, corn on the cob with al fresco dining on the deck. 
   
Monday:  Parmesan Sage Pork Chops, salad, new potatoes

Tuesday:  Forage in the Fridge (D and A will be out of town) so this pretty much means I will eating microwave popcorn, Diet Coke and string cheese for dinner.  :)

Wednesday:  Salsa Verde Chicken Enchiladas, salad, Spanish rice

Thursday:  Ground turkey Stuffed shells (modified from this recipe), salad

Friday:  Forage in the Fridge (aka leftover night)

Saturday:  Burgers and brats.  D has a great cheese stuffed burger recipe.

I am also planning on making some blueberry coffee cake and maybe some blueberry ice cream since we went blueberry picking yesterday. 

Friday, August 8, 2014

Fall Dreaming

Source
I can't believe it is already August and Fall is almost here. This means it is time to put together my wish list of items I would love to add to my wardrobe, home and life. 

There is something about Fall that calls for a bulky Irish sweater. They keep you so warm and toasty.  I am thinking this 3/4 length coat with hoodie would be a great addition to my wardrobe. I think this would be perfect for a football game or a hayride.

Source
I love these boots. The buckle details are too cool! Added bonus that they come in wide calf. (I have wide calves so it can be a giant pain to find boots.)

Source
I am into chunky necklaces like these that I found on Etsy. They fill in a neckline so nicely.

Source

Source
I adore wide leg pants and lam loving this pair from Nordstrom. Though I don't think I could walk with such high heels. 
Source
I know chevron is almost over but I think this teeny chevron pattern on this rug from Rugs USA is subtle and not so in your face. It would be perfect for the dining room. I think it would hide any spots quite nicely.
Source

This is the one I want for the living room since diamonds are the new chevron, right?  My only fear is that the design might be to busy and make one dizzy.
Source
I so want the Cute-as-a-Button chair from World Market. I love how the buttons are subtle pops of color.  Two of these flanking a small table would be perfect for reading.
Source
 I can't forget the mutts.  I am thinking they need new collars.  Maybe matching collars preppy collars?

Source
And finally, for D.  He is dreaming of getting a smoker.  I could get behind this purchase.  Smoked beef brisket or pork shoulder?  Yum!

Source

Do you have anything interesting on your Fall wish list?  Or am I the only one dreaming of cooler temps right now?

Monday, June 23, 2014

Indian Roasted Carrot and Celery Root Soup {Recipe}


I am participating in a Fitness Challenge through D's work.  In addition to the fitness challenge part, there are nutrition challenges too.  This week's was to try a new fruit or vegetable every day. This was a bit difficult since we eat lots of fruits and veggies and our CSA share the last three years has exposed us to a variety of new vegetables.  So I headed to the grocery to see what I could find.  There were only a few items that would work, one of them was Celery Root. 

Source:  BubbleWS
Now these things are quite unattractive but turns out that underneath a knobby exterior is delicious, earthy tasting goodness.  But how best to eat the celery root?  I decided to roast it since roasting usually brings out such delicious flavor.  But what else?  I hit the fridge and found some carrots.  I was thinking of a delicious carrot ginger soup D and I had years ago.  But I wanted something with a kick so decided to go Indian. Tandoori and Sweet Curry - Yum!  Preparation is so easy. Roast, boil, blitz, enjoy!

I have been eating a serving as a starter for lunch or dinner (all the fiber helps to fill me up) but double the amount to a cup, add a salad with some shredded chicken on top and you have a low cal, low fat, filling meal.

I hope you enjoy this soup as much as I do.  If you want to kick up the spice, add more Tandoori or Sweet Curry.

Ingredients
  • 1 large celery root, peeled and chopped
  • 2 lb carrots peeled and chopped
  • 1 T olive oil
  • 4 cups chicken stock sub veg stock to make vegetarian)
  • 1/2 teaspoon salt
  • 1/2 teaspoon  pepper
  • 1 teaspoon Tandoori seasoning
  • 1 teaspoon  Sunny Paris seasoning, Penzeys
  • 1/2 teaspoon  Sweet Curry powder
  • 1/2 teaspoon ground ginger
Directions
  • Preheat oven to 350 degrees
  • In a large bowl, toss celery root and carrots with the olive oil
  • Place on cookie sheet
  • Roast for 60 minutes or until soft
  • Once carrots and celery root are roasted, place in a large pot with stock
  • Bring to boil
  • Reduce heat
  • Puree with stick blender (or in a food processor)
  • Add spices and seasonings
  • Let simmer for 10-15 minutes to let flavors meld
Nutritional Info
Serving size: 1/2 cup
  • Calories: 58
  • Carbs: 8
  • Fat: 2
  • Protein: 2
  • Sodium: 284
  • Fiber:  4

Saturday, June 21, 2014

Sneak Peeks: Clues into Some Upcoming Reveals

Since there has been a lot going on over the last year or so, we have a few projects to reveal over the coming months.

Of course, in prime K & D style, we have some details to finish on some of them (isn't that always the way?) but I can give you some clues and sneak peaks to wet your appetite.

Not used in a bathroom.
Source: Houzz

As time consuming as you would imagine.
Source: Cutting Edge Stencils
Used on several projects, inside and out.
Source:  Wille Logging

Yes, this one is for canning. Couldn't think of anything else you would use it for. :)
Source: Amazon
Not used to line a sidewalk.
Source: Dollar Tree

Not for drying off.
Source: Sam's Club
Hopefully these random images have you intrigued.  I tried to come up with the most random assortment of photos I could. And, don't worry, none of these are from the same project.  So no pressure canning by solar light. :)