Showing posts with label Guest Post. Show all posts

Thursday, October 18, 2012

Apple Struesel Caramel Cupcakes

This post was originally seen as a guest post on Practically Functional. ________________________________________________________________
Today I am sharing what has become my new favorite dessert of the Fall - Apple Struesel Caramel Cupcakes.

We have a monthly family dinner at our house the first Sunday of every month.  I love this because it not only gives my parents, D's mom, my brother, my great-aunt and a close friend, who is like family, a chance to get together and catch up in the midst of our busy lives - it also gives me an excuse to bake something new at least once a month. Sunday, I decided to try a recipe I found on Oh My Sugar High

Of course, I can't leave any recipe well enough alone and had to change it up a bit.  I swapped some of the ingredients up - added brown sugar, more apples and used a goat's milk caramel sauce.  I think the results of these  small changes were delicious!  The apple flavor was not overwhelmed by the cinnamon and the sweetness of the caramel was the perfect combination with the cupcake (which isn't the moistest I have ever had but the vanilla ice cream takes care of that). 

Everyone loved it and even my mom, who originally wanted to split a cupcake with someone else, ate the whole thing!

A couple of tips - make sure to watch how the cupcakes are baking. I didn't watch and the bottoms of some of mine got a bit burnt.  Wipe up any struesel that spills on the flat part of the cupcake pan.  The sugar in it will burn and make the oven smokey.  

I hope you enjoy this dessert as much as we did!

Apple Struesel Caramel Cupcakes
Source: Oh My Sugar High

Cupcake Ingredients
2 cups all purpose flour
2 tsp baking powder
1/4 tsp salt
1/2 cup unsalted butter, softened to room temperature
1/2 cup white sugar
1/2 cup brown sugar
2 eggs
2/3 cup of low-fat milk
4 small apples, diced - 2 for batter and 2 for topping
1/2 tsp Vanilla Extract
1 tsp Cinnamon

Streusel Topping Ingredients
1/3 cup white sugar
1/3 cup brown sugar
3/4 tsp powdered cinnamon
2/3 cup all purpose flour
1/4 cup of cold unsalted butter, diced into cubes
1/4 cup rolled oats

Caramel topping (we used some Beekman 1802 Cajeta - a delicous goat milk caramel.)

Directions
Preheat oven to 350°F
Cream butter and sugar until light and fluffy
Add eggs and beat for a minute or so after each egg
Add vanilla
In a separate bowl, mix together all dry ingredients
Alternate dry ingredients with milk into mixer, starting with the dry and ending with the dry.
Lightly fold 2 diced apples into batter.
Spray muffin tin with non-stick spray
Scoop into into muffin tins (about 3/4 full)
Sprinkle remaining diced apple on top of cupcakes
In the same bowl that previously held the dry ingredients, mix all struesel ingredients by hand until you have a texture that is coarse and crumbly
Top apple-sprinkled cupcakes with streusel topping
Bake for 25-30 minutes or until toothpick test comes out clean
Let cupcakes cool on wire rack for 15-20 minutes.
Just before serving, heat caramel sauce and take the ice cream out of the fridge to soften slightly
Place cupcake on plate with a scoop or two of ice cream.
Drizzle with caramel sauce.

Enjoy!

Jessi, thanks so much for letting me share my new favorite fall dessert with all your readers!

Thursday, October 11, 2012

Guest Post from Jessi of Practically Functional

Hey there Claiming Our Space readers! I'm really excited to swap blogs with K today; I'll be sharing one of my favorite breakfast recipes with you: Quiche Lorraine! (And for those of you who don't speak French...ummm, me!... Quiche Lorraine is just a fancy name for a bacon and cheese quiche! :-p)

Quiche Lorraine With Ham

First, let me introduce myself. I'm Jessi, and I blog at Practically Functional, where I share my practical attempts at Domestic Goddessery. I work full time in IT, which is fun but slightly stressful, so I took up DIYing and blogging as a way to relax and unwind when I get home from work. I love crafting, organizing, gardening, cooking, and all things DIY. I think that any project, no matter how big or daunting, is simple enough for anyone to accomplish when broken down into step by step pieces. So even though I'm no professional crafter, as long as I can fit a project into a weekend I'm willing to try anything!


Breakfast is my favorite meal; I love pancakes, waffles, eggs, bacon, you name it! So I absolutely love quiche, and Quiche Lorraine (bacon and cheese) is the perfect combination of two fabulous breakfast foods.
Here's what you need:
  • 1 pastry pie crust, 9 inch
  • 12 slices of bacon (or 1 1/2 C diced ham)
  • 1 C shredded Swiss cheese
  • 1/2 of a yellow or white onion, minced
  • 4 eggs
  • 2 C light cream
  • 3/4 t salt
  • 1/4 t white sugar
  • 1/8 t pepper
I had actually cooked a ham a week earlier, and we had TONS of leftovers. So I used about 1 1/2 cups of diced ham instead of the 12 slices of bacon listed above. Either way is totally delicious!
Start by preheating your oven to 425 degrees (F).
Fry your bacon in a large skillet over medium-high heat until it is crisp. (If you're using ham that is already cooked, you can skip this step, just make sure to dice it.) Drain the grease and chop the bacon coarsely.
Put your pastry shell into a pie pan. At this point, also make sure your cheese is shredded and your onion is minced.
Quiche Lorraine With Ham
Sprinkle the bacon (or ham), cheese, and onion into your pastry shell. (You may notice their is no onion in the picture above or below...that's because I don't like onions. And my husband wasn't around to scold me for not following the recipe exactly. :-p)
Quiche Lorraine With Ham
In a medium bowl, whisk together the eggs, cream, salt, sugar, and pepper. Once it's well mixed, pour the mixture over the bacon etc. and into the pastry shell.
Quiche Lorraine With Ham
Put the pie pan into the oven and bake for 15 minutes. Then reduce the heat to 300 degrees (F) and bake for 30 more minutes. If you stick a knife into the quiche an inch from the edge and it comes out clean, it's done. If not, keep cooking it. The times on this aren't super exact; you may need another 5-10 minutes to get your quiche fully cooked, especially if you use a glass pie pan like I did.
Pull the quiche out and let it sit for 10 minutes before cutting it into wedges. This part is important; the quiche firms up during these 10 minutes and if you try to cut it right away it will totally fall apart on you!

Quiche Lorraine With Ham
I was hungry so I didn't let it sit for quite the full 10 minutes, which is why it's falling apart a bit in this photo. But it was still delicious!

Thanks a ton to K for letting me swap blogs with her today! Make sure you stop by Practically Functional and check out K's recipe over there. I'd love to have you visit!
Signature

Thursday, September 27, 2012

Guest Post from Nici at Posed Perfection

Hi there!

I'm so excited to be guest posting today here at Claiming Our Space.  When K asked me if I'd like to do a post swap, I was thrilled at the prospect of meeting you, her sweet bloggy friends. I'm Nici Higby and you can find me over at Posed Perfection.

I am married to Mr. Perfect for Me and I am a homeschooling mom to two great kids. At Posed Perfection, I share simple, delicious recipes, easy-to-duplicate craft projects, household tips and whatever is on my heart for the day.  I hope you'll stop by for a visit soon!

I recently ran across a recipe that had been scribbled down on a torn piece of paper in my well-used, over-stuffed recipe box. When I read the ingredients and pictured the finished product, I just knew it would be something I wanted to share with you.  I call these Wild about Chocolate Brownie Bites.  With all the fun animal print party themes out there, I think these would be a perfect dessert to serve to your party guests.

Here's what you need:
family size brownie mix, cocoa, oil, water, an egg and Hershey Hugs

Here's how you make them:
Start by mixing all the ingredients(except the HUGS) in a bowl and stir until combined.

Drop by teaspoonful into mini muffin tin sprayed with baking spray(with flour). Bake for about 11 minutes at 350 degrees.
Remove from oven and let cool for a minute. Then place unwrapped HUGS on the brownie bites and press in slightly.

Carefully move to wire rack and cool completely. As the HUGS melt, gently press down the tip for a smooth top.

Wild about Chocolate Brownie Bites
(makes about 3 dozen)

36 to 40 Hershey Hugs 
1 family size package of your favorite brownie mix
1/4 cup cocoa
1/4 cup water 
1/4 cup vegetable oil
1 egg

Preheat oven to 350 degrees. Spray mini muffin pan with baking spray. Remove the wrappers from the Hugs. Mix together brownie mix, cocoa, water, oil, and egg in medium bowl until combined. Drop by teaspoonful into the brownie cups, filling them about halfway. Bake for 11 minutes. Remove from oven and cool for 1 minute. Gently press one Hug into each brownie bite. Carefully remove the bites from the pan and place on wire rack to completely cool.

If you like this recipe and would care to see others like my Chocolate Yummies or Chipper Chicken Soup, I'd love for you to visit. I also share simple seasonal crafts like my Fabulously Frugal Pumpkins

Thanks, K, for the opportunity to meet your sweet friends. I just know my readers are loving your post at my place today.  

Don't forget to head over to Posed Perfection to check out my guest post!  See how I ended up taking a total disaster into a delicious dessert.

Thursday, September 13, 2012

Guest Post from Marilyn of 4 You With Love

It's guest post day here at Claiming Our Space!

I am so happy to have Marilyn from 4 You With Love sharing her great stool revamp. She is totally talented and has a great blog.  You should become one of her followers so you don't miss anything!   I am posting over on Marilyn's blog so head on over and check out my end table update.  


Hello to all my new friends at Claiming our Space.  It's so fun to be visiting!  I'm Marilyn and my blog is 4 You With Love.  On my blog you'll find recipes, knitting patterns, tutorials, and more!  Today I'd like to share my most current DIY furniture project.

I just love the look of those retro chrome kitchen stools.  However, they are so expensive.  Here's one of the cheaper ones I found at Wayfair.com for $86.99 (marked down from $125.00) with free shipping.  WOW! so if I purchased 4 for to use around my island, it would cost *gulp* $347.96!  Way out of my budget.  But aren't they cool looking?

Well, when I went to Goodwill, I found 4 wooden stools:  2 at $3.00 each and 2 at $4.00 each.  So I've now spent $14.00.  Here's one of the $3.00 stools.


Okay, let's get started on this transformation.  After I sanded down the stool, it was time to paint!
1.  I used Krylon metallic paint.  
2.  I turned the stool upside down and painted the stool following the instructions.  (note:  don't forget to turn your can upside down and "spray" to clean out your nozzle between coats)
3.  I turned the stool right side up to paint the other side of the rungs.

After I was sure the legs and rung were completely painted, it was time to add batting to the seat.
4.  For this step I used quilt batting and spray adhesive.
5.  The batting wasn't quite thick enough so I folded it over for double thickness.  (I secured these layers with spray adhesive)
6.  I sprayed adhesive on the top of the stool seat and placed it on the batting.

7.  Using scissors, I trimmed the batting so that it was about 2-3 inches wider than the stool seat.
8.  Using a staple gun, I began stapling the batting to the under side of the stool.  Be sure to pull your batting tight as you staple so that it is snug.
9.  Once the batting was completely stapled, I trimmed away the excess, especially around the legs.

 Okay, the batting is on, now it's time to cover the seat with vinyl.
10.  I laid the stool seat on top of my large vinyl piece.
11.  I then cut the vinyl so that it was easier to work with.
12.  I trimmed the vinyl into a circular piece.

13.  Using a stable gun, I begin attaching the vinyl to your stool.  Keeping the vinyl snug, I then stapled the opposite side as well.
14.  Next I rotated the stool 90 degrees and repeated step 13.
15.  I continued to staple the vinyl to the under side of the seat.  Once it was firmly attached, I trimmed away the excess vinyl.

Okay, we're in the home stretch.  Are you getting psyched?  I am!
16.   I had accidentally scuffed up some of the paint while I was attaching the vinyl.  I covered the new seat with plastic wrap and then I carefully spray painted the marred areas.
17.  The last step!  I placed some felt circles on the bottom of the legs so that they would not mar my floor.

Are you ready for the big reveal?  Here it is!


Isn't it cool?  Here's the price breakdown for 4 stools:

Stools $14.00
Vinyl (1 yard at 40% off of $16.99) $10.19
4 cans of spray paint $24.00
Batting $4.00
Total cost for 4 stools:  $52.19 or $13.05 each!

Okay, so now what should I purchase with my $295.77 savings?  Decisions, decisions.  

Thanks K for allowing me to visit today.  It's been a blast!  And friends, don't be shy.  Stop by and visit 4 You With Love sometime!

Marilyn

Thursday, August 30, 2012

French Toast - Guest Post from Julie of This Gal Cooks

Hello there! I'm Julie from This Gal Cooks! I'm delighted to be guest posting for Kristina today. Isn't her blog great?! Be sure to head over to my blog today as she is guest posting for me! Also, I am currently having a HUGE giveaway at my blog that you're sure to love.

A little about me: I'm a foodie who loves to cook and bake. I dream of one day owning my own cafe or bake shop. I'm also an aspiring DIYer. If you love cooking with a dash of DIY, you'll love my blog!


Now, on to my recipe! What I am going to share with you today is a simple french toast recipe. Be sure to use fresh bread for this recipe as it makes it super delicious! I've always loved french toast. It's one of my favorite breakfast treats. What's your favorite? I hope you enjoy my recipe!


Ingredients
Inspired by allrecipes.com
  • 6 slices of fresh bread
  • 2 eggs
  • 2/3 cup of milk
  • 1/4 tsp of ground cinnamon
  • 1/4 tsp of ground nutmeg
  • 1 tsp of vanilla
Directions

1. Beat together the egg, milk, vanilla, cinnamon and nutmeg.
2. Heat a skillet over medium-high heat.
3. Dunk each slice of bread into the egg mixture. Be sure to coat both sides with the mixture.
4. Cook on both sides until golden.
5. Serve with syrup or your favorite topping. 

I hope you enjoy this recipe!


Thursday, August 2, 2012

Guest Post - Rachel from Adventures of a DIY Mom


It's a guest post day here at Claiming Our Space.  After checking out Rachel from Adventures of a DIY Mom's amazing furniture refinish (where does everyone find these furniture deals?), head on over to check out my plastic horse bookends.


I'm Rachel and I blog over at Adventures of a DIY Mom.
I love to share craft and sewing projects. I love to bake and I often share recipes. I also host a weekly link party on Tuesdays.

Today I'm sharing a furniture refinish. I had been looking for something that could house all of our games. Right now we have board games in two bedroom closets and card games are in the kitchen. So when I came across this at a yard sale, I knew it would work perfectly. I snagged it for only $8.

It was part of a huge three piece entertainment center. Luckily, they didn't make me buy the whole set. My husband thought it was just a boring box, so he added baseboard and crown molding to give it some character.  So this is not a true before picture, but you can imagine what it looked like.

I took off the doors and gave it a quick sand. Then I painted the outside a light green I had left over from my basement. The color is Prairie Sage by Glidden. I left the interior white.

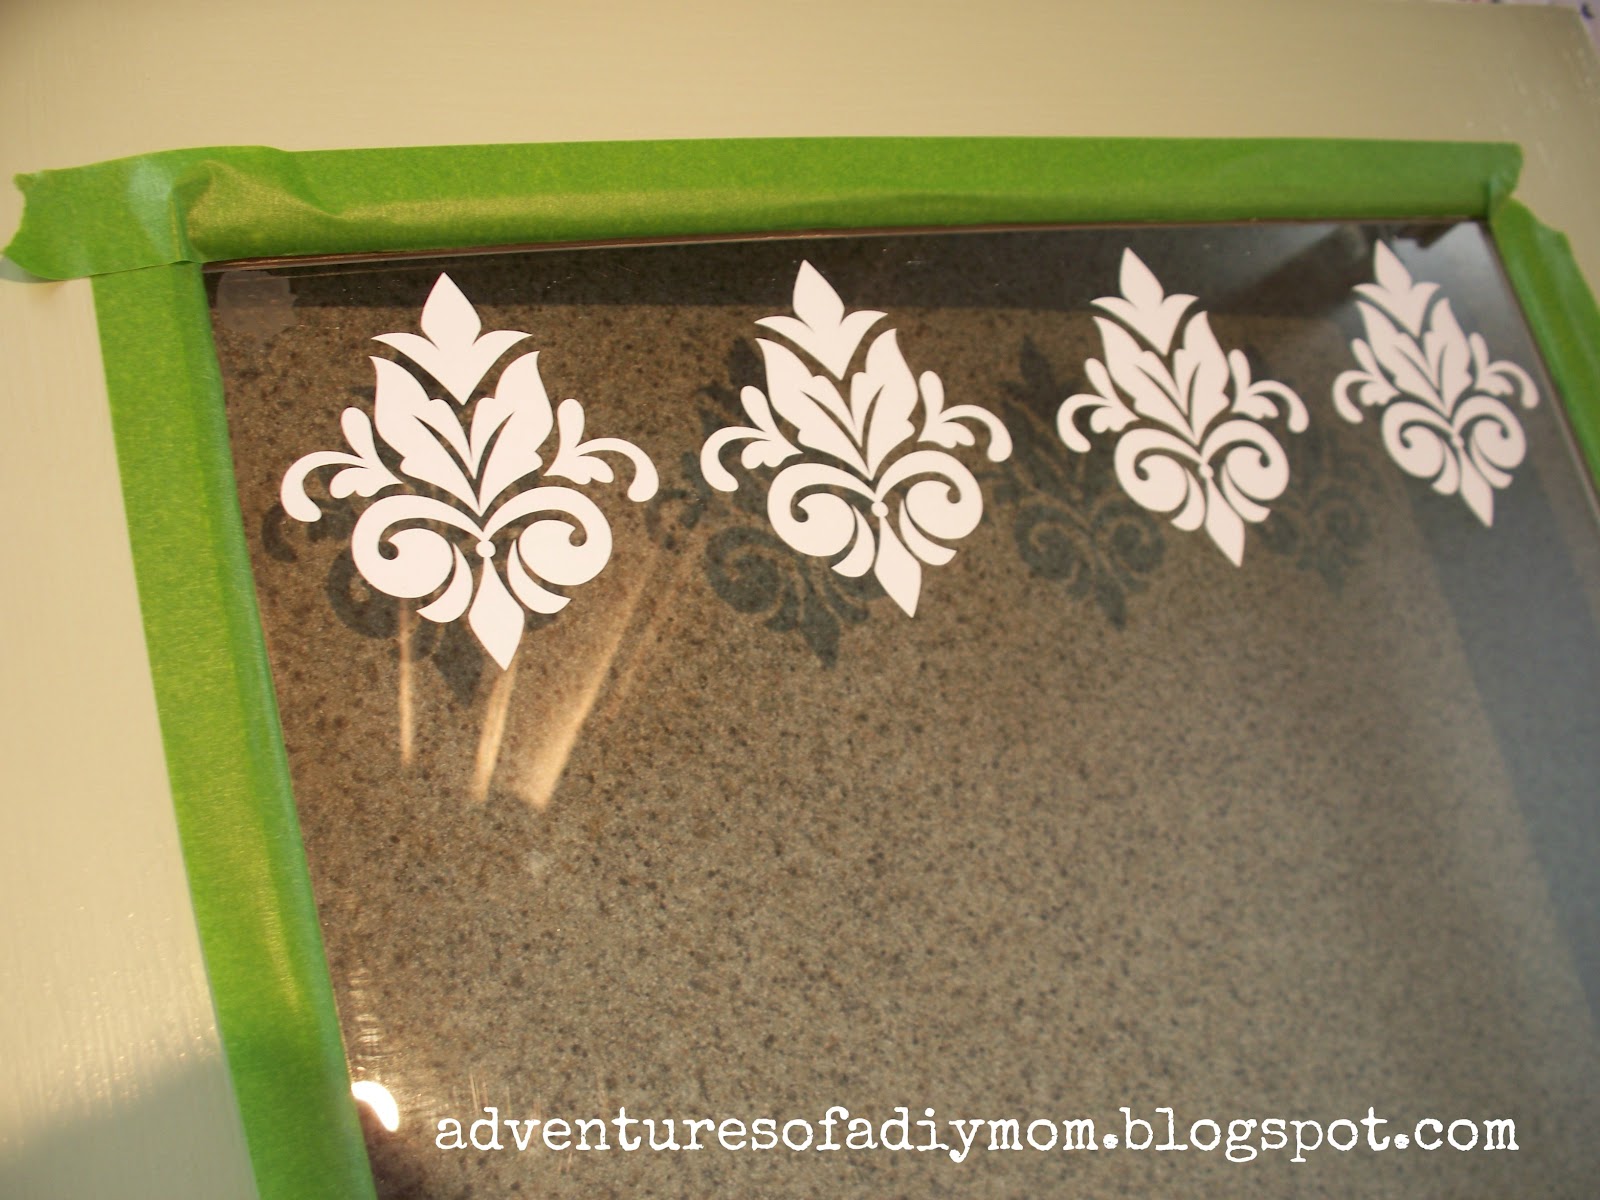
Then came the fun part - stenciling. I searched through the online Silhouette store and found this damask pattern.

I cut it out with card stock, taped it on the door and painted. I used Frosted Pine by Glidden {another leftover from finishing our basement.}

Next I cut out some smaller stencils and painted them on the sides.


Both on the bottom and the top of the cabinet.
This was so much easier and quicker than my last stenciling project.


Once I was done painting, there was the problem of the glass door. I wanted to keep games inside, but that's not always very pretty. I decided to frost the glass. But I wanted to keep the damask theme, so I cut out some vinyl and put it in place.


I also taped the edges off and started applying the etching cream.


The bottle says it is not intended for large areas, and I wouldn't recommend it if you want it to turn out perfectly. There were a few spots that looked uneven, but overall I'm happy with the results.


I lightly sanded over the stenciled areas and also along the edges to let some of the white paint show through.

And here's the final result.


It fits perfectly in this spot at the bottom of the stairs. These pictures best capture the true color of the piece.


And a look at the before and after.

I spent a total of $9. The cabinet was $8 and I spent $1 for the Silhouette stencil. I used leftover paint and etching cream. The baseboard and crown molding were also left overs.
I love a good makeover that doesn't end up costing me a lot.
What do you all think of the result? Do you like the color and the stencil?

Thanks so much for having me!!

Thursday, April 19, 2012

Trading Blogs Guest Posting Party -


Have you heard about the Trading Blogs Guest Posting Party hosted by Melissa from Serendipity and Spice

This is the second TBGPP and I really hope you will sign up to take part.  It is a great opportunity to meet other bloggers, find new blogs to follow and really put on your creative caps to come up with a great project to share with your Guest Posting Partner's readers.  I am already trying to think of what project I want to do.

I participated in the first TBGPP and it was so much fun.  I traded with a cool blogger Jenny from The NY Melrose Family and had a great time.  Make sure to check out Jenny's blog!

How does it work?
  1. Head to the TBGGP post on Serendipity and Spice and sign up.
  2. Melissa will partner you with another blogger.
  3. You write up your post and send it to your partner.
  4. You post your partner's post on your blog.
It is that easy!   All the details and date specifics are outlined in the TBGGP post

Just make sure to sign up by Sunday, April 29. 

Thursday, March 22, 2012

Trading Blogs was a Great Party!

Trading Blogs 
was a complete success!

A couple of Saturdays ago, I participated in Serendipity and Spice's Trading Blogs party.  What fun!  I traded with Jenny from The NY Melrose Family but I wanted to make sure you got to see the rest of the participants.  Try to stop by and see these as well as their other projects.
Trading Blogs was a sort of blog party that Melissa hosted where everyone signed up to be partnered with a blog to trade for the day.  We wrote guest posts and were featured on our partner's blog for the day.

Here are the posts:
Please go check them out and leave some comment love!

Saturday, March 10, 2012

Guest Post - Jenny from The NY Melrose Family - Lucky Charms Snack

I am so excited to guest post here at Claiming Our Space.  My name is Jenny and I'm from The NY Melrose Family.  I'm a teacher mommy that loves crafts, diy decorating and organization.  I usually have an assistant working with me, who often distracts me from what I'm trying to get done.  Luckily, she's cute and quite a character.  I'm talking about my two year old daughter, Riley.  The snack I'm here to share is for her friends at daycare.  So, here we go!

For Valentine's Day I was inspired by pinterest for Riley's Goldfish Valentine and once again I've been pricked by the pinterest pin.  I want to share Riley's St. Patrick's Day Snack for her daycare friends.  Here's the labels that I made using Microsoft PowerPoint.  It took me a couple of tries because I needed the writing to be upside down so that once they were folded they could be easily stapled.