Sunday, January 31, 2010

Entering the Digital Age!


In honor of the dip in temps in our neck of the woods, I thought that today would be all about gas.  Not methane, though we have quite a bit of that thanks to Hubs.  I am talking about natural gas, the kind we use to heat our house. 

We have a multi-zone, natural gas fueled, hot water baseboard heating system with four thermostats.  Zone One is the Family Room and Kitchen*, Zone Two is the Dining Room and Living Room*, Zone Three is the Office and Front Bedroom*, Zone Four is the Master Bedroom* and the Center Bedroom, Zone 5 is the bathrooms (this zone comes on whenever another zone kicks on). The * denotes which room the thermostat is located in.

It is quite nice because we are able to turn the heat up in only the areas where we are hanging out versus heating the entire house.  The not nice part?


We had the old fashioned "lever style" thermostats.  You know the kind I am taking about.  The ones where you have to guestimate and eyeball what the current temp is and hope the temp you want is the temp you are setting it for.  Personally I loath these types of thermostats.

After getting a wake up call in the form of our December natural gas bill (more than double November's), we realized that we needed to get a better handle on how we are heating the house.   Solution:  digital thermostats.  Like these.


We went with the most basic model since we didn't need it to be programmable and we only have a 2-wire system.  We got these at Home Depot for about $25.00 a unit.

Then it was a matter of switching them out.  The switching out part was easy.  Since we have a 2-wire system, we only had two connections to make.    Here is a tip:  Take a pencil and wrap the wire you removed from the old fixture around it.  This will ensure that the wire won't fall back into the wall. 

One hiccups we found was that some of the thermostats had an old-fashioned mercury switch.  Needless to say once those were carefully removed, they got double bagged and placed in the basement waiting to be brought to our county's Public Works Department for proper disposal since placing liquid mercury in the regular trash is a big no no.

I swear this gizmo looks like a high school science project from the 50s.

It actually took more time to sand, spackle and paint the area that was previously covered by the old thermostats.


No these were not taken all in the same room.  I realized that I hadn't taken photos of all the stages in any one room.  Whoops.  So you get to see the Benjamin Moore Riviera Azure from our front bedroom, the awful tan from our living room and Valspar Key Lime Pie from our kitchen.

Now all we need to do is wait to see if being able to set each zone to a definite temperature will result in lower bills or at least not the same shocking jump we saw in the last bill.  Personally, I think it will be the latter since January is our coldest month here is Michigan.   

Will keep you posted when we get out bill for the last week of December and the first three weeks of January.  

Tip of the Project:  After you disconnect the thermostat wires, wrap them around a pencil to ensure they don't fall back into the wall.

Friday, January 29, 2010

Making a Square a Circle


As you may remember, a few weeks ago I made the surprising discovery that several of the bedroom doors had less than optimal doorknob holes (like the one above).  It made replacing the original "attractive" 70s brass doorknobs with the new brushed nickel ones problematic, to say the least.

So we purchased one of these and got to work. 

The problem?  Since there was already a hole in the door, how would we use the hole saw bit to round it off to make an actual circle.

After some trial and error (OK, more along the lines of the saw jumping and skipping around the hole and me using an interesting selection of words not to be used in polite company), Hubs and I figured out how to make the process work smoothly. 

Here's are the steps we worked out.

1.Place the door across your saw horses.  You will be drilling through the door, so you don't want to put it on a solid surface.

2.  After placing the correct sized hole saw on your drill, start the bit spinning.

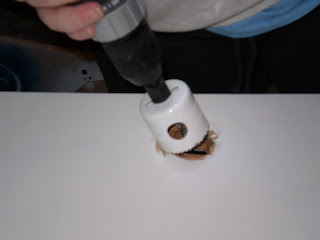
3.  Bracing yourself, place the edge of the bit at an angle at the edge of the circle you want to drill. Create a small groove.


4.  Slowly rotating the angle of the hole saw, repeat step 3 on another side of the circle.


5.  Repeat step 4 on the third side of the hole.


6.  At this point, using the grooves you created earlier as a guide, straighten the hole saw and applying pressure begin to work the saw through the door.  The grooves should keep the saw in line until you get further into the door.


7.  Eventually, you will make it through the door.


Now you have the correct sized hole for your doorknob.

I do have to be totally honest, I did have some skipping on my door (which caused some rather colorful language to be uttered during this endeavor.) . 


However, it wasn't anything that a little sandable wood filler and a coat of white semi-gloss paint didn't fix.

And this


looks so much better than this.


If the instructions weren't clear or you have any other tips, please let us know. 

I am sure we will run into more doors that need some "rounding off" as we continue to replace our doorknobs.

Sneek Peek - Coffee Table Revamp


We got the coffee table above at a local antique store.  LOVE the marble top, HATE the (dingy) yellow and gold base.  I know that gray and yellow are hot right now but not this yellow and not with the gold.

With the selection of our new wall colors, we have a better idea of how the direction of decor in the living room.  This means it is time to get rid of the yellow. 

Yay!!

All I can tell you about the revamp is that there is an elephant involved.  How's that for an obscure clue?

Wednesday, January 27, 2010

Happy New Year (Several Weeks Late)


Happy New Year! (a few weeks late!!)  I realized that this post has been sitting as a draft for the last 3 weeks.  Whoops!

It is hard to believe that another year has past.  And what a year it has been.  We sold a house, bought a house, started to remodel a house, hosted a couple of parties including the big family Christmas Eve party, tore up a bathroom, repainted several pieces of furniture and painted a bunch of rooms.  Wow!  With all that, I can only imagine what the next 12 months (OK, next 11 months and 1 week) will bring. 

So in the time honored tradition of making resolutions, I thought I would share some of ours.

For the Home

1. Institute the "15 Minute Rule" before bed each evening. This means spending 15 minutes cleaning up the messes of the day so the next day starts out without that "man, the house is a wreck" feeling.
2. No beginning a new home project without completing one unfinished project.
3. No bringing in a new piece of furniture to be refinished without finishing a piece currently waiting to be redone.
4. Never let the "To Be Filed" pile get above the top of it's bin.
5. Get new food storage containers so we can get rid of the dreaded box of random lids and bottoms.
6. Organize craft supplies.
7. Sort through last boxes from our August 2009 move in the basement.
8. Make regular donations to charity to reduce amount of stuff in the house.

For the Body
1. Exercise 30 minutes a day at least 3 days a week.
2. Try one new healthy recipe each week.
3. Restart WW with a goal of losing 50 lbs. (This one is mine, not Hubs')

For the Blogs
1. Post to each blog at least twice a week.
2. Create an ongoing "series" for each blog that posts monthly.

Here's hoping that at least some of them will last through the end of February.  

Tuesday, January 26, 2010

Elbow Grease + a Coat of Paint = A New Nightstand

Have I told you lately how much I love Craigslist? OK, maybe I have.  But it is true.  And pieces like this are the reason.

This is not a good before pic.  
I apparently forgot to take a pic of the end table in all its dinged wood and formica topped glory.

This little table was $7.  It is solid wood but very very dinged up.  As an added bonus the top is formica.  Not exactly a decorators dream piece.

But as I have learned, a lot of elbow grease (sanding and more sanding) and a coat of paint (well, several coats) will result in something that looks entirely different.  Especially when the piece has nice lines and good storage space.


How did I transform the piece? 

Step one:  Sand, sand, sand.  Then sand some more, especially the formica top. You need to give the primer something to "grab" onto. 

Step two:  Wipe with microfiber cloth or other lint free cloth to remove all the dust created by sanding.

Step three:  Prime.  I used Kilz oil based primer (the smelly version since I was working in the garage).

Step four:  Let it dry, overnight.

Step five:  Tape off the base and the edges of the two layers.  (I painted the flat surfaces in a glossy finish and the sides and legs in a flat finish.) Spray glossy paint, in thin layers, letting dry completely between layers.  Once you have the coverage you like, let dry for at least 24 hours.


Step six:  Mask off glossy surfaces with newspaper and painters tape.  Spray flat paint, in thin layers, letting dry completely between layers.  Once you have the coverage you like, let dry for at least 24 hours.

Step seven:  Remove tape and place in intended location.  In our case, this was our front bedroom.


Here's wishing you luck (and strong forearms for the sanding) on your revamp projects.


Cost of the Project:
$ 7.00 Cost of end table
   5.00 Can Kilz Primer
   2.00 1/2 Can Glossy White Spray Paint
   2.00 1/2 Can Flat White Spray Paint
   2.00 Most of a roll painters tape (you can see in the pic above why I ended up using so much tape)
$18.00 Total Cost

I am linking this project to
the Power of Paint Party. 


The Penny Pinching Party at The Thrifty Home


http://www.thethriftyhome.com

Monday, January 25, 2010

Not Bad for a Free Table - A Couch Table Revamp


Remember the redo of the computer desk?  Well, at the same time I picked up that lovely piece, the seller gave me this couch table for free, along with another end table that hasn't yet been revealed.


So not our style.  The color is all wrong.  We are not yellow-y orange-y oak people.  We are dark espresso stain people.   However, I thought the table had potential (plus it was my favorite price - free!).  The lines are clean and with a darker stain, would fit in nicely with our plan for the downstairs guest room. 

With a complete sanding, the piece was prepped for stain.  Sorry no picture of the sanded piece, I need to be better about taking "during" pics.

After not finding an actual espresso stain at either Home Depot or Lowes, I headed to the local woodworking store for a pint can of water-based espresso stain.

It took three coats of the stain to get the table dark enough to match other pieces in the house that I wanted to coordinate this one with.  After another three  coats of water based poly and 24 hours to dry, we have a great piece for the guest room.


I like that the space under the table gives a spot for a guest's suitcase and the table itself gives them a place to put out a few of their things.

Now we just need to get the rest of the room done.

Cost of the Project:
$ 0.00 Table - Free from Craigslist Seller
   2.00 Espresso Stain  (Used only a small part of the $10.00 can)
   4.00 Water-based Poly (Used only a small part of the $16.00 can)
   5.00 Two sanding blocks (can be resed on another project)
$11.00 Total Cost

Thursday, January 21, 2010

Why You Should Wear a Mask...


when spray painting or using a paint gun.

I took the photo above in my garage about 5 minutes after spray painting a lamp and a couple of baseboard rad covers.  To my eye, the air looked clear even if the smell of paint was still very strong.  However, as you can see in the photo, there were still a bunch of small unseen particles in the air.  Yup, all those dots in the photo are paint molecules.

I will admit, I am not always the best about wearing my mask but after looking at the photo above, I realize that I need to wear it all the time when I am spraying paint and need to keep it on until I am back in the house.

 Just something to keep in mind when turning your Frugal Finds from ugly ducklings to beautiful swans. 

Tip of the Project:  Wearing a mask while spraying paint to keep your lungs safe. 

Wednesday, January 20, 2010

Dining Room Progress Report - Lighting, Paint and Board & Batten Wainscotting

Our dining room is almost done.  Just a few tweaks here and there are needed. Before we do the big reveal, here are some in progress pics to peak your interest.  

As I posted a couple of months ago, we replaced the carpet with bamboo.  That was the beginning of the transformation.

We swapped out the light fixture.  While the original chandelier was lovely in a sparkly brassy old world way, it was not our style.


This is our new chandelier.  It is a knock off of a chandelier from Restoration Hardware.  I love the warm glow from the "candles."  Even better was the price (compared to the RH version) of $230 at Lowes.


Next up was paint.  We selected a two tone color scheme that will make sense in a minute.  Behr Chocolate Sprinkle (in flat enamel) and Valspar Churchill Hotel Vanilla (in semi-gloss). 


Next we needed to add the wood for the board and batten wainscotting.  Thank goodness Hubs is a math wiz.  Without him, this would have taken days longer to complete. 


Once all the trim was installed, we started caulking (oh, there was so much caulking), priming and painting.


Now we are making progress.  Even better, it looks completely different from where we started. 


Stay tuned for the big reveal later this week.

Tuesday, January 19, 2010

IKEA Table of a Different Color


After our center bedroom was complete, I realized that we needed another bedside table.  Since we are on a budget, the first place I checked was Craigslist.  However, apparently, the end table/night stand/bedside table is a hot commodity in our area since my searching over several weeks was unfruitful.

My next low cost option?  IKEA.  (Boy do I love that store!)

With the geometric shape theme we have going on in the room, I thought that the round shape of the Noresund table would work quite nicely.


However, the black is all wrong.  It is too dark for the room.

Solution:  Spray Paint!!  Our favorite brand Rust-Oleum in particular. 

I decided to go with a two-tone look.  White glossy for the flat surfaces and navy glossy for the legs.  That color combo ties in with the bedding with the white, blue and green.  To be honest, I would have loved to do a green leg but I couldn't find the right color green in a glossy spray can. However, now that it is in place, I love the navy. It stands out so nicely against the green walls. 


Project Cost:
$20.00 Noresund table
    3.50 1 Can White Gloss Spray Paint
    1.75 1/2 Can Navy Gloss Spray Paint
$25.25 TOTAL COST

I am linking this to the Domestically Speaking Power of Paint Party.  Come join in the fun.


Monday, January 18, 2010

Last I Checked a Square Is Not a Circle

One of our ongoing projects is replacing the mismatched doorknobs in our house.  At last count we still have at least four different mismatched brass doorknobs types. 

These, we believe, are original to the house.


standard 70s issue

At some point a couple of these were installed.


I do like the braid detail on this one

As were some of these.


Close match but no cigar

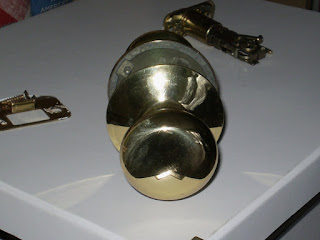
And finally, a few of these. This is one of the few I have managed to swap out.


Pretty blah, don't you think?

Aren't they all just lovely?

Slowly but surely all are being replaced by this style.


So much better looking, don't you think?  Current count:  3 replaced with 9 to go, not including the front and back doors to the house.  

But as I am replacing the knobs, I am finding that a quick swaparoo isn't always possible.  Not when you have holes like this


and this. 


Last I checked a square wasn't a circle and wasn't standard issue when installing a doorknob. 

Sigh!  So that means that I will be adding a hole saw like the one below to our inventory of "tools we didn't anticipate needing to buy to finish a project."


Sunday, January 17, 2010

Wanna Hang Out? A Review of Wall Anchors

When doing remodeling, you will inevitably need wall anchors to secure any one of a myriad of things to your walls. It could be shelves, pictures, curtain rods or even a bathroom sink. After completing several projects with successes and even more failures, I have found what works and more importantly what doesn't.

Below is a review of the four main types of wall anchors we have used over the last few months as we have been moving from room to room making changes to our home.


The Sleeve: this is a plastic cylinder that the screw fits inside. The basic concept is that as the screw goes in the sleeve expands and 'grabs' the wall. The problem is you have to have just the right size hole or the sleeve is too loose and pulls out. Or the hole is too small and the sleeve won't go in. Even with a proper size hole, this type never seems as secure as I would like. I guess they would be OK for something light like a small picture. But, in my opinion, they are far too much work for too little result.  An example of The Sleeve is found in black in the photo above.

The Cone: this is a plastic anchor shaped like a traffic cone. An improvement over the sleeve-type, the cone shape doesn't require drilling as specific a hole size, although you definitely still have to pre-drill. But being able to step down a tad on the hole size allows for a more secure fit. This type of anchor is actually quite useful for light duty shelves or larger pictures. Examples of The Cone are found in white, blue and gray in the photo above.


The Self-drilling in plastic (in photo above): This is a cone shaped anchor with large threads on the outside. I have seen some with a knife-like point for stabbing into drywall and cone-types that screw in without the need to pre-drill a pilot hole. The knife end goes right into drywall with ease but is also easy to break off if you twist a little too hard or strike a stud. The result is a big hole to patch if you make a mistake. The all-screw cone types (without the knife-like point) are a little harder to start, however I find a 1/8 pre-drilled hole allows them to screw right in. They have a strong and secure hold. I even have some of these holding a curtain rod track in a ceiling.


The Self-drilling in metal (in photo above):  the cream of the crop well worth the extra money. They, like the self-drilling in plastic, look like a really thick wood screw and they will hold whatever you are trying to hang very securely. I have two sizes one rated for 50 lbs and one for 75 lbs. Due to being made of metal they screw right into the drywall or wood without much trouble. However, like the plastic versions, a small pre-drilled hole does make it so much easier. We have used these in plywood with great success as well.

The biggest difference between the metal and plastic versions is that the metal version very rarely breaks and always holds firm. The extra cost for means less frustration and that is a smart buy in my book.

The verdict: The only ones I use now are the self-drilling either in plastic or metal depending on the application.

Tip of the Project: Pre-drilling a small pilot hole allows the self-drilling anchors to more easily seat themselves in wood or drywall.