Monday, April 30, 2012

Stir-Fried Honey-Ginger Chicken with Peppers


I love Martha, Martha Stewart that is. She is fabu! Though, if I had to speak truthfully, I don't usually love her recipes.  They have a million steps and use a thousand ingredients that are not usually found in one's pantry or local grocery. OK, maybe I am exaggerating about the million steps and the thousand ingredients, but not on the unusual ingredients.  Admit it, you know what I am talking about.

So when I came across this recipe, I immediately said, "Holey moley, I have all these ingredients at home.  We HAVE to try this!" Added bonus:  I got a wok from my parent for my birthday that we hadn't tried yet.

The prepping of the ingredients takes longer than the actual cooking since there is a lot of chopping and cutting.  The first time I made this, I did all the prep myself and it took me about 45 minutes to an hour from start to finish.  The second time we made this, we used beef (a very tasty option, just need to cook the meat a bit longer than the chicken) and D helped with the prep.  Then it only took about 30 minutes from start to finish, which was great until we realized the brown rice wasn't done cooking. Whoops! So we just used the waiting time to get some dishes done, set the table and play with Willow.

I hope you enjoy this recipe as much as we did.


Stir-Fried Honey-Ginger Chicken with Peppers (source: Martha Stewart)

Ingredients
  • 1/4 cup honey
  • 2 tablespoons rice vinegar
  • 2 tablespoons low sodium soy sauce
  • 2 tablespoons vegetable oil
  • 1 pound boneless, skinless chicken breasts - sliced into 1/4-inch strips
  • 1/4 cup peeled fresh ginger - grated
  • 2 garlic cloves - minced (I rehydrated some dried minced garlic from Penzeys)
  • 3 red, orange, & yellow bell peppers (ribs and seeds removed) - thinly sliced
  • Cooked brown rice - for serving
Directions
  • In a small bowl, whisk together honey, vinegar, and soy sauce
  • Heat a large skillet or wok over high until hot.
  • Add 1 tablespoon oil and swirl to coat skillet.
  • Add chicken and stir until opaque but not cooked through, about 3 minutes; transfer to a plate.
  • Add 1 tablespoon oil, ginger, and garlic to skillet and stir until fragrant, 30 seconds.
  • Add peppers and stir 2 minutes.
  • Add soy mixture and bring to a boil.
  • Return chicken to skillet and toss until sauce thickens and chicken is cooked through, about 3 minutes.
  • Serve over rice.

Sunday, April 29, 2012

From Drab Curtains to Soft Dog Bed


When we moved in the previous owners left all the window treatments.  However, none were our style.  Including the heavy velvet ones in the living room.

You can see them here.  Not that attractive.


But, like a good aspiring pack rat, I took them down and packed them away in a closet since I was sure that I would be able to use them sometime in the future.  

Well, the future is now!

Willow, who is just the sweetest dog ever, got two new beds last Christmas. She loves those beds since they are fluffy and she sinks right in.

See what I mean?

The bad part is that they didn't have an inside liner so when they needed washing, we had to put all the stuffing in a garbage bag and then restuff it afterwards (aka a giant pain in my rear), and you know that we never could get all of the fluff out of the cover or into the bag. This meant that we ended up with fluff "bunnies" each and every time.

After dealing with fluff bunnies in the family room, the bedroom, the laundry room and the dryer, it was time for another plan.  I thought immediately of the thick velvet curtains that I had stored in one of the bedroom closets. The tag said "dry clean only," but I thought that was because of the damask imprint so I ran them through the washer and dryer to see what happened.  Well, they washed up perfectly and got amazingly soft. 

Since Willow's beds are like a big pillow, making the cover couldn't have been easier.  To make things even easier, I skipped the zipper and used velcro/hook & loop tape as a closure.  I will get to a zipper eventually, I promise. 

Materials
  • Fabric
  • Poly-Fil/Extra Stuffing
  • Velcro/hook & loop tape
  • Sewing machine
  • Matching thread
Directions
  • Open bed and add stuffing.  I used a 20 oz bag of Poly-Fil.
  • Lay your bed on the fabric and figure out how big you need to cut your two pieces of fabric.  This is where I lucked out. My curtain panel was the exact length I needed so I needed to only make 1 cut, the width.


  • Cut your fabric with approx 1 inch seam allowance around 3 sides and a 2 inch allowance on the 4th side (this should be a short side).  The reason for this is so you will sew the velco on "nice side" of the fabric.
  • Fold one short edge over 1 inch, press with iron. Fold over again 1 inch and press.  Sew a straight stitch along the folded edge farthest from the outside (I hope that made sense).  Repeat on the 2nd piece of fabric.  This will give you the finished edge to sew the velcro to. **In my case, I was able to use a finished edge and skip this step.
  • Place fabric right sides together.
  • Pin around the two long sides and one short side.
  • Sew along the two long sides and one short side using a straight stitch and a 1/2 inch seam allowance. You now have what amounts to an inside out pocket.  So far so good.

  • Leaving the "pocket" inside out, it is time for the Velcro.
  • To sew on the Velcro, measure the opening and cut 1 piece hook tape and 1 piece loop tape just a bit shorter than the measurement.  I tried pinning the velcro but gave up since I kept bending my pins and not wasn't able to get it centered right. So I ended up just free handing/eyeballing it. 
  • I took my piece of hook tape attached it with a zig zag stitch down the middle of the tape.


  • I did the same with the loop tape on the other side.
  • That is the last of the sewing! Not too hard, just straight stitches.  Perfect for my novice abilities.
  • Turn it right-side out and there you go...a new dog bed cover.

  • Just put the old bed inside and Viola! A super fluffy bed for your furry friend.
I need to figure out a way to craft during the day while I am at work so I don't end up taking photo like this in my basement.
Willow loves it so much she is falling asleep already. 

I made this cover over a week ago and Willow loves it so much she hasn't "begged" to sleep in our bed at all.  At bedtime she goes right to her bed, lays down and waits for us to put the blanket on her. (Yes, she is spoiled rotten!)

Linking up to these parties.

Saturday, April 28, 2012

Weekend To Dos 4/28-29 & Menu Plan 4/29-5/5


The weather this weekend is supposed to be cruddy with rain and even a snow shower forecast. Because of this, I don't have "spread bark."  We only have about 5-6 wheelbarrows more to do in the main part of the yard but I refuse to work in the rain or snow.  So most of the weekends projects are ones that take place indoors.  Here's hoping you all stay warm and dry this weekend.
  1. Willow to the vet
  2. Willow to the dog park
  3. Run random errands
  4. Fill out and send CSA form
  5. Bring papers to Boy Scout paper drive
  6. Cleaning, Grocery, Laundry
  7. Finish up bench, horse bookends, yarn wrapped balls
  8. Take photos of everything
  9. Write up food posts
  10. Take pics of Willow
  11. Mow yard
  12. Work on Living Room (painting)
D is out of school for a couple of weeks before heading back for Summer term.  While that will mean adding at least one more night of cooking to the schedule, this coming week he will be out of town on business a couple of night.  Willow will be so happy to sleep in our bed while he is gone.

Sunday:  Meatballs with homemade tomato sauce
Monday:  FITF
Tuesday:  FITF
Wednesday:  Chicken in the Crockpot
Thursday:  Dinner Salad with leftover chicken
Friday:  Chipotle Burritos
Saturday:  Cheese ravioli with homemade tomato sauce


Wednesday, April 25, 2012

Willow Wednesday

Yes, I do have fur that keeps me warm but who doesn't like to snuggle under the blankets?

The Claiming Our Space Garden & a $3 Off Coupon From Whitney Farm Organic Products

**This is a Sponsored post written by me on behalf of Whitney Farms. All opinions are 100% mine.**

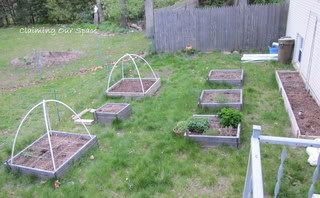
This is year 2 of the Claiming Space garden.  The beds are prepped, for the most part, and are ready for this year's plantings.  OK, the grass does need a good trim and I need to fix the fence that helps to keep out the bunnies,  but don't worry, these are on the list for the coming weekend.  I also have a plan for the fence at the West end of the garden so check back to see how it turns out.

Claiming Our Space Garden

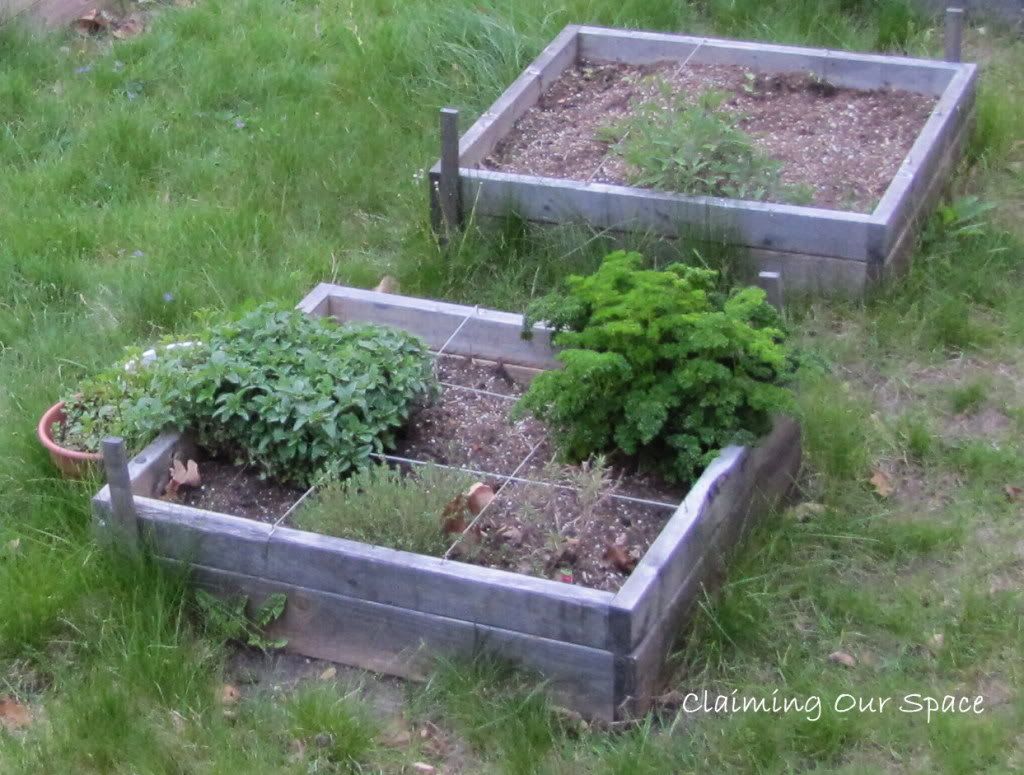
My herbs survived the winter. I don't think I will ever need to buy oregano or parsley again.
Claiming Our Space Herb Garden

Last year we had some successes with the potatoes in tubs, lettuces, peas and cukes along with some failures with the brussel sprouts, tomatoes, strawberries.   I am hoping to maximize the successes and minimize the failures this year by actually remembering to fertilize my veggies.

Truth be told, I think I may have used a fertilizer once last year and that can't have helped my plants at all.  I mean, fertilizer is an important ingredient for a successful garden.  While I NEED to remember to fertilize, I want to make sure that the product I use is organic and not only good for the plants and veggies but is safe as well.  Two products that fits the bill are Whitney Farms organic plant food and organic soil.

109103_1.jpg (6 documents, 6 total pages)

Using organic products is important to us.  We live close to a river as well as the Great Lakes so we are very aware that what we put in the ground can have a big impact on our water system.  Using organic products makes us feel safer and that we are doing the best we can for both ourselves and the environment.

Additionally, we regularly eat produce straight out of the garden all summer long.  (Here is where I am hoping everyone does this too)  To me, there is nothing better than eating peas straight from the pod or a strawberry right off the plant. Yum! By using organic products, it makes me feel better about not always washing everything off before eating.  Plus, it would take much too long to fnish weeding if I needed to go inside to rinse each snow pea pod I may eat while weeding.

Do you have any big plans for your garden or any garden experiments you are trying this summer?  If so, I would love to hear about them.

Whitney-Farms-Logo_Banner_New_C.jpg (6 documents, 6 total pages)

To get $3 off your Whitney Farms plant food or soil purchase, click on the link below.
Whitney Farms®

I plan on redeeming mine this weekend.  I am going to experiment with growing some carrots in flowerpots this year so I will need some good soil to tip the chances of success in my favor.

Advertisement
Visit Sponsor's Site

Tuesday, April 24, 2012

Tout It Tuesday - #3


Welcome to Tout It Tuesday - #3!

Thanks to everyone who linked up last week! 
There were so so much great stuff shared last week and here are my favs.

Stenciling Tips from Adventures of a DIY Mom - Her tips will help to ensure a perfect stencil job!

The NY Melrose Family's Maple Asian Salmon Salad - This is a quick and easy salad that is definitely going on our menu plan soon!

Mamal Diane's Whole Wheat Chocolate Chip Cookies - these look to tasty for words and a sweet way to add some whole wheat flour into baking.
Ceperka's Dandelion Syrup - Nice that there is a good use for these and the syrup is good for soothing sore throats too.

Cookin' Up Good Times' Guinness Meets Bratwurst - Brats, beer and fire:  It's the manly trifecta! D can't wait to try this recipe this summer.

Shabby Beach Nest's Plastic Spoon & Bottle Hummingbird Feeder - A great recycle/reuse project just in time for summer

Make sure to grab the Featured button
 
<a href="http://www.claimingourspace.com/" target="_blank"><img src="http://i248.photobucket.com/albums/gg186/gooch100/COSButton-Featured.jpg" /></a>

I can't wait to see what people will be share this week and know that I will be inspired by everyone's projects and recipes.

Just a few rules/guidelines.

1. I would love it if you would follow through GFC or Bloglovin'. You can also follow on Twitter where I will be sharing my favorites throughout the week.

2. Please do not link parties or shops. Everything else is accepted.

3. Linking to Claiming Our Space isn't required but I would appreciate it if you would grab my button and either display it with the post you are linking up or under your list of parties.

<a href="http://www.claimingourspace.com/" target="_blank"><img src="http://i248.photobucket.com/albums/gg186/gooch100/COSButton-ToutItTuesdays.jpg" /></a>

4. Please try to visit at least two posts for each link you submit and leave a comment. Comments make everyone happy!

Now let's Tout It!!

Monday, April 23, 2012

Herbed Fingerling Potatoes

I love a good potato.

I love them roasted, mashed, sauteed or baked. Served with cheese, bacon, butter or herbs. Made on the grill, in the oven or on the stove top. I love Yukon Gold, Redskin and Russet. And now I have a new love. The Fingerling potato.

I saw the bag of multicolor Fingerlings at Costco and just had to buy it. I figure it must have been my Irish heritage crying out in my DNA telling me to "Eat the potatoes!!"  This is the same DNA that tells me to drink  Bulmers and sing along with pub tunes (both of which tend to turn out well) so I inclined to listen regarding the potatoes.

Once I brought them home, the questions was how to prepare them.

On the drive home after a trip to Penzeys to get some more Italian Herb Blend, it hit me. Roasted with herbs, olive oils and roasted garlic salt. I could taste the goodness already. I also remember having seen an episode one of the chefs of some cooking show on PBS from years ago making a series of cuts in fingerling potatoes prior to roasting so I tried that as well. I think that the olive oil and salt were able to get into get into the cracks making these taste so wonderful.

Herb and Garlic Roasted Fingerling Potatoes
(Source: the depths of my brain)
Ingredients
  • Fingerling potatoes
  • Olive Oil
  • Roasted Garlic Sea Salt (I purchased this at Costco)
  • Italian Herb Blend
Directions
  • Preheat oven to 350.
  • Wash potatoes.
  • Let dry slightly.
  • Make a series of cuts down the length of each potato about halfway through.
  • Place in a small bowl.
  • Drizzle with olive oil.
  • Sprinkle with roasted garlic salt.
  • Sprinkle generously with Italian herb blend.
  • Stir to coat all potatoes with olive oil, salt and herbs.
  • Pour onto nonstick baking sheet.
  • Cook for 30-40 minutes or until the potatoes are crisp on the outside and soft on the inside.

Saturday, April 21, 2012

Weekend To Dos 4/21-22 & Menu Plan 4/ 22-28


Why does it seem like as the weather gets warmer there are more things to add to the To Do list? Maybe because it is true?  In addition to all the inside stuff, you get to add the outside stuff.  With our light winter and early spring, I feel like we got "cheated" out of more weekends that could have been spent tackling our inside projects.  I guess that is just the way it works sometimes.

Onto our To Do list for this weekend.  It is pretty light on items since we still have a bunch of this stuff to spread.


We managed to get about half of it spread last weekend and during the week, while dodging rain storms, but still have a ton left to go. I have to say that I didn't take a photo of what is left of the pile since it makes me a little sad that there is still so much left after we have already done so much work.
  1. Finish spreading bark (we are almost done in the front yard. Yay!)
  2. Trim box woods
  3. Mow lawn
  4. Fill out and send CSA form
  5. Contact local farmers on pricing on a whole pig and a 1/2 cow
  6. Attend cousin's girlfriend's baby shower
  7. Laundry/cleaning/grocery
  8. Plant seedlings and seeds in garden
  9. Bring papers to Boy Scout paper drive
  10. Make dog bed cover for Willow

Sunday:  Beef Roast in the slow cooker (moved from last week. Since we had so many leftovers, we didn't make this.)
Monday:  Honey Mustard & Dill Salmon from Alderberry Hill. I saw this on a linky party and thought it looked so tasty.
Tuesday:  FITF*
Wednesday:  FITF
Thursday:  Balsamic-Rosemary Grilled Pork Chops
Friday:  Chipotle Burrito
Saturday:   FITF (D is going to visit a friend for the weekend)

*FITF=Forage in the Fridge

Thursday, April 19, 2012

Trading Blogs Guest Posting Party -


Have you heard about the Trading Blogs Guest Posting Party hosted by Melissa from Serendipity and Spice

This is the second TBGPP and I really hope you will sign up to take part.  It is a great opportunity to meet other bloggers, find new blogs to follow and really put on your creative caps to come up with a great project to share with your Guest Posting Partner's readers.  I am already trying to think of what project I want to do.

I participated in the first TBGPP and it was so much fun.  I traded with a cool blogger Jenny from The NY Melrose Family and had a great time.  Make sure to check out Jenny's blog!

How does it work?
  1. Head to the TBGGP post on Serendipity and Spice and sign up.
  2. Melissa will partner you with another blogger.
  3. You write up your post and send it to your partner.
  4. You post your partner's post on your blog.
It is that easy!   All the details and date specifics are outlined in the TBGGP post

Just make sure to sign up by Sunday, April 29. 

Wednesday, April 18, 2012

Willow Wednesday

Willow is a multi-tasker.
She works on her tan and watches for squirrels at the same time.

Follow my blog with Bloglovin

Tuesday, April 17, 2012

Tout It Tuesday - #2


Welcome to Tout It Tuesday!  I can't wait to see what people will be share and know that I will be inspired by everyone's projects and recipes.

Just a few rules/guidelines.

1. Follow me through GFC or Bloglovin'. You can also follow me on Twitter where I will be sharing my favorites throughout the week.

2. Please do not link parties or shops. Everything else is accepted.

3. I would appreciate it if you would grab my button and either display it with the post you are linking up or under your list of parties.


<a href="http://www.mingourspace.com/" target="_blank"><img src="http://i248.photobucket.com/albums/gg186/gooch100/COSButton-ToutItTuesdays.jpg" /></a> 
4. It would be great if you would visit at least two posts for each link you submit and leave a comment. Comments make everyone happy! 

Monday, April 16, 2012

Chocolate Chip Biscotti


I like tea but give me a good cup of coffee any day. According to D, I make my coffee so strong you can stand a spoon up in it. Mmmm, strong coffee...

So at an English tea party, I would be the one asking for the skinny vanilla latte. Being a coffee lover does have its perk though.  Why?  Because what goes great with a latte? Biscotti!! Dip one of these crunchy treats in your coffee and it is a little slice of heaven.  Especially since this version has that most wonderful of ingredients - chocolate!

While making biscotti is a bit time intensive due to the double baking.  According to Wikipedia, "Biscotti" is the plural form of biscotto. The word originates from the medieval Latin word biscoctus, meaning "twice-cooked/baked." It defined oven baked goods that were baked twice, so they were very dry and could be stored for long periods of time. Pliny the Elder boasted that such goods would be edible for centuries. Such nonperishable food was particularly useful during journeys and wars, and twice baked breads were a staple food of the Roman Legions.

Now that we have taken a walk down "History Lane" it is time to get back to the good stuff...the recipe.

Chocolate Chip Biscotti (Source:  modified from this recipe on cook.com)

Ingredients
  • 1/2 c. butter, room temperature
  • 1 c. sugar
  • 2 eggs
  • 1 1/2 tsp. vanilla
  • 2 c. flour
  • 1/2 tsp. baking powder
  • 1/2 tsp. baking soda
  • 1 1/2 c. chocolate chips (I used half milk chocolate and half semi-sweet chocolate)
Directions
  • Combine butter, sugar and eggs, mixing well.
  • Beat in vanilla.
  • Combine dry ingredients.
  • Add to egg mixture.
  • Add chocolate chips.
  • Batter will be very stiff and sticky.
  • Cover dough with plastic wrap and refrigerate for 1 hour or overnight.
  • With floured hands, divide the dough in 2 loaves about 12 inches long (like French bread).
  • Place loaves on 10 x 14 inch sheet, leaving at least 3 inches between.
  • Flatten each loaf slightly, evenly.
  • Bake in preheated 400 degree oven for 20 minutes, or firm to the touch.
  • Remove.
  • Cool slightly; lower oven to 375 degrees.
  • While still warm, slice loaves in diagonal slices, about 1/3 to 1/2 inch thick.
  • Arrange on ungreased sheet and bake at 375 degrees for 15 minutes, or until firm.
  • Do not brown.
Once they cool, make yourself a nice pot of coffee and start dipping!

Saturday, April 14, 2012

Weekend To Dos 4/14-15 & Menu Plan 4/15-21


I had a laundry list of items to put on the To Do list this week.  But then I came home to this on Thursday evening.


Yup, that is a big hulking pile of shredded bark.  Eight cubic yards of it.  Needless to say, getting this stuff spread and off the driveway so I can park in the garage again is the only item on our To Do list. 

OK, it won't really be the only item since we still need to clean, do laundry and get to the grocery store. And we need to finish cleaning out the garage so we can get to the yard tools and wheelbarrow we will need to start the spreading of the bark.  Man, it is going to be another busy weekend. 

To Do List:
  1. Finish cleaning garage
  2. Finish Spring yard clean up
  3. Start spreading bark in front yard
  4. Laundry, Grocery, Cleaning
  5. Willow to dog park
  6. Willow "Doggy Day Spa" - bath, nail trimming, tooth brushing and ear cleaning
  7. Take photos for next week's blog posts
  8. Write up next week's blog posts
  9. Get weed blocker and lawn staples to prep garden paths for bark
  10. Clean the Fridge / Organize the Freezers
Additions
  1. Move green file cabinet to basement
I have a feeling that we won't get all the bark spread this weekend so there will probably be work in the evenings to get it finished up. What this means for the menu is that things have to be easy peasy and the slow cooker fits that bill perfectly! So it is all slow cooker all the time this week.

Sunday:  Takeout Pizza
Monday:  BBQ pork in the slow cooker
Tuesday:  FITF*
Wednesday:  FITF
Thursday:  Salsa verde chicken enchiladas (we cook the chicken and salsa verde in the slow cooker)
Friday:  Beef roast in the slow cooker
Saturday:  FITF

*Forage in the Fridge

What are your favorite slow cooker dishes?  I am always on the lookout for new ones and would love for you to share.

Friday, April 13, 2012

Foyer Fix Up - Part 2

First off, I have to apologize for the quality, or lack there of, in the photos for this post. Some were taken with my old camera which was in the process of breaking down and some were taken with my old Blackberry which didn't have the best camera.

In the end it doesn't matter since the tile in the foyer looks a-mazing, if I do say so myself.  I know D agrees since over a year later, we still stop to look at it as we walk down the hall.

As you may remember, we started this journey with a blandness.

No, this isn't our stuff.  This is one of the listing photos.
We have replaced the light, painted and added our furniture. (see Foyer Fix Up -Part 1 for the details)

Now it is onto the biggest job.

Flooring!

When we moved in, we knew the flooring was laminate. What we didn't know realize is the poor job one of the previous owners did on installation since there was a big rug covering much of the floor. It was baaaad. Though it was click and lock flooring, many of the pieces were neither clicked or locked. To make up for that there was liberal used of finish nails through the top of many of the pieces. In the sunlight it looked like someone spilled glitter on the floor there were that many nail heads glinting.

See what I mean.

Love the huge gap. Perfect for catching dirt and pebbles.
So one night in a fit of "I can't take this anymore" and "Something must be done," I ripped out the flooring.


I have to say that ripping out the flooring before we had a total plan on what to replace it with may not have been one of my smarter moments. I mean, we had a vague and general plan on what we thought we wanted to do. Slate. 12 x 12 tiles. Laid on the diagonal. Easy and peasy. However, we hadn't done any measuring, we hadn't purchased any supplies, we didn't have a tile saw, I think you are getting where I am going with all this. 

Once we went tile shopping, the plan quickly spiraled out of control into uncharted territory. In both a good way and bad way. The good? If we could pull it off, it would look a-freaking-mazing. The bad? It was waaaaay complicated and we hadn't done complicated tile yet. Yeah, I think for a moment we were possessed by the spirits of professional tile installers.

The new plan?  Still slate but in addition to the 12 x 12s there will be a pinwheel tile for the inner border and 6 x 6s in the middle. Like I said, waaaaay complicated. Plus, we had the added bonus of the room being narrower by 1.5" at door end and the wall with the closet is just over 1" shorter than the other wall. [sigh] Thank goodness D is a Math Wizard.

This is why a dry fit is key! If you do a dry fit you can make the allowances and deal with the wonkiness before you are elbow deep in thinset.

So we began the loooooooooooooong process of dry fitting the tiles. I have to tell you, this stage took f.o.r.e.v.e.r. Like several weekends and a number of evenings. Mainly because of all the measuring, and double checking the measuring, then cutting, then fitting, then needing to make tweaks (more measuring and cutting)and then starting all over again on another tile/section/etc. In some ways it was brutal. But as the design started to unfold, we could tell it would totally be worth it. 

Let the dry-fit fun begin!

See what I mean by complicated? What were we thinking?
The little triangles were a total pain since the slate kept splitting into layers.
Dry fit is all done!! Let the celebration begin!
Once we had all the tiles cut and marked, we moved them into to the living room, where they were laid out on some blankets in the exact layout for the install.  Then we were were onto the next step...


Installation!

First up, underlayment. We are lucky enough to have 1.5" thick subfloors so we didn't need to add any additional plywood. This meant we could move directly to installing the Ditra. We used this product for a couple of reasons. We like that it adds some waterproofing since this is the front door. Since we were using a natural stone, we liked the fact that it minimized the movement between the layers of flooring (subfloor and slate).


I could go into some detail how to install it but will instead refer you to the Installation Handbook and instead tell you some tricks we used and tools that we found came in handy.

1. Kneepads: Wear them. This stuff is HARD on the knees. Even now mine ached when I think about crawling around on that stuff.

2. A Level (the longer the better): to make sure you don't have any high spots in the Ditra

3. A board wrapped in carpet and a rubber mallet: This will help you make sure the Ditra is pressed into thinset. If you find a high spot, you can place the board on top and use the mallet to hammer it down until it is level.

4. Some sort of palm protection: See #1. This stuff is hard on the hands too. I actually ended up tracking down a pair of my old biking gloves since they had padded palms to save myself some major pain.

5.  You can see pieces of painters tape in the dry fit pics.  We used those to make sure the pieces were lined up right. We marked out a bunch of stuff, where the grout lines were along the hall floor, how adjoining tiles were to line up, etc.  We figured that since we only had one shot at this, we would try to make every effort to minimize where we could go totally wrong.

Once the Ditra was down and the thinset underneath was dry, it was tile laying time!!

Thanks to all our planning and the complete dry fit, this step went quite quickly and we were done in about 2 hours.


Another day of thinset drying and it was onto grouting. The knees pads were again a great help since slate is hard too. :-)

Grouting is a dirty business, so no pics at all, but as the clean up began, we knew we had a winner. The darker tiles on the outside, the lighter ones on the inside. It looked just as we had hoped.

A couple of days of the grout drying and we were left with this.  It is beginning to look pretty darn fab at this stage.


At this point we only had one more step to go.   

Sealing!

We were in the home stretch.  I couldn't have been happier.  We used the glossy stuff since we wanted the tiles to look wet and really bring out the color.

4 coats later, we were done!!


How gorgeous did it turn out! We just love it!! All the long weekends and late nights were totally worth it.


But we will probably never, ever, never, never, ever do another tile project as complicated as this one again!

We went from bland 


to GRAND!


Cost of Foyer Fix Up - Part 2 (approximate since I can't find all the receipts)

$   70.00 Tile Saw
     60.00 12 x 12 slate tiles
     40.00 pinwheel tiles
   120.00 6x6 tiles
     70.00 Ditra
      40.00 Grout & Thinset
      20.00 sealer
      10.00 tile spacers 
        0.00 sponges, floats, etc. (we already had this stuff from a previous tile job)
$  430.00 Total Part 2
      84.50 Total Part 1
$514.50 Running Total to Date

The last step is installation of baseboards and trim pieces.  However, that won't happen until we do all the baseboards and trim in the hallways and living room later this summer.

But even without the new baseboards and trim, I think it looks amazing!